- Connect from the Windows Control Panel
- Connect from a Mac workstation
- Printing from a Linux workstation
- ConfidentialPrinting
Note: Your Departmental Administrator or one of your colleagues can tell you which printer you should be using. Typically the printer name will start with PS, then Building code (Tory Building = TB), followed by room number. Ex. Printer in Tory Building room 301 would be pstb301. Please note that network printing from Windows 11 is not supported and will not work.
Connect from the Windows Control Panel
- Determine the name of the printer that you wish to connect to (e.g. psab401c).
- In Control Panel click on View Devices and Printers.
- From the left hand navigation, click “Add Printer” .
- Click on ‘Add a network, wireless…’
- Click on ‘The printer that I want isn’t listed’.
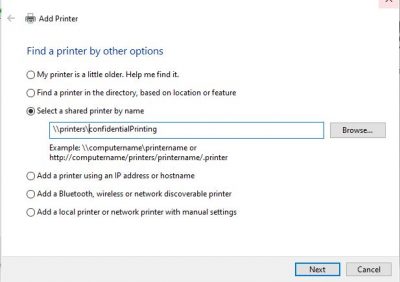
- Make sure radio button ‘ select a shared printer by name’ is selected.
- Enter in cell ‘ \\printers\printername’ (printername would be psab401c, for example).
- Click Next.
- Click Next.
- Click Finish.
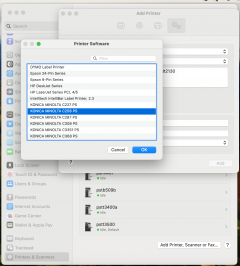
Connect from a Mac workstation
- Open System Preferences, and click on Printers & Scanners.
- Click on the + icon (underneath the list of configured printers), the Add Printer, Scanner, or Fax window will open.
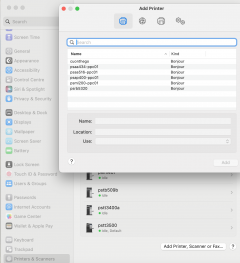
- Select the Advanced Icon – *NOTE* If Advanced icon is missing, Control-click in area near the icons and select “customize toolbar”. Drag the advanced icon next to the other icons
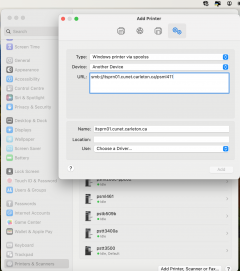
- Type: Windows printer via spoolss,
- URL: smb://itsprn01.cunet.carleton.ca/printername (ex. psaa106)
- Name: printername
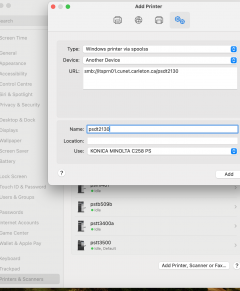
- Use: Manufacturers Driver for your OS from their website (use Generic Postscript only if it is recommended one).
- Click Add
- Check box Duplex Printing Unit if it asks.
- when entering your credentials with Sonoma 14.x.x only use your username (FredFlintstone for example) and password
You may have to use cunet\username or username@cunet if using older OS’s.
When prompted to save your user name and password do not check “save password in the keychain” until you confirm your connection works. If you have issues in the future you may need to delete the keychain entry and re-enter your credentials
You will now see the printer listed on the Print & Fax window, with a green dot indicating the printer is available (or red if offline), and the status of the printer.
Printing from a Linux workstation
- From run menu run Printers
- Click Add window will open.
- From Network Printer
- LPD/LRP Host or Printer
- Host: printers.cunet.carleton.ca
- Queue: name of printer
- Forward
- When prompted for a Driver (ppd file), download the following driver, unzip it and then browse for one of the included drivers:
- PPD file (zip): Konica Minolta Bizhub C258 PPD
- Fill out the next form. Mostly the fields can be left as is, but change the printer Model to C258
- Forward
- Fill out form — Apply
- Print Test Page
ConfidentialPrinting
This queue prints to The Print Shop’s Konica Minolta Multi Factor Printers (MFA).
In a standard printing environment, a user’s jobs are sent directly to the printer for immediate printing. This results in wasted paper and toner when printing is forgotten and not collected. It also presents a security risk if those forgotten jobs were sensitive or confidential. The Confidential Printing queue provides a simple solution that places your jobs in a holding state until you authenticate and releases the job at any Konica Minolta printer. You may select individual jobs to release after successful authentication with your Campus Card at the Printer. Print jobs will be held in a queue for 12 hours.
Confidential Printing offers:
- Secure printing – sensitive jobs will not sit uncollected on the printer. Jobs only print when released by the user.
- Follow-Me printing – provides a roaming print solution where users print to a single queue and jobs will be “pulled” to any printer where they authenticate.
- Reduced wastage – no more uncollected jobs. No wasted paper or toner.
Your print job will not be released to the printer until the user swipes their Campus Card, enters their credentials, or UserID and PIN.
Adding the ConfidentialPrinting queue
To add the ConfidentialPrinting queue to your computer, follow the instructions above for your OS type, and use ConfidentialPrinting as the printer name. You will then see it added as a new printer that you can print to.
- In Control Panel click on View Devices and Printers.
- From the left hand navigation, click “Add Printer” .
- Click on ‘Add a network, wireless…’
- Click on ‘The printer that I want isn’t listed’.
- Make sure radio button ‘ select a shared printer by name’ is selected.
- Enter in cell \\printers\ConfidentialPrinting
- Click Next.
- Click Next.
- Click Finish.