Posts have likely been introduced to you in the form of blog entries or news items. Posts are usually grouped together to allow for easy accessibility.
- Posts are dynamic content, meaning that they are updated frequently
- Using posts is the most effective method for sharing up-to-date information
- Posts do not appear on the navigation menu
This is an example of a post.
Step by Steps
In the post editor screen, you’ll find most of the same options as in the page editor screen.
Creating a new post
- Add a new post using the side or top menu.
- Give your post a title by typing into the Add Title field and add content to the text editor box.
- Add your post to a category.
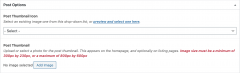
- Give your post a thumbnail by selecting from the Post Thumbnail Icon drop down list or upload your own thumbnail.
- Save, schedule, or publish your post.
Pulling posts onto a page
 Add/Edit the page on which you would like to list news.
- Click Add Post Element located above the content editor.
- Click the List News icon.
- Select which categories you would like to have placed on this page. If no category is selected, all posts will be listed.
- You also have the option to set the number of items limit, add a load more button and display post thumbnails.
- Click Insert Element.
Video Tutorial
Transcript
Try It Out!
Now that you have learned how to work with posts, time to try it out!
- Add a new post with a title, some content, and a thumbnail.
- Add your post to a category.
- Publish your post.
- List your new post on a page.