This is the first half of the Managing Content topic, in which we will cover how to add, save, publish and schedule content.
Step-by-Step
In this step-by-step, we will demonstrate how to manage pages, but the same steps apply for all other types of content.
Adding Content
There are 3 ways you can add a new page:
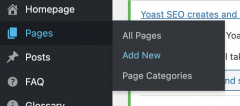
- Hover over Pages on the side menu, select Add New
- From the All Pages screen, click the Add New button on the top, next to Pages

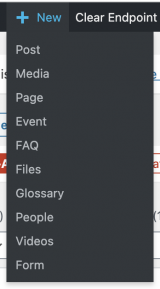
- Hover over New on the top menu, select Page
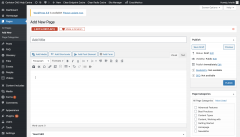
You will be taken to the content editor screen, where you can give your page a title and add content to your page. You also have saving and publishing options in the Publish menu.
Saving, Publishing and Scheduling Content
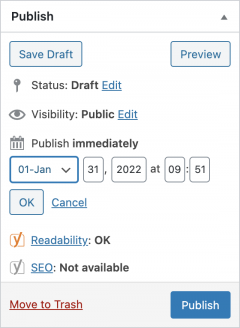
You can save, publish or schedule your page from the Publish menu on the right of the content editor screen.
- To save your page as a draft, select Save Draft. Your page will be visible to the site editors only.
- To publish your page, select Publish. Your page will now be visible to the public.
- To schedule your page:
- Select Edit next to Publish Immediately.
- Enter the date and time you want your page to go live.
- Click OK to save your setting.
Video Tutorial
Transcript
Try It Out!
Now that you have learned how to add, save, publish and schedule content, time to try it out!
- Add a new page.
- Give the page a title and some content. This page can be about a topic you like, or something related to your Department.
- Save this page as a draft.
- Publish this draft page.
- Add a new page and give it a title and some content.
- Schedule this page to be published after 15 minutes.
- Check back in 15 minutes to see this new page go live.