- Technical Requirements for Zoom
- Creating a Zoom Account
- Accessing your Zoom Account – Online, Computer, Mobile Phone
- Joining a Zoom Meeting – Web Browser, Computer, Mobile Phone
- Zoom In-Meeting Tools
- Zoom FAQ for Students
NOTE: This document replaces a downloadable .pdf file that was previously available on our website.
Zoom is an online video meeting for collaborating with others online. Your instructor may be using Zoom to hold classes online. You can also use Zoom to meet with your classmates for group projects or study groups. This guide has information to help you get started with Zoom. It also has links to a few resources to help you if you want more information.
Technical Requirements for Zoom
These are the following technical specs and recommendations for successfully using Zoom:
Computer and Internet Recommendations
- You should have either a laptop or desktop computer with (at least) 2GB of memory and a 1Ghz processor (any computer bought in the last five years should be fine).
- Use either a built-in or external camera with a headset or earbuds to reduce ambient noise.
- If you are joining using your mobile device, you’ll need one with 4G LTE (best) or 3G (minimum connection)
Internet Connection Speed
- Ideal: 5 Mbps upstream, using an ethernet cable instead of wifi.
- Minimum requirements: 1.5 Mbps upstream and 1.5 Mbps downstream.
- To check bandwidth use, https://speedtest.net/
Creating a Zoom Account
While you can join a Zoom meeting without an account, your instructor may require you to have an account in order to join in class activities. Students can sign up for a free Zoom account as follows:
1. Navigate to https://carleton-ca.zoom.us/
2. In the top right-hand corner of the screen, you’ll see an orange button with the text “SIGN UP, IT’S FREE”. Click on this button.
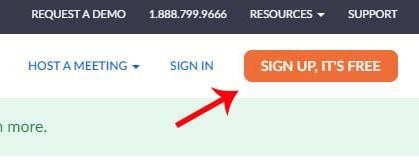
3. Zoom will ask for your date of birth and your work email address to sign up. You can use your Carleton email address. When you have entered these pieces of information, Zoom will send you a confirmation link to the email entered.
IMPORTANT: Do not reuse your MC1 password when creating an account.
4. Once you have confirmed your email, you will be able to log into Zoom online anytime at https://carleton-ca.zoom.us/signin/.
You can read more about how to sign up for a Zoom account in Zoom’s quick start guide for new users.
Accessing your Zoom Account – Online, Computer, Mobile Phone
You can access your Zoom account (and Zoom meetings hosted by others) through three platforms:
- Online at https://carleton-ca.zoom.us/signin/
- Via the Zoom computer desktop app
- Via the Zoom mobile app
Download Zoom for Computer Desktop
- To download Zoom for your computer, visit https://carleton-ca.zoom.us/support/download/. Zoom should automatically download a “ZoomInstaller.exe” file.
- Open and run the Zoom installation by clicking on the ZoomInstaller.exe file.
- Follow these links and instructions to set up the Zoom computer desktop app:
Download Zoom for Mobile
Follow these links and instructions to download the Zoom mobile app:
- Apple/Mac iOS:
- Android:
You can read more about how to download the Zoom apps in Zoom’s quick start guide for new users.
Signing into Zoom
Once you have a Zoom account, you can sign in at any time using your login credentials.
To sign in online
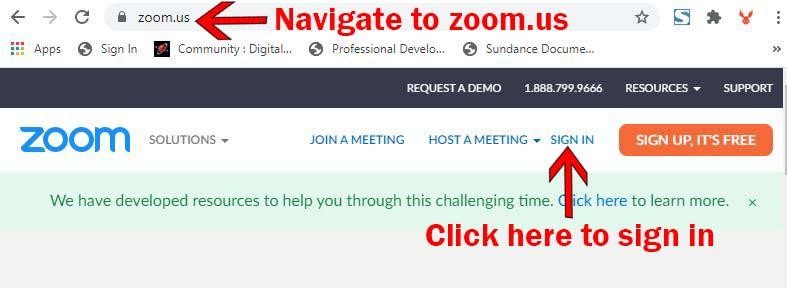
- Navigate to https://carleton-ca.zoom.us/signin
- Fill in your login credentials
- Click on the large blue “Sign in” button.
To sign in on your desktop app
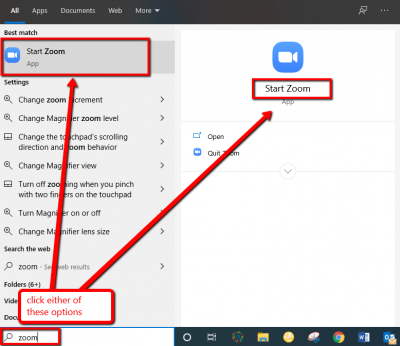
- Find the Zoom icon on your desktop or via “Finder” or “Cortana” and click on it (double click for desktop icon).
- A Zoom window will open and you will have 2 options: “Join a Meeting” or “Sign in”.
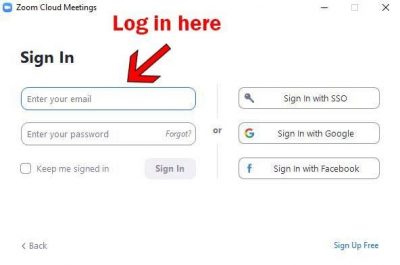
- Select “Sign in”.
- Fill in your login credentials.
- Click on the blue “Sign in” button.
 |
 |
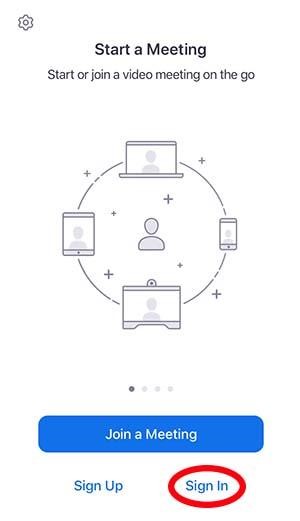
To sign in on your mobile device
- Find the Zoom icon on your phone and tap on it to open it.
- A Zoom window will open and you will have three options: “Join a Meeting”, “Sign Up” and “Sign In”.
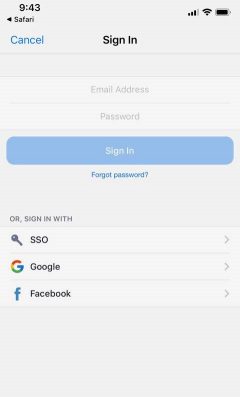
- Select “Sign In”.
- Fill in your login credentials.
- Click on the blue “Sign in” button.
 |
 |
Joining a Zoom Meeting – Web Browser, Computer, Mobile Phone
If your class is being hosted through Zoom, your instructor should provide the Zoom Meeting ID in order for you to join the online session. If they have also set a password for your online meeting, they will provide you with the password too. They may send this information to you via email, or they may upload the information to your course information in cuLearn. Make sure you have the ID, and if needed, the password before proceeding.
You can watch a video or read more about joining a Zoom meeting here.
To join a Zoom Meeting via Web Browser
- Navigate to https://carleton-ca.zoom.us
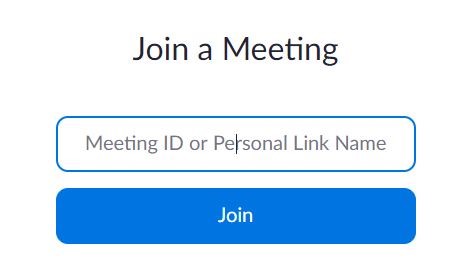
- Click on “Join a Meeting”.
- Enter the meeting ID provided to you by your instructor.
- Enter the passcode provided when prompted.
- After these steps you may find yourself in a waiting room. Do not worry. Your instructor will let people into the Zoom classroom when they are ready.
 |
 |
To join a Zoom Meeting via Desktop App
- Find the Zoom icon on your desktop or via “Finder” or “Cortana” and click on it (double click for desktop icon)
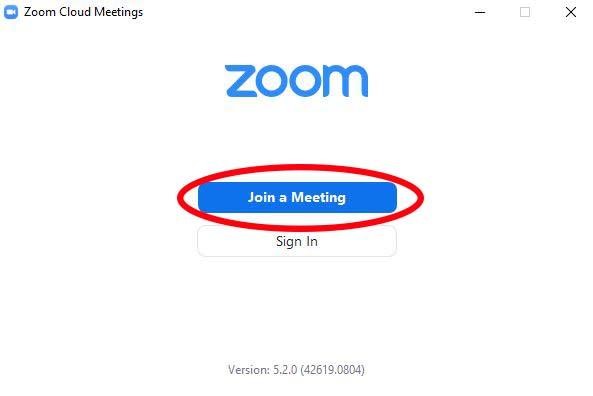
- A Zoom window will open and you will have 2 options: “Join a Meeting” or “Sign in”
- Select “Join a Meeting”
- Enter the meeting ID, and below that, enter your first and last name.
- Click on the blue “Join” button.
- After these steps you may find yourself in a waiting room. Do not worry. Your instructor will let people into the Zoom classroom when they are ready.
 |
 |

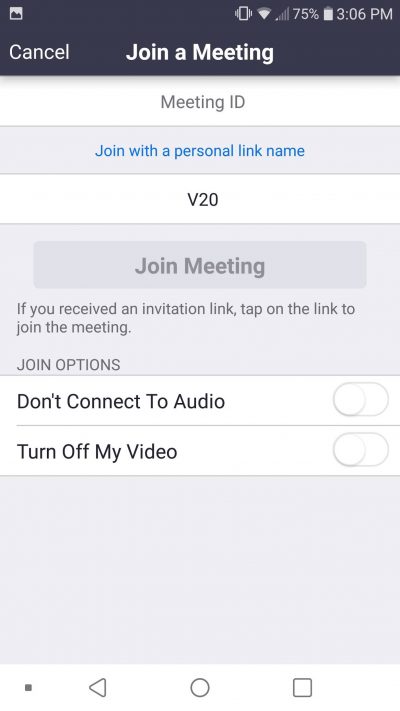
To join a meeting on your mobile device
- Find the Zoom icon on your phone and tap on it to open it.
- A Zoom window will open and you will have three options: “Join a Meeting”, “Sign Up” and “Sign In”.
- Select “Join a Meeting”.
- Fill in the Zoom ID number.
- Click on the blue “Sign in” button.
 |
 |
Zoom In-Meeting Tools
When you enter a Zoom meeting, you will have the ability to interact with others in the meeting using a variety of different tools.
This is what your toolbar will likely look like:

Below, we walk through the tools in the toolbar (left to right), in addition to some other features you might be asked to use during your online classes. You can read more about the various Zoom tools here.
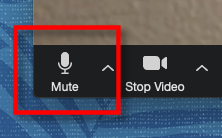
Zoom mute icon
Mute
The mute icon allows you to mute and unmute your microphone. Large lecture-style classes may automatically mute your mic and prevent you from unmuting it. Smaller-style tutorials, breakout rooms, and classes will likely allow you to mute/unmute yourself.
Best practice: keep yourself MUTED unless you need to speak.
When your mic is muted, the mute icon will appear with a RED line across the mic image.
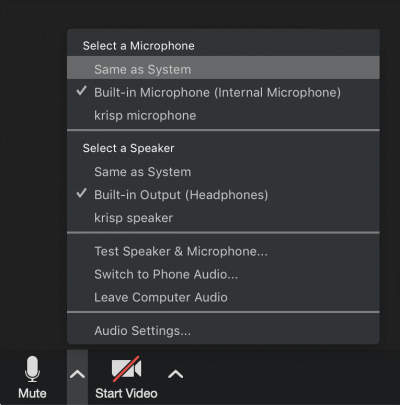
Zoom mic setup menu icon
Mic Setup Menu
By clicking on the chevron (^) beside the mute icon, you will be able to access different setup options for your microphone and speakers (from top to bottom):
- Select a Microphone: Under this menu header, a list of the available microphones will appear. Select the mic you want to use.
- Select a Speaker: Under this menu header, a list of speaker options will appear. Select the speakers you want to use.
- Test Speaker & Microphone: Use this feature to make sure your mic and speakers are working properly.
- Switch to Phone Audio: Use this option to CALL into the meeting instead of connecting over internet.
- Leave Computer Audio: This option will disconnect your computer’s connection to the Zoom meeting audio. The mute button will change to an icon that reads “Join computer audio” link. Simply click this button to re-connect to the meeting audio.
- Audio Settings…: This menu header allows you to go into Zoom’s more advanced audio settings.
More information on configuring your audio settings can be found here.
Zoom video icon
Video
The video icon allows you to turn your video on and off. Large lecture-style classes may automatically prevent you from turning your webcam on. Smaller-style tutorials, breakout rooms, and classes will likely allow you to control whether or not your camera is on.
Best practice: unless your instructor has specifically requested that students keep their cameras off, have your video camera ON so the instructor can see you (provided you are comfortable doing so).
When your video is off, the video icon will appear with a RED line across the image.
You can learn more about testing your video before a meeting here.
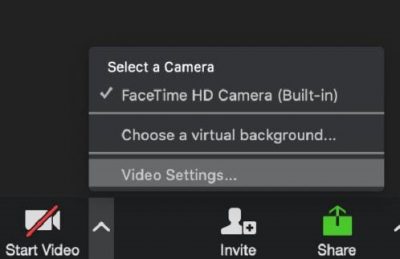
Zoom video setup menu button
Video Setup Menu
By clicking on the chevron (^) beside the mute icon, you will be able to access different setup options for your web camera (from top to bottom):
- Select a Camera: Under this menu header a list of your available web cameras will appear. Select the one you want to use.
- Choose Virtual Background: If your computer has the right technical specs, you might have the option to choose virtual background. You can read more about virtual backgrounds here.
Best practice: Use a simple (non distracting) virtual background to prevent other participants from seeing your background.
- Video Settings…: This menu header allows you to go into Zoom’s more advanced audio settings
More information on configuring your video settings can be found here.

Zoom participants icon
Participants
The participants button allows you to see all the attendees participating in the session.
If you click on the participants button when your Zoom view is in FULL SCREEN mode, the participants list will become a pop up window separate from the main Zoom window that you can move around and resize as desired.
If you click on the participants button when your Zoom view is NOT in full screen mode, the participants list will appear to the right of the main Zoom window.

Zoom chat icon
Chat
The chat button allows you to participate in the conversation via text.
If you click on the chat button when your Zoom view is in FULL SCREEN mode, the chat box will become a pop up window separate from the main Zoom window that you can move around and resize as desired.
If you click on the chat button when your Zoom view is NOT in full screen mode, the chat box will appear to the right of the main Zoom window.

Chat with everyone
Using the chat, you can send private messages to other meeting participants or you can send a message to the entire group (i.e. everyone).
NOTE: Your instructor may disable your ability to chat privately with other classmates. If they disable this feature, all your messages will be shared with the instructor AND the class.

Save the chat
Also note that chat conversations can be saved for future retrieval. You may or may not have the ability to save the chat. If this feature is enabled, it will appear as three small dots in the corner beside where you enter text into the chat box. Click on those dots, and select “Save chat”.

Share screen icon
Share Screen
Normally, the share screen button will be disabled by your instructor. This means that if you are asked to share your screen, you will need to request permission from the “Host” of the meeting.
If you have permission to share your screen, click on this button, and a pop up window will appear, which allows you to choose to share your entire computer screen, or a selected computer application that is open.
NOTE: The computer application MUST be open in order for it to appear in the share screen pop up window.
Best Practice: To maintain privacy, always choose to share a computer application, not your Desktop.
You can find more information on sharing your screen here. You can also find more information on how to adjust your screen layout when sharing, here.

Button to start/stop meeting recording or show if meeting recording is taking place.

Button to select reaction.

Button to leave Zoom session.
Additional Features
You may have access to additional features when participating in your online class. The host of the meeting has full control of what features you will have access to during the class.
Screen Views
If your instructor has given you control over the view settings, you can adjust the way that videos are arranged in the Zoom display. Here is information on how you can switch between different screen views.
Breakout Rooms
You may be asked to participate in Breakout Rooms. These will be smaller groups of students, sometimes joined by the instructor.
Whiteboard
Zoom has a digital whiteboard feature. Your instructor may use this for brainstorming and annotating during class.
Polling
Zoom has a polling feature. The instructor may use this to poll a class with questions.