Copying
Instructions
- Go to your departmental device and swipe your Campus Card or Copy Card.
- Select the Copy icon in the top left corner.
- Place the document that you would like copied face up on the tray located on the top of the printer or face down on the scanner glass.
- Once your document is ready to be copied, press “Start”
- Once complete, log out by pressing the “Access” button.

Copying Options
How to use the Duplex (two-sided) function
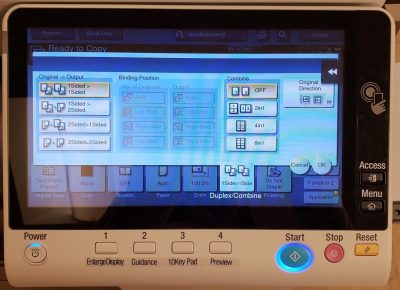
To change duplex settings for copying, click on the Duplex icon found on the “Ready to Copy” Page.

Once the Duplex icon is selected, the screen will appear like this. Users are now given the option to Print 1-sided – 1-sided, 1-sided – 2-sided, 2-sided – 2 sided or 2-sided – 1-sided. For more options, users can select “More”.
How to Use the Zoom function
The zoom feature allows users to convert documents from their original size, or to larger or smaller sizes when copying. To use the zoom feature:
- Select “Copy” on the main home screen
- Select “Zoom”
- You can choose from an allotted pre-set offered, or you can insert the percentage at which you would like your document zoomed or reduced.
How to use the Density function
The density feature allows users to adjust how dark or light they would like their copied documents to appear. The Density icon can be found on the “Ready to Copy” page under the Quick Setup tab.
When the Density icon is selected, the screen will appear as shown below. Users can then select if they would like their copies to appear darker or lighter than the original and to what extent. When this feature is set to zero the copy will appear the same as the original.