- Creating new project sharing areas
- Managing people on projects
- Sending people direct links to specific areas in cuCollab (Deep Linking)
cuCollab is deprecated: New cuCollab sites are no longer being created Existing cuCollab sites will remain accessible as long the server remains operational, but no new memberships should be expected to be added.
Carleton committees and working groups are encouraged to consider the use of Microsoft Teams, which provides a superset of cuCollab capabilities for document sharing, collaboration, and online meetings. The Service Desk can provide consulting on the use of MS Teams, as well as assistance in migrating files from cuCollab to Teams.
Creating new project sharing areas
You may have a new committee or another working group that you would like to use cuCollab for.
To create a new project area:
Fill out the New Project Request form.
Note: The creation of new project areas can take between 1-2 business days.
Managing people on projects
Inviting someone to join cuCollab
IMPORTANT: in order to add someone to a Project, you must be the Project Leader and the person you want to add must have logged into cuCollab at least once.
To invite someone to join cuCollab for the first time:
Send them an email with the following snippet :
To sign up for cuCollab, please visit http://carleton.ca/cucollab/signup
Note: only use this link to sign up. After you have been added, you will log in at http://cucollab.carleton.ca going forward.
Note: Remember that a person must be a Carleton employee to join cuCollab. To share documents externally, view the documentation for Sharing Files outside of cuCollab.
Adding People to Projects
To add a person
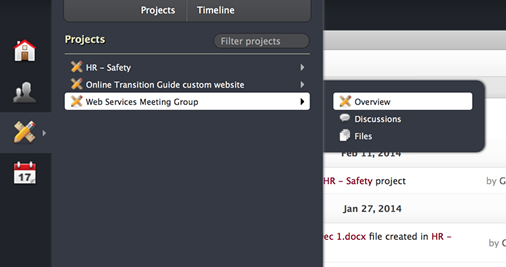
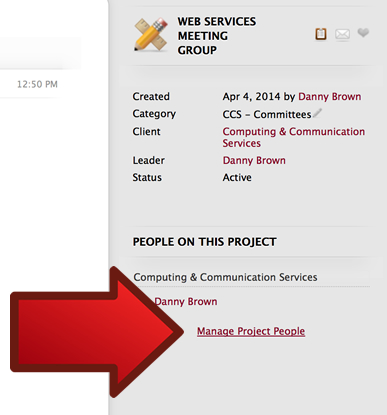
- Go to the Project Overview page.
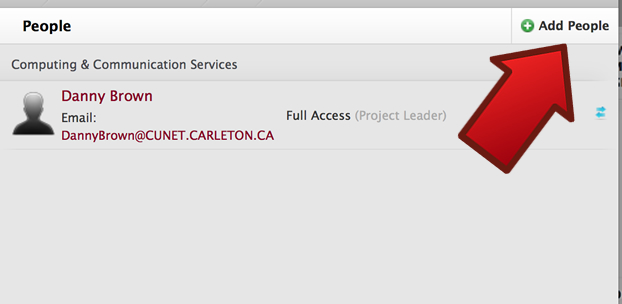
- Click on ‘Manage Project People‘ in the bottom right.
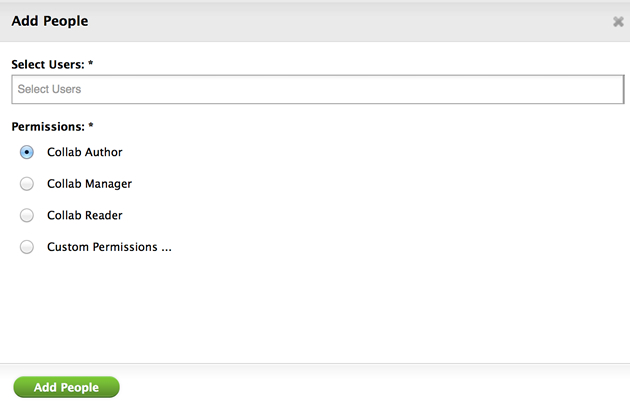
- Click on ‘Add People‘ in the top right.
- Select the role you want the user to have in this project area. If you are uncertain about which role, please read our help section on Roles and Capabilities. Note: Do not select Custom Permissions!

- In the ‘Select Users‘ input field, simply start typing the name of the user you want to add. If they are in the system (have logged in at least once), the name will appear and you can select it. Finish by clicking the green ‘Add People‘ button. Note: If the user’s name does not appear, they are not in the system and will need to be invited (see above).
Letting members of your group know that they have been added
Good protocol after adding users is to send them a communication. If they are new to cuCollab, consider sending them the following message:
For our [COMMITTEE NAME] committee, we are going to be using cuCollab to share our documents online. cuCollab is a service that enables Carleton committees to collaborate and securely store files online. To learn more about cuCollab and for help documentation, visit http://carleton.ca/cucollab.
To access cuCollab, visit http://cucollab.carleton.ca and log in with your MyCarleton One (MC1) username and password. For easier access, here is a link directly to our [COMMITTEE NAME] file area: [INSERT DEEP LINK (SEE BELOW) TO FILES AREA OF PROJECT]. Using this link, you will still need to log in, but once logged in you will instantly see our files.
Sending people direct links to specific areas in cuCollab (Deep Linking)
When messaging members of your project, the easiest way to help get users to find your Files Area or a particular file is to send them the direct link (URL), instead of asking them to log in at cucollab.carleton.ca and find the content themselves.
To send a direct link:
- Go to the file or area in cuCollab that you want them to visit.
- Copy the URL (also known as web address) from the Address Bar in your browser.
- Paste this URL into the email or whatever communication you are sending.
The direct links will be quite long and look something like…
https://cucollab.carleton.ca/public/index.php?path_info=projects/web-services-meeting-group/files
If not logged in, the person you send the link to will still need to enter their username and password, but after doing so, they will be taken directly to the appropriate page.
Deleting or Archiving Project Areas
cuCollab project areas can be deleted permanently or archived.
Archiving a project area removes it from the list of Projects, but it remains accessible in the Archive. Archiving does not delete or remove files. If you have a long list of inactive project areas that you do not want to permanently delete, you might consider archiving them.
Deleting projects means that the project area and all of its files, comments, discussions, etc. will all be permanently deleted.
To Delete or Archive a project area, fill out the Project Archive or Deletion Request Form.