How to share files
These steps can be done either in the web version, or the desktop version of OneDrive
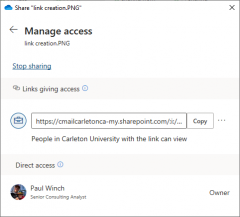
- Right click on the file or folder and click on “Share”. You will see the following screen
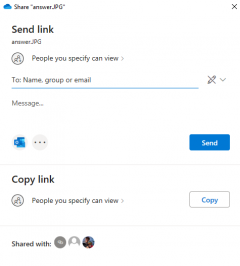
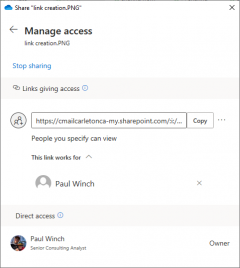
- By default the Share type will be set to “People you specify can view”. By clicking that, you can change the option
- “Anyone with the link” – this feature is unavailable
- “People in Carleton University with the link” – this option will create a link that can be posted, and anybody with a Carleton account can click the link to view the shared file/s
- “People with existing access” – this option is used if the file has already been shared with others, and they need the link sent to them again
- “Specific people” – this is the default option, used to send the link to individuals. Note, the individuals can be within Carleton, or external users
- Choosing either “People in Carleton” or “Specific people” will give you options under “Other Settings”
- “Can view” – the default option, alows users to view the file/s, but not edit them. This also allows the option to block them from downloading a copy of the file/s.
- “Can edit” – allows users to view and edit the items. This disables the option to block them from downloading the file/s.
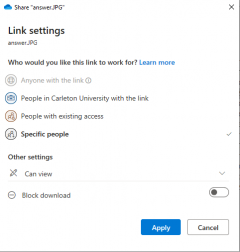
- Click “Apply”
- Enter in the name(s) of the user(s) you wish to share with (when you start typing, it will search through all Carleton users and display them for you to pick from. If sending to an external user, type in their full email address)
- There are 2 ways to share the link;
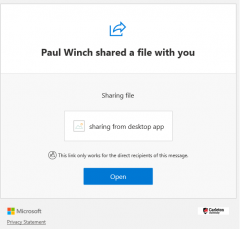
- To quickly share the link with a customized message, enter in your message in the “Message…” field and click “Send”. This will send a pre-generated email through your Outlook with link to access the file(s)
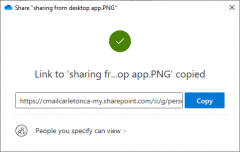
- To post the link on a webpage, send it in a chat, or add it to an email, click on the “Copy” button, and it will generate a link.
 *Note-most sharing works best if using the O365 web Onedrive. Individual files you have shared will not show up on the Desktop App. If you want users to be able to see files on the Desktop App you must put the files in a folder and share the folder. Users will then be able to see these files in the folder on the desktop app. Also if not using M365 Office then users will not be able to collaborate on the desktop app, rather only in the O365 web apps.
- To quickly share the link with a customized message, enter in your message in the “Message…” field and click “Send”. This will send a pre-generated email through your Outlook with link to access the file(s)
Changing Shared permissions
Stop Sharing
- Right click on the file or folder and click “Share”
- At the bottom of the window it will show “Shared with:” and icons of who it has been shared with, as well as an icon indicating a sharing link has been created. Clicking on any of the icons will allow you to change the sharing options
- Click on “Stop sharing” and a confirmation box will appear.
- Click “Stop sharing” again to remove the sharing links to the file/s.
Add More Users
If you have chosen to share with specific people, and need to add more users
- Right click on the file or folder and click “Share”
- Enter in the name(s) of the user(s) to add (when you start typing, it will search through all Carleton users and display them for you to pick from. If sending to an external user, type in their full email address)
- As with initially sharing the file(s), there are 2 options
- To quickly share the link with a customized message, enter in your message in the “Message…” field and click “Send”. This will send a pre-generated email through your Outlook with link to access the file(s)
- To post the link on a webpage, send it in a chat, or add it to an email, click on the “Copy” button, and it will generate a link for you.
Remove Users
If you have chosen to share with specific people, you can choose to remove certain users if they no longer need access
- Right click on the file or folder and click “Share”
- At the bottom of the window it will show “Shared with:” and icons of who it has been shared with, as well as an icon indicating a sharing link has been created. Clicking on any of the icons will allow you to change the sharing options
- Under the link, it shows the icons of the users you have specified. Click on the down arrow to the right to show the list of users by name
- To the right of each user is a “X” you can click to remove the user. Click on “Remove” in the confirmation window.
Was this page helpful?
518
ced06a1ec6
2 people found this useful