
- Getting Started with Zoom
- Joining a Meeting
- Using Zoom and its Features
- Conduct during a Zoom Session
- Privacy
- Additional Information
- FAQ
Last updated: Nov. 23, 2022
Zoom is a web-based video conferencing service for collaborating with others online. It is available across multiple platforms such as desktop and mobile. Your instructor may be using Zoom to hold classes online. You can also use Zoom to meet with your classmates for group projects or study groups. Here is some information to help you get started with Zoom.
Getting Started with Zoom
- Access your Carleton Zoom account. You will likely be required to sign into a Carleton Zoom account to join and fully participate in your classes via Zoom. You can access your Zoom account by visiting https://carleton-ca.zoom.us/signin and entering your MC1 credentials.
- Download Zoom. Visit Zoom’s download center to download the Zoom client, the Zoom plugin for Microsoft Outlook, Zoom mobile apps, and more!
- Test your set-up. Although it’s possible to test your audio and video during a Zoom call, it’s ideal to test these out ahead of time with the Zoom test meeting.
- Familiarize yourself with the platform by watching this video on how to navigate the Zoom application or by exploring the platform for yourself.
| Related Support Resources |
|
Joining a Meeting
There are multiple ways to join a Zoom meeting.
Via Brightspace
Students should join their Zoom meetings directly within the Zoom plugin in Brightspace to avoid running into error messages. Some students may still be able to access certain meetings via the Zoom app or via the browser if the host has changed their security settings, but students will likely receive an error message or passcode prompt if they don’t use the Zoom plugin in Brightspace.
Instructors will likely require students to join the meeting in Brightspace by posting a meeting link with an obscured embedded passcode to the Zoom plugin. If your instructor requires this type of authentication, you must join via Brightspace. No other method will work.
To join via Brightspace,
- Log in to Brightspace with your MyCarletonOne credentials.
- On your Brightspace homepage, access your course in one of the following ways:
- Click on your course under My Courses.
- Click the Course selector grid (
 ) and search for your course name or select your course from the menu.
- Click on Tools in the course toolbar and select Zoom from the bottom of the dropdown menu.
- From the Zoom dashboard, locate the meeting you wish to join and click the Join button to launch Zoom.
- If prompted, enter the meeting password provided by your instructor.
- After these steps, you may find yourself in a waiting room. Your instructor will let participants into the Zoom classroom when they are ready.
Via Application or Web Browser
If your instructor has not added the Zoom plugin to your course, they may have provided a meeting ID and passcode instead.
- Open the Zoom application or navigate to carleton-ca.zoom.us/join.
- Enter the meeting ID provided by your instructor.
- If prompted, enter the meeting password provided by your instructor.
- After these steps, you may find yourself in a waiting room. Your instructor will let participants into the Zoom classroom when they are ready.
NOTE: If you receive the following error message:
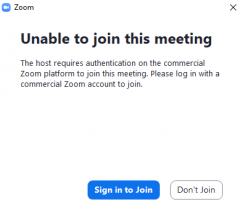
This means you MUST sign into your Carleton Zoom Account before joining the meeting. See our support page on this process for more information.
Via Meeting Link
It’s also possible to join a Zoom session with a meeting link, which may be sent by email or posted in Brightspace.
We strongly recommend that students launch classes in the Zoom Desktop Application rather than in a browser, and ensure that the application is up to date.
This video tutorial shows you how to join a Zoom meeting using a meeting link.
| Related Support Resources |
|
Using Zoom and its Features
In-Meeting Tools
When you enter a Zoom meeting, you will have the ability to interact with others in the meeting using a variety of different tools located in the toolbar at the bottom of the application. Read on to learn more about these tools.
| Tool | Description | |||||||
 |
Mute / Unmute
|
|||||||
 |
Start Video / Stop VideoStart and stop broadcasting your webcam feed. Use the caret (^) next to the Start Video / Stop Video button to access different setup options for your webcam. |
|||||||
 |
ParticipantsShow and hide the list of participants in the session and invite others. Hover over your name in the participant list for these additional options:
|
|||||||
 |
ChatShow and hide the chat window. Use the chat box to participate in the meeting via text. Learn more. |
|||||||
 |
Share ScreenStart and stop screen sharing. The host (instructor) can disable this option. You will be able to select the desktop or application you want to share. Learn more. |
|||||||
 |
RecordIf your instructor is recording the class, you will hear a verbal notice upon joining the session and will see the record button light up with a red dot. The record button will likely be disabled by your instructor. |
|||||||
 |
ReactionsClick the Reactions button to access emoji options. Click on an emoji and that image will appear on the screen of your video for all to see.
|
|||||||
 |
LeaveUse this button to leave the Zoom session. |


Screen Layout
If your instructor has given you control over the view settings, you can toggle between the active speaker view and the gallery view, which changes the way that videos are arranged in the Zoom display.
Active Speaker View
|
|
Gallery View
|
Additional Features Instructors May Use
You may see the following features used by instructors during Zoom sessions:
- Breakout rooms: smaller sessions in the meeting allowing participants to meet in smaller groups, assigned by the host.
- Whiteboard: annotate and brainstorm on a shared screen or digital whiteboard.
- To annotate the whiteboard, you must join the session via the Zoom desktop app.
- Polling: answer single or multiple-choice questions provided by the instructor.
- Waiting rooms: the attendees are held in the waiting room before the host admits them.
- You will see a screen with the following message when you join a meeting with the Waiting Room enabled:
“Please wait, the host will let you in soon.”
| Related Support Resources |
|
Conduct during a Zoom Session
In a Zoom session, or any synchronous session for that matter, be respectful of your host and peers. A host can be your instructor or TA — whomever is hosting or moderating the online session. This means,
- Joining the live class from a quiet location, so that you and others can listen without being distracted by background noises.
- Muting your microphone when you aren’t speaking to the class, so that others aren’t distracted by outside noises.
- Turning on your webcam for face-to-face interactions if you are comfortable. So much of communication is seeing and responding to people’s faces.
- Ensuring that you don’t have any posters, drawings, or writing in the background of your screen that could be offensive to others.
- Using your preferred name or the name you would use in a professional setting as your username. Do not use a false username nor create one that might be considered offensive.
- Following specific “terms of engagement” set by your instructor. Some instructors will want you to use the chat feature to indicate that you want to get involved; others will use the hand raising feature, or ask you to raise your hand with your webcam on. Whatever process your instructor uses, follow it. It can be disruptive and confusing for a moderator to have participants free-for-all on this issue.
As a general rule, conduct yourself with the same level of professionalism you would if you were attending the class on campus.
| Related Support Resources |
|
Privacy
When using Zoom, it is important to be aware of the following:
- Your Personal Meeting ID (PMI) is a virtual meeting room permanently reserved for you. It is always accessible with the same Meeting ID and personal link. Do NOT use your PMI to host public events. Once people know your PMI, they can join any meeting that uses it at any time.
- Tip: Lock your PMI or use the Waiting Room feature to admit participants individually.
- If using a web browser to access a Zoom meeting, use a private/incognito browser. As a standard practice, Zoom data mines all information provided on their service.
- Do NOT share sensitive/secure/confidential information and files on Zoom. Similarly, check your meeting surroundings before enabling your camera, and remove any personal information (e.g., address, account credentials and passwords) from your background.
- Zoom meetings, including lectures and classroom discussions, might be recorded without the instructor or other participants being aware of using screen capture and/or external recording devices. Please note that Carleton University’s policy prohibits students from recording class sessions and distributing any class recordings. Instructors may choose to record synchronous remote class sessions but must follow specific guidelines set out by the university.
Participants may be able to join Zoom meetings without the host’s permission and/or using a false identity. Your instructors may do the following to keep uninvited guests out of the Zoom meeting:
- Refrain from posting Zoom meeting links on publicly accessible forums or syllabi.
- Share Zoom link details through the Brightspace Zoom tool so that only enrolled students can access the virtual classroom.
- Use a unique password for each Zoom meeting, even if it is a recurring meeting such as a virtual class.
- Share the password for a Zoom meeting shortly before it is scheduled.
Additional Information
The information on this page has been condensed into our Zoom Guide for Students (pdf below) and FAQ. If you’re still having trouble, contact online@carleton.ca.
 |
Zoom’s Official Support SiteVisit Zoom’s help center at support.zoom.us. This is an excellent collection of resources for all things Zoom. Their short, modular tutorial videos and instructions are designed to help you easily find the support you’re looking for. |
 |
Student Technical SupportStudent support for educational technology applications is provided by the ITS service desk. |