Aye Aye, Caption: Generating Transcripts and Closed Captioning from YouTube Videos
If you’re up-to-date with web accessibility standards, then you are likely aware of the importance of captioning and transcripts for video content. The next step to attaining web accessibility is to understand how to actually implement features like captions and transcripts. This article will detail how to create YouTube captions, whether or not you have a transcript, as well as how to download a transcript from YouTube captions.
There are three key components to this process:
- The video
- The captions
- The transcript
The audio portion of the video (usually narration) should be visually represented in simultaneous captioning on the video. A transcript (full version of the text that is spoken in the video) should also accompany the video.
Luckily, once you have a video, it’s fairly easy to produce a transcript and captions using YouTube’s built-in features.
Adding captions
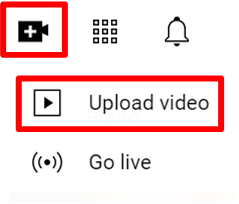
The first step in the process is to upload your video to YouTube.
- To upload a video, simply go to your YouTube homepage while signed in and click the “Create” icon in the upper right.
- Choose “Upload Video” from the dropdown menu.
- From there, you will be prompted to upload a video file. Drag and drop your file into the window or click “Select Files” and browse to locate your file.
- The next screen will allow you to edit your video details.
From here, there are a few ways you can go about adding subtitles or captions.
Option 1: Using auto-generated subtitles
- If you haven’t yet published your video, follow the steps above and then publish the video by navigating to the “visibility” tab on the top menu and clicking publish in the bottom right. You can choose to publish it unlisted, if you wish.
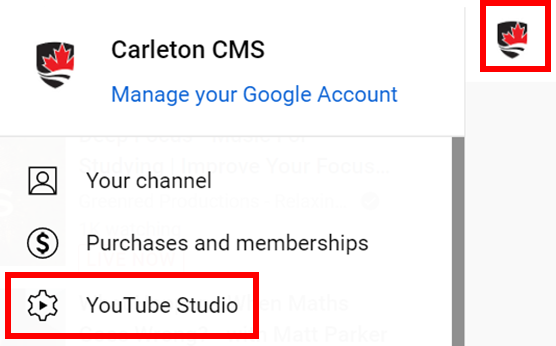
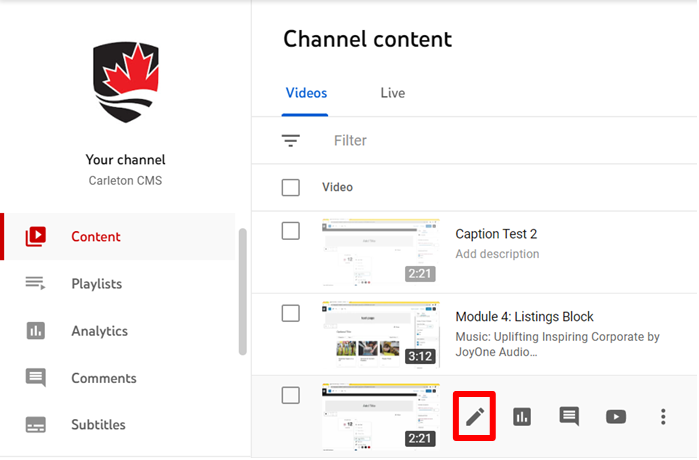
- Open YouTube Studio by clicking your profile icon in the top right corner and selecting “YouTube Studio” from the dropdown menu.
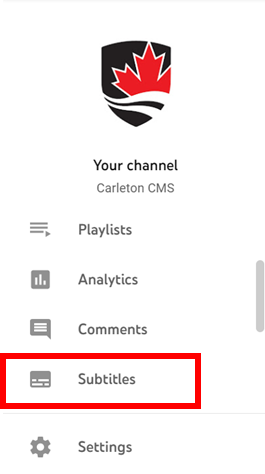
- Scroll in the left hand menu down to “Subtitles” and click it.
- Next to your video, there should be a languages column. Click the dropdown arrow.
- Hover over the column which has “(Automatic)” at the end of its name. and select the “Duplicate and Edit” option in the right of the column.
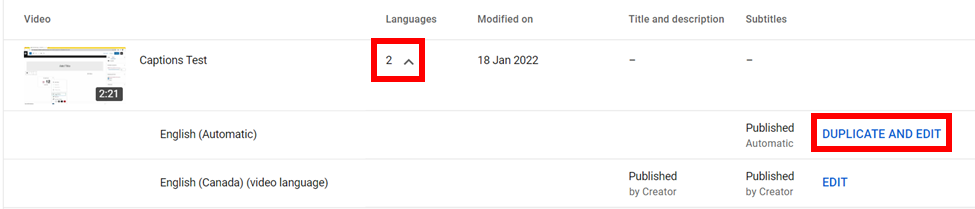
- NOTE: YouTube needs a few moments to generate these captions. For the two-minute example video that I am using, it took about five minutes for the auto-generated captions to appear. Longer videos will likely take longer to generate captions.
- This will bring you to a screen where you can edit the text of your captions, using the box in the top right third of the screen. Fix any mistakes you find, including misidentified words, capitalization, and punctuation.
- From this screen, you can also play and pause the video itself (top right section), adjust when captions appear (bottom section), and edit the text and timings (top left section). Once the captions match the video, click the blue “Publish” button.

Option 2: Generating captions from a transcript
- Navigate to the subtitle menu
- If you are still in the video uploading phase, navigate to “Video Elements” using the top menu. Then click on “Add” to the right of “Add Subtitles”
- If the video has already been uploaded, then open YouTube Studio by clicking your profile icon in the top right corner and selecting “YouTube Studio” from the dropdown menu.
- Choose “Content” from the left-hand menu and then hover over your video. Click on the left-most “Details” icon that appears.
- From this screen, scroll down to “Subtitles” in the column on the right and click it.
- If you are still in the video uploading phase, navigate to “Video Elements” using the top menu. Then click on “Add” to the right of “Add Subtitles”
- You can either upload a .txt file with the “Upload file” button or copy-paste your text into the box that appears when selecting “Auto-sync”
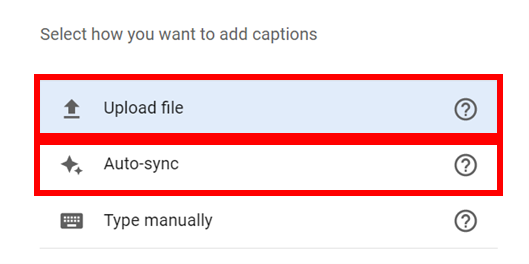

- When uploading a file, YouTube will ask you whether the file is with or without timings. If your document includes timestamps, click “with timings”. Otherwise, click “without timings”.
- YouTube will automatically try to sync the audio with the captions with either the “Upload file” or “Auto-sync” options. You can adjust the timing by dragging the text boxes on the bottom menu.
- Especially when uploading a .txt file, the spacing in the text editor can be off. This will be reflected in the captions themselves, so be sure to fix spacing issues for the best quality of captions. Check for any other mistakes in your transcript and use the bottom timeline section to adjust caption timings by dragging their corresponding text boxes or changing the time-stamps under the “Edit Timings” option.
- When finished, press the “done” button in the top right corner
Option 3: Typing your own captions
- Navigate to the subtitle menu (see the first step of Generating captions from a transcript)
- You can either use “Auto-Sync” or “Type Manually”: “Auto-Sync” will let you type the entire text uninterrupted and automatically sync it to the audio to the best of YouTube’s ability while “Type Manually” will provide you with timestamps and ask you to transcribe the audio for that section.
- Once you have completely transcribed the audio, check it over for mistakes, adjust timings if necessary and then click “Done” in the top right.
Generating a transcript
It is often handy to have both captions and a transcript. If your YouTube video has captions, it’s fairly easy and quick to generate a transcript, even if you did not create one initially. Here’s how!
- Open your video on YouTube
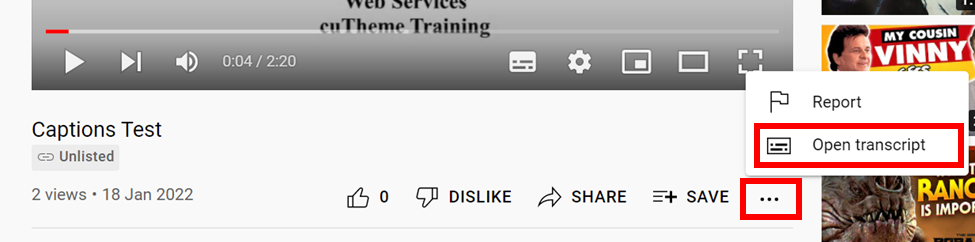
- Below the video title, there is a bar with like, dislike, share, and save options. On the very right, there are three dots. Click these dots. From the menu that appears, select “Open transcript”
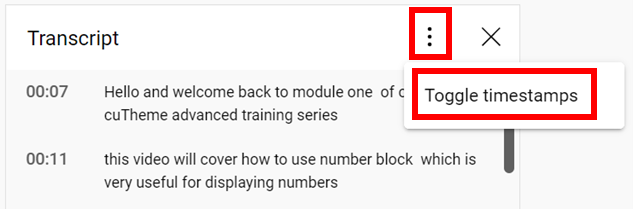
- The transcript should now appear to the right of the video. To toggle off the timestamps, click the vertical three dots in the top right of the transcript block and select “Toggle timestamps”. This will hide the timestamps, leaving just the textual transcript.
- Copy and paste this text to wherever you need your transcript.