Block Editor Workspace
Basic Training Module 1: Getting Started
The Block Editor is where you create and edit content on your website. Whether you’re building a new page, updating existing content, or adding images and other media, most of your work will take place in the editor.
Unlike traditional word processors, the Block Editor uses blocks to create content. Every heading, paragraph, image, button, or other piece of content is added as a separate block that can be edited, moved, and customized individually.
In this lesson, you’ll learn about the main areas of the Block Editor and the tools you’ll use most often.
Opening the Block Editor
Understanding the following areas will help you navigate the editor more confidently.
To open the Block Editor:
- From the Dashboard, select Pages > Add New.
- Alternatively, select an existing page and click Edit.
- The Block Editor will open and display the page content.
The editor is divided into three main areas:
- Top Toolbar
- Content Area
- Settings Sidebar
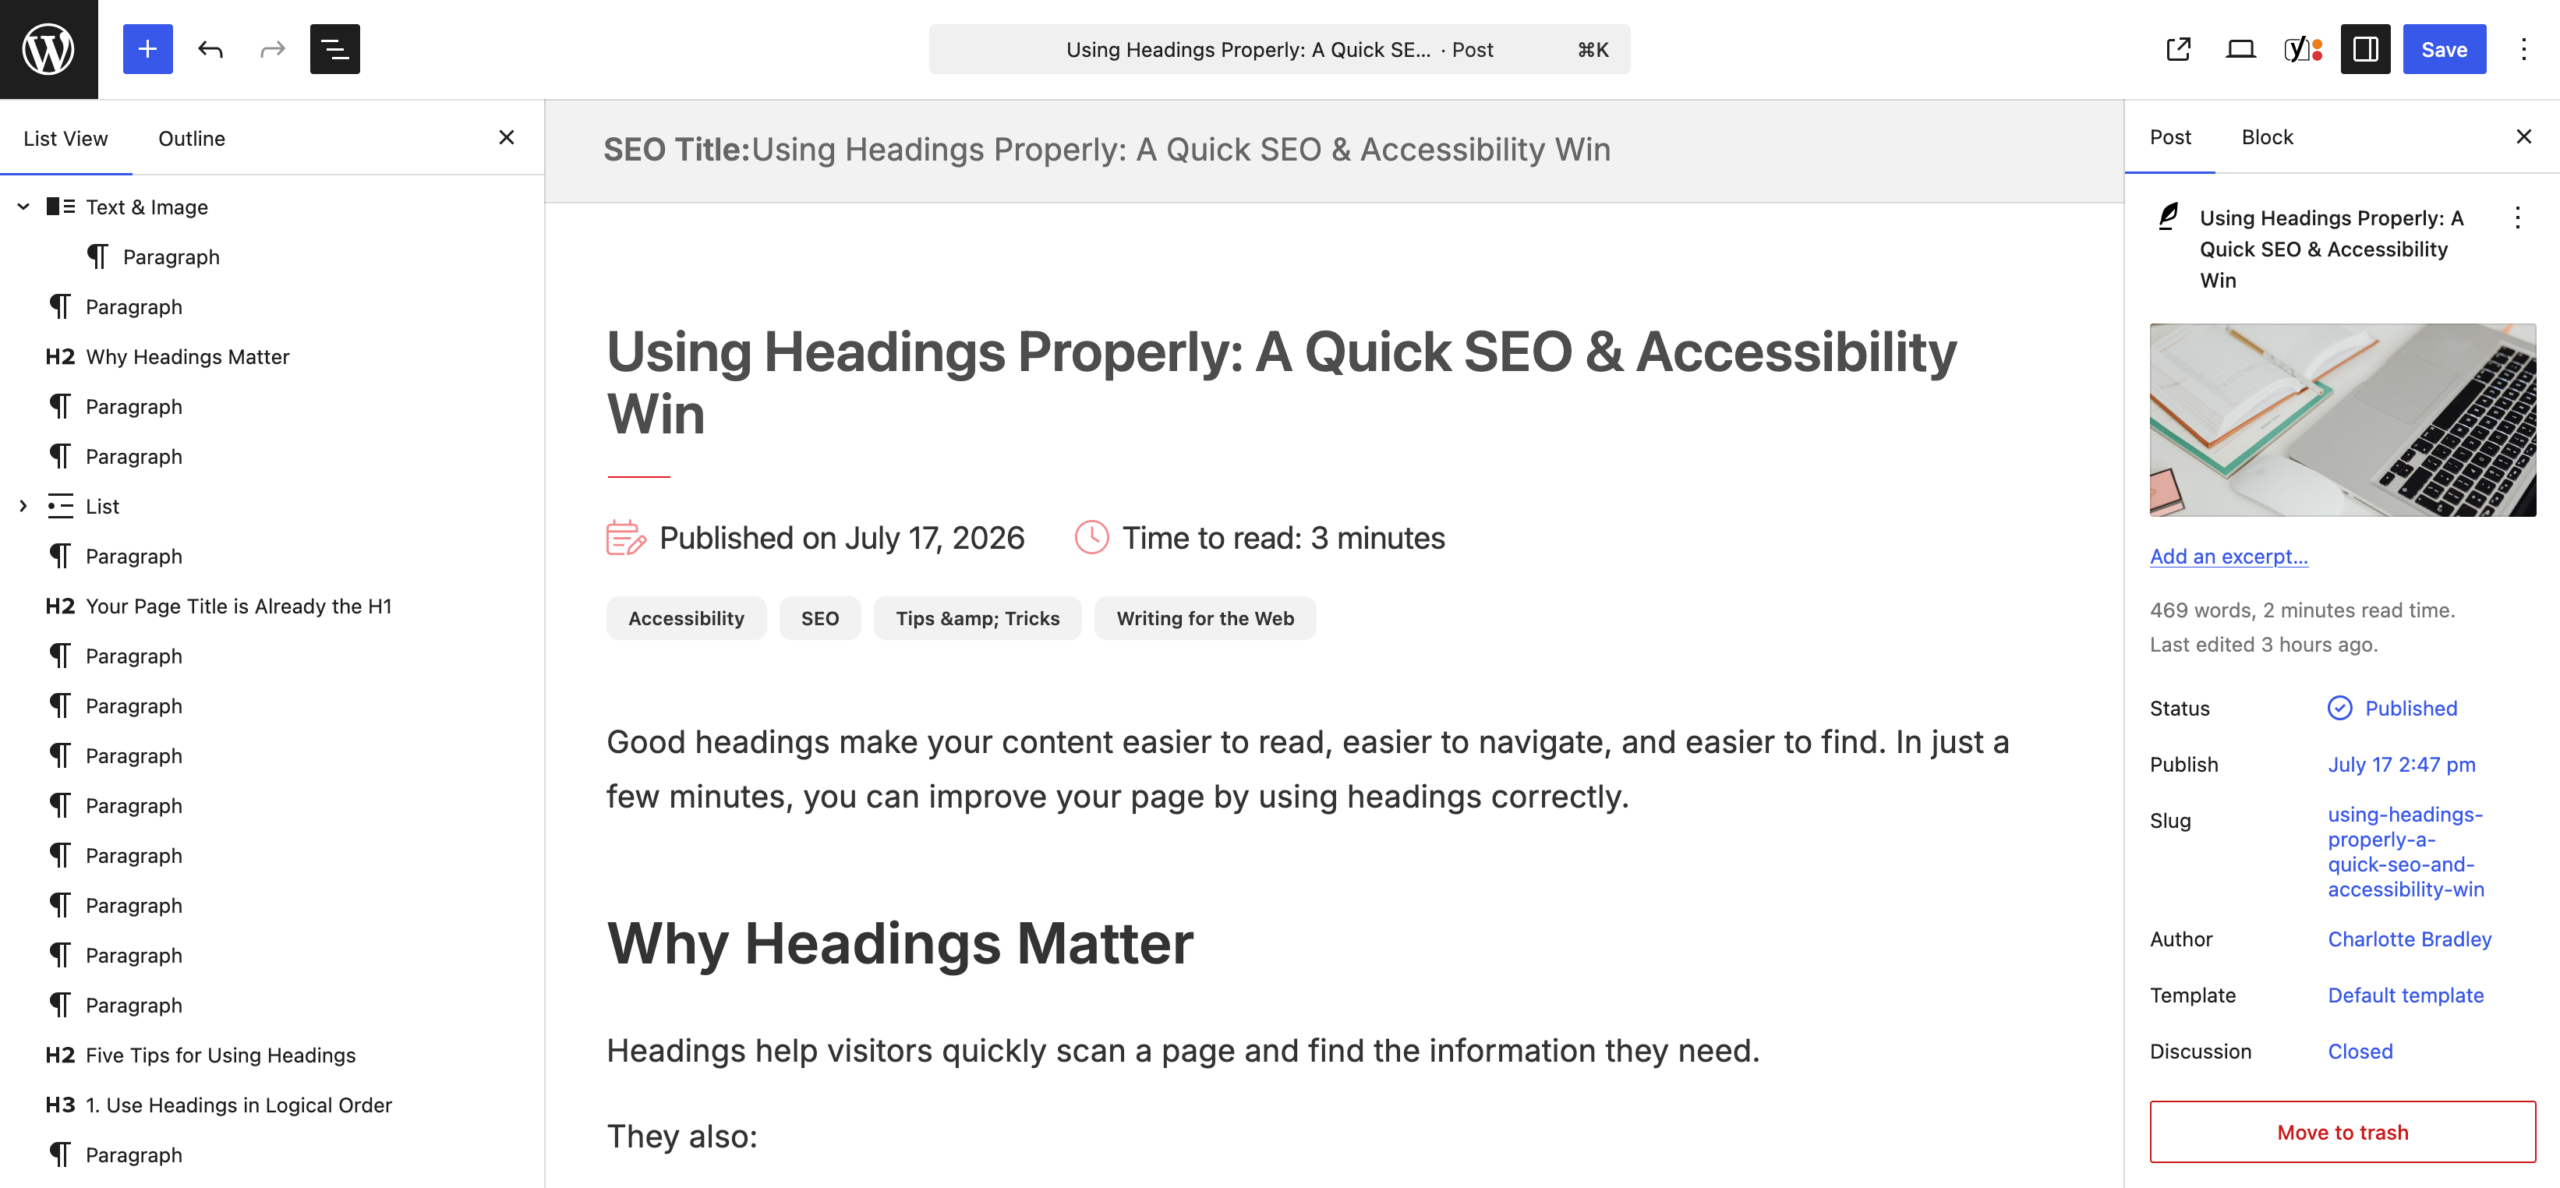
Top Toolbar
The Top Toolbar contains tools and actions that apply to the entire page. Some of the most commonly used options include:
Add Block
Click the + button to open the Block Inserter. From here, you can browse or search for blocks to add to your page.
Undo and Redo
Use Undo to reverse your most recent action and Redo to restore it. These tools are helpful when experimenting with layouts or making corrections.
Preview
Preview allows you to view your page before publishing or updating it. Reviewing your work before publishing helps ensure that content appears as expected.
Publish or Update
When you’re ready to make your changes live, use the Publish button for new content or the Update button for existing content.
Content Area
The Content Area is where you create and organize your page. When you place your cursor within the page, you can begin adding content using blocks.
Adding Content
Click the + button or start typing to add content to the page.
Common content blocks include:
- Paragraphs
- Headings
- Images
- Lists
- Buttons
You’ll learn about these blocks in later modules.
Organizing Blocks
Each piece of content exists as an individual block.
Blocks can be:
- Moved up or down
- Reordered within the page
- Duplicated
- Deleted
- Transformed into other block types
This flexible approach makes it easy to build and organize page layouts.
Settings Sidebar
The Settings Sidebar appears on the right side of the editor and provides access to settings for both the page and the selected block.
Tip: If you cannot see the Settings Sidebar, click the settings icon in the upper-right corner of the editor.
Page Settings
Page settings apply to the page as a whole and may include options such as:
- Page title
- Publication status
- Visibility
- Featured image
- Page attributes
Available settings may vary depending on your site’s configuration.
Block Settings
When a block is selected, the sidebar will display settings specific to that block.
For example:
- A Paragraph block may include text formatting options.
- An Image block may include image size and caption settings.
- A Button block may include style and alignment options.
Most block customization happens here.
Workspace Views
The Block Editor includes several viewing options that can help you work more efficiently.
Fullscreen Mode
Fullscreen Mode hides the WordPress navigation menu and provides more space for editing content.
List View
List View displays all blocks on the page in a hierarchical outline. This is especially useful when working on longer pages with many blocks.
-
Welcome to getting started with cutheme, module one. This video will teach you all about the block editor workspace. The block editor workspace is where you will build and develop all of the content for your website.
There are different options in how you can set it up to best suit your preferences and workflow.
First, let’s start by launching the block editor workspace. Hover over Pages and click Add New Page. Now you can choose your preferred work mode. By default, it’s set to full screen. Click on the three dots at the top right to change this setting. Personally, I prefer to see the left-hand navigation bar while I work. So I like to toggle full screen mode off.
And you’ll notice that there are several other options here. You can play around and see which you prefer.
There are also some options over here at the top left. The first one is the block inserter. And just like what it sounds like, you click on this to add blocks to your web page.
Next, you have the option to switch between the select tool, which allows you to select blocks, and the edit tool which is for editing.
Click the undo icon, which is right here, to revert to your most recent changes. And you can click the redo button right beside it to reapply changes that you have undone.
The document overview button right here will give you an overview of the entire page. You can see these are all the blocks on your page and you can navigate to them by clicking. You can view it either as a list or an outline.
The Save Draft button allows you to save your page without publishing it. This button is only available if your page still needs to be published. And you’ll also see the Publish button. Again, this is only available for brand new pages that have not yet been published or are still in draft.
Once your page is live and has been published, you’ll notice that there’s an Update button over here. Every time you make changes to this page, you’ll want to click the update button to save the page.
Click on this icon right beside the update button to view your page.
The setting button over here at the top right allows you to see the options for the page as well as your blocks on the page.
Click the last icon at the right to view more tools that are available. We’ve already looked at the view options here at the top. Another one that you might find handy is down here – copy all blocks. Click on that to copy every block on your page and then you can add a new page and when you get the blank page you can paste in the blocks by clicking Command+V .
Try It Out
Now that you’re familiar with the Block Editor workspace, try the following:
- Create a new page.
- Add a Paragraph block.
- Type a short sentence.
- Open the Settings Sidebar.
- Select the Paragraph block and review its settings.
- Open List View and locate your block.
- Return to the editor and continue exploring the workspace.