Customizing User Settings
The Account Settings page allows you customize many usability and accessibility elements in D2L Brightspace. Accessibility, Pronouns, Personalization, Discussions and Email settings within Brightspace can all be customized on this page.
Accessibility Settings
The Account Settings page allows you to change accessibility settings. These include:
For more information about Accessibility in Brightspace at Carleton, please see Accessibility in Brightspace.
To customize Font Settings:
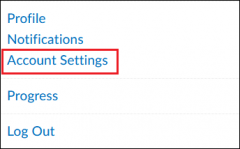
- Log into Brightspace with your MyCarletonOne credentials.
- Click your name in the right-top corner of the screen.

- Click Account Settings.
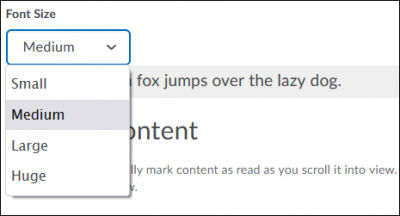
- Go to Font Settings.
- Select the desired font size from the drop down menu.
- Click Save and Close to save these settings and return to the Profile page.
To customize Reading Content Automatic Marking:
- Log into Brightspace with your MyCarletonOne credentials.
- Click your name in the right-top corner of the screen.
- Click Account Settings.
- Go to Reading Content.
NOTE: Automatic making is enabled by default for some Brightspace tools, and can interfere with the functioning of some assistive technologies. If you are using a screen reader you may wish to disable automatic marking.
- Select the checkbox to disable automatic marking.
- Click Save and Close to save these settings and return to the Profile page.
To customize Video Settings:
- Log into Brightspace with your MyCarletonOne credentials.
- Click your name in the right-top corner of the screen.
- Click Account Settings.
- Go to Video Settings.
- Select the checkbox to enable Brightspace to work with any assistive technologies for videos.
- Click Save and Close to save these settings and return to the Profile page.
Pronouns Settings
Brightspace allows you to use pronouns in your profile card. For more resources about Pronouns in Brightspace, please see the Adding Pronouns in Brightspace support page.
To enable Pronouns
- Log into Brightspace with your MyCarletonOne credentials.
- Click your name in the right-top corner of the screen.
- Click Account Settings.
- Go to Pronouns.
- Check Allow others to see my pronouns.
- Choose one of the options for which pronouns to use.
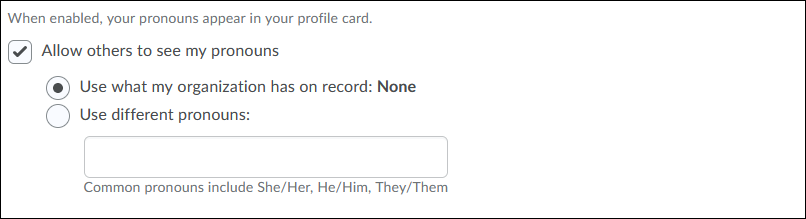
NOTE: You have the option of selecting to use the pronouns your organization has on record. If this field is labelled None, you will have to input your pronouns in the Use different pronouns box.
- Click Save and Close to save these settings and return to the Profile page.
Personalization Settings
The account settings page also allows you change personalization elements such as :
To select Time Zone
- Log into Brightspace with your MyCarletonOne credentials.
- Click your name in the right-top corner of the screen.
- Click Account Settings.
- Go to Time Zone.
- In the drop down menu labelled Continent, choose your continent.
- In the drop down menu labelled Time Zone, choose your time zone.
NOTE: By default, your time zone will be set to your organization’s time zone. To restore your time zone to the default, click the
 icon beside the time zone drop down menu.
 - Click Save and Close to save these settings and return to the Profile page.
To customize Locale and Language settings
- Log into Brightspace with your MyCarletonOne credentials.
- Click your name in the right-top corner of the screen.
- Click Account Settings.
- Go to Locale and Language.
- Select your language option from the drop down Preferred Locale and Language menu.
- Select your desired settings for Clock, First Day of the Week, Date, Number Format and Percentage Format from the drop down menus.
NOTE: The default settings for Clock, First day of the week, Date Format, Number format and Percentage format are all determined by your Organization. You can customize these settings, but some courses may override your selections.
- Click Save and Close to save these settings and return to the Profile page.
To customize Online Status
- Log into Brightspace with your MyCarletonOne credentials.
- Click your name in the right-top corner of the screen.
- Click Account Settings.
- Go to Signing In.
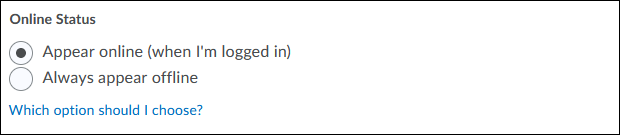
- Select your preferred Online Status from the options presented.
- Click Save and Close to save these settings and return to the Profile page.
Discussions Settings
The discussions tab contains your Personal Settings discussions as well as Grid View Settings for how discussions are displayed in Brightspace.
TIP: For further information about any of the fields in the Discussions tab you can click the ![]() icon. A pop-up window will provide more details about each field.
icon. A pop-up window will provide more details about each field.
To customize Personal Settings for Discussions
- Log into Brightspace with your MyCarletonOne credentials.
- Click your name in the right-top corner of the screen.
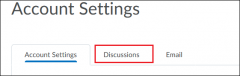
- Click Account Settings.
- Click Discussions.
- Go to Personal Settings.
- Select your desired settings for Display Settings, Default View, Reply Settings and Subscription Settings by checking the appropriate boxes.
- Click Save and Close to save these settings and return to the Profile page.
To customize Grid View Settings for Discussions
- Log into Brightspace with your MyCarletonOne credentials.
- Click your name in the right-top corner of the screen.
- Click Account Settings.
- Click Discussions.
- Go to Grid View Settings.
- Select your desired settings for Default Threading Style, Display Settings, Post Fields to Display and Character Limits by checking the appropriate boxes.
- Click Save and Close to save these settings and return to the Profile page.
Email Options
To enable Email Receipts
- Log into Brightspace with your MyCarletonOne credentials.
- Click your name in the right-top corner of the screen.
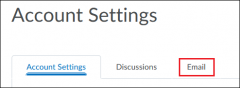
- Click Account Settings.
- Click Email.
- Check the box labelled Send a copy of each outgoing message.

NOTE: The email that will receive the copy/receipt is the email you use to log into your Brightspace account.
- Click Save and Close to save these settings and return to the Profile page.
To set up Email Signature
- Log into Brightspace with your MyCarletonOne credentials.
- Click your name in the right-top corner of the screen.
- Click Account Settings.
- Click Email.
- Enter your email signature in the box labelled Email Signature.
- Click Save and Close to save these settings and return to the Profile page.