How-to submit a remote ANSYS Electronics Desktop (HFSS) job
Total capacity of the cluster 104 cores 1728GB Memory
| Name | cores | Memory in GB |
|---|---|---|
| pbs-me5159-02 | 60 | 1025 |
Video to help with the configuration,
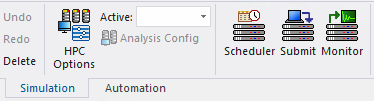
Step 1: Configure the Scheduler by clicking the “Scheduler” button, or just Import… this file. After entering your username and password, click Refresh to confirm it connects to the HPC head node.

Step 2: Submit a job by clicking on the “Submit” button.
Example Setting file that can be imported. Much easier to use than configuring everything by hand.
If you import the Settings file by sure to adjust the Project path options, see 3. below.
AnsysEM Product Paths
| Ansys Version | Path |
|---|---|
| AnsysEM 2022r1 | /CMC/tools/ansys/ansys.2022r1/AnsysEM22.1/v221/Linux64/ansysedt |
| AnsysEM 2021r1 | /CMC/tools/ansys/ansys.2021r1/AnsysEM21.1/Linux64/ansysedt |
| AnsysEM 2020r2 | /CMC/tools/ansys/ansys.2020r2/AnsysEM20.2/Linux64/ansysedt |
| AnsysEM 2020r1 | /CMC/tools/ansys/ansys.2020r1/AnsysEM20.1/Linux64/ansysedt |
1. Enter a product path to the version of AnysyEM that you want to simulate with.

2. Pick the project you are going to simulate

3. Click Options to set the mapping between your UNIX and Windows home directory

4. Click Add… and filling in the paths as follows
Windows path: \\Project Path server from above.doe.carleton.ca\doe_username. For most people the server is ugradfs.doe.carleton.ca Unix path: /home/doe_username5. Use Electronics Pro, Premium, Enterprise product licensing, needs to be checked
6. One Batchoptions needs to be set, by clicking Add..

Now everything is setup to submit a job.
Step 3. Set Computer Resources.
The nodes are listed above to see the number of cores available. The amount of resources used is up to you, the simplest setup is to set Method: to “Number of Cores and (Optional) RAM”

and set the number of cores up to 106

Test all settings by click “Preview Submission” and there should be no errors. You are now ready to “Submit Job”. Good luck!
If you require any help with any step on the page please contact Scott Bruce.