Menu Best Practices
Module 3.2 – Advanced: Site Organization: Menu Best Practices
There are a variety of things you can do to ensure that your navigation menu is intuitive and useful to your visitors. From knowing which pages to include on your menu, to how to structure it, this tutorial will explore some best practices for creating a menu in cuTheme.
But first, let’s look at the new top-level nav in cuTheme.
Top Level Menu
As you can see, we’ve moved to a top-level navigation structure with cuTheme. This may be a big change if you are used to working in ccms with the side-level navigation.

Benefits of a Top Nav
- Consistent user experience across the Carleton domain
- Use the full width of the screen for content – more real estate!
- More modern approach
- Simplifies our template with streamlined development
- Mobile friendly
- Accessible
Step-By-Step: Best Practices
1. Keep it Simple
A top-level nav limits the number of items you can have at the top level due to actual space. However, this is not such a bad thing! Having too many items on your menu can be overwhelming. You don’t need to add every page.
We recommend 5-7 items at the top level. Too many choices can confuse users and lead to choice paralysis.
2. Take Inventory & Create a Plan
Start by looking at the pages on your website. How many pages are there? Can anything be deleted, or merged? Are pages organized in hierarchically in the backend? The most important pages should be at the top level and child pages beneath.
Creating an outline or plan for your website structure and menu is a very useful approach. Consider how many levels you need, and what will fall under each section
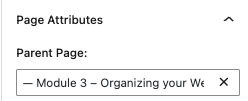
Use the Parent Page dropdown at the right to choose your top-level page. This organizes your site, which helps you find pages in the back end more easily, creates a logical URL and path for search engines as well as a logical organizational structure for your users.
3. Chunk Info Logically
Group related sub-menu items under main headings for a straightforward and intuitive menu. For example:
- Future Students
- Undergraduate
- Programs
- Graduate
- Undergraduate
4. Create Clear Menu Labels
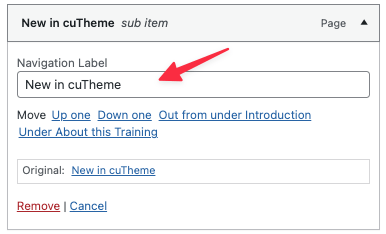
By default, WordPress uses the page name as the label for your menu item. You can change this to shorten or clarify for your visitors.
Expand the menu item by clicking on the arrow at the top right. Under Navigation Label, highlight the name in the text field and type in a new menu item label. Click the Save Menu button.
5. Order and Prioritize Items
Once you have your main sections in mind, it’s time to prioritize your content. Decide which sections or pages are the most important and should be prominent. These will form the top level of your navigation menu.
The primacy effect tells us that people tend to remember or go to the first items in a list while the recency effect suggests that the most recent item read (usually the last in a list,) also sticks in the reader’s memory. This suggests the first and last items on your menu garner the most attention.
Following, are some of the critical pages typically found on Carleton sites. But note, your priorities may vary based on your website’s goals and content:
- About
- Programs
- Future Students
- Current Students
- Research
- News & Events
- Contact
Conclusion
To summarize, here are our recommended best practices and steps to re-organize your menu:
- Keep it simple (5-7 items top level) Remove unnecessary items
- Take inventory of your pages and the organizational structure (number of pages, parent/child page relationships)
- Group like items and logically organize your menu. Use sub-items to further group split up your menu
- Make labels descriptive and clear (but not unnecessarily long)
- Put important items at the very top or very bottom of your menu
Video Tutorial
Try it Out!
Now that you better understand menu best practices, try implementing them!
- Open your menu
- Consider menu best practices and evaluate your menu
- Re-organize and/or re-label if this would improve your users’ experience