Basic Text Editing
Module 1.5 – Getting Started: Editing Essentials: Text Editing
Table of Contents
Basic text editing involves a variety of options that you may be familiar with from using word processing programs. Using the text editing toolbar, you are able to move or change the block you’re editing, alter text alignment, add hyperlinks, and more!
Step-By-Step
While editing a “Page” or “Post”, click on the empty block and begin typing.
Once you’ve typed in some text, a menu will appear above the text, with several text editing options on it.
Text Edit Options

- This indicates what type of block you’re using. It will have the icon of that block visible, and clicking on it will provide a list of other blocks you can convert your content into.
- Next are the up and down arrows. Clicking on either of these buttons will move the text block up or down one space.
- The next button, which has three horizontal stripes, allows you to change the text alignment. Clicking on it will give you the option to align your text to the left, center, or right.
- Next up are “B” for making the text bold, and
- “I” for italicizing the text.
- The next button is for creating a hyperlink. To add a hyperlink, highlight some text and click on the hyperlink button. You will then have the option to add the URL and decide if you want the link to open in a new tab or not.
- The down arrow allows you to select further formatting options such as strikethrough.
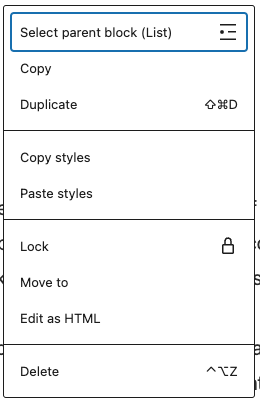
- At the far right is an icon of three dots. Click to view block settings such as copy, duplicate, and delete.

Video Tutorial
-
Welcome to the final video of getting started with cuTheme module one. This video is going to introduce you to working with text on our new theme.
We’ll go over the basics of making edits to a page that already exists. Once you have logged into your site, navigate to the page where you’d like to make changes. and then click Edit Page at the top.
Click your cursor inside of a paragraph block, and you’ll see a menu appear above the text.
The first icon indicates what type of block you’re using. It will have the icon of the current block and if you click on that, you can see a list of the other kinds of blocks that you can convert to.
Next, the up and down arrows allow you to move the block up and down throughout your page.
The rest of the menu has a lot of the basic text formatting options that you’re familiar and used to seeing in other word processing platforms.
For example, the next icon allows you to align your text left, center or to the right.
Highlight text and then click the B to bold or the I icon to italicize the Text.
The chain icon allows you to create hyperlinks. Highlight the text that you’d like to use as the anchor. Click on the chain and then you can paste in the URL or start typing the name of a page from your website and it will appear for you to select.
Click the drop-down menu to find other options such as strikethrough.
And at the far right, you’ll notice the three dots. Click on these to view block settings such as copy and duplicate.
Try it Out!
Now that you have learned basic text editing, it’s time to try it out!
- Type in some text in a blank/paragraph block.
- Bold the text, italicize the text, and then add a hyperlink to the text.
- Add another paragraph block. Transform it into a heading.
- Move the heading block above the paragraph block.
- Delete the paragraph block.