In Module 1, we cover how to log in to the Ventus Student Portal and create a Ventus account. We then give you an overview of the Ventus dashboard.
Dashboard Walk-through
For a high-level walkthrough of the features and functions of Ventus dashboard, check out the following video:
Transcript
Logging in / Account Creation
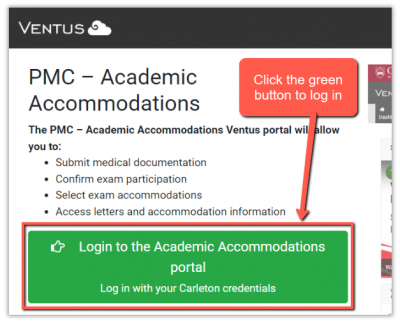
Logging in to Ventus
To log in to the Ventus Student Portal:
- Go to ventus.carleton.ca/student
- Click the green button labeled “Login to the Academic Accommodations Portal”
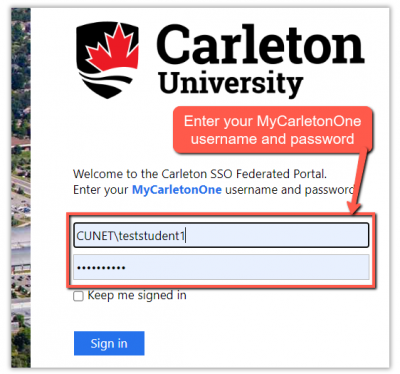
- Now, at the Carleton SSO Portal, enter your MyCarletonOne username and password
Creating a Ventus Account
If you are logging in to Ventus for the first time, after entering your MyCarletonOne credentials, you will be prompted to create a new account with the following screen:
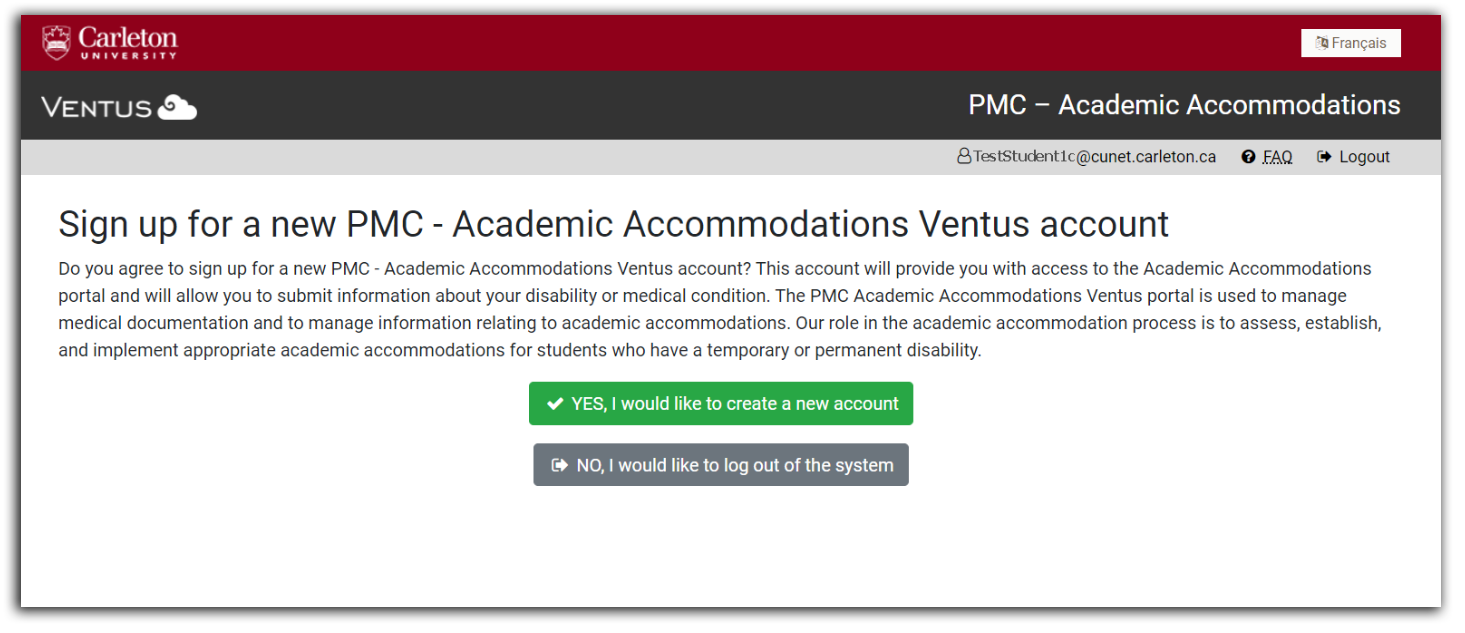
Click the green button labelled “Yes, I would like to create a new account” and a new account will be created for you.
Dashboard Overview
Profile Tab
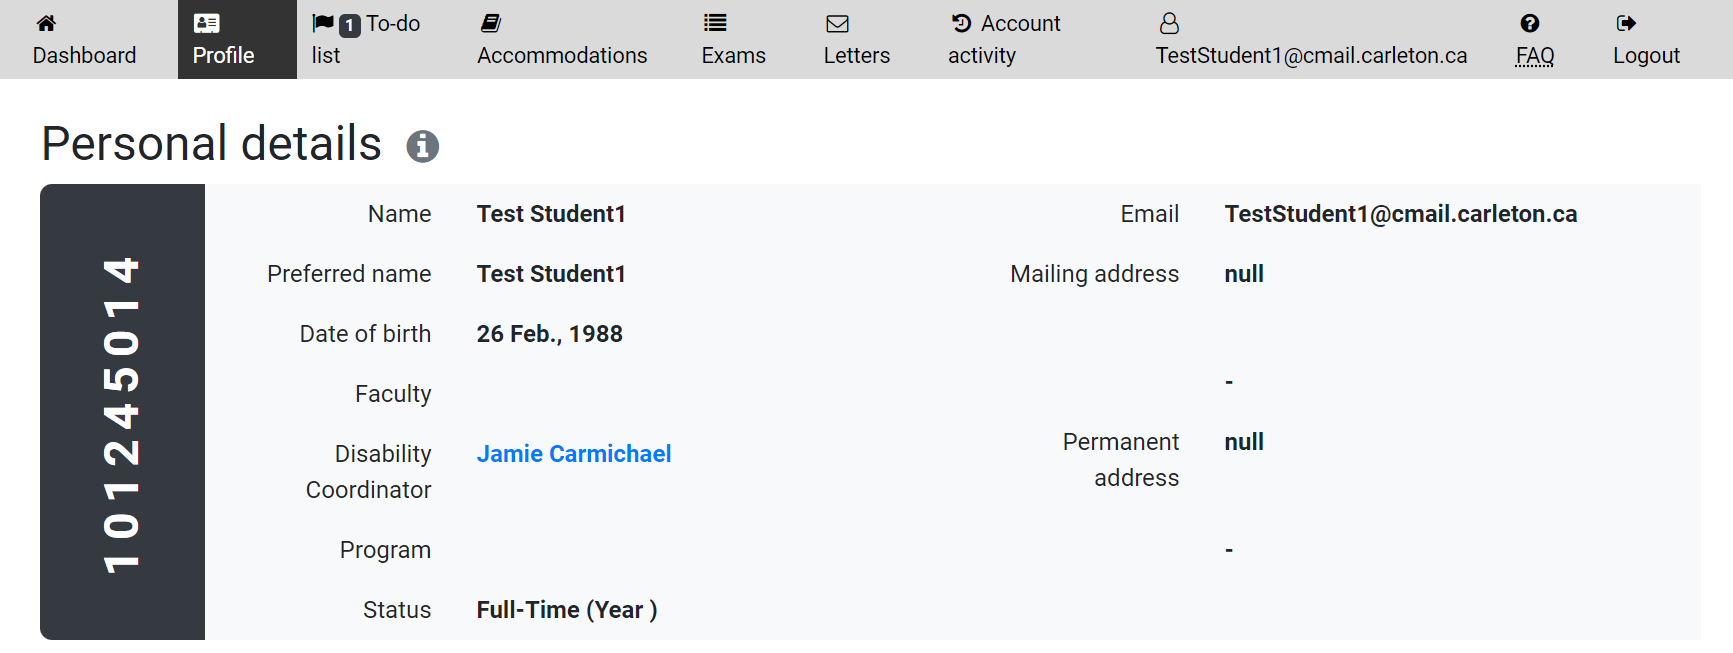
The Profile tab is where you can view the personal details and disability details that PMC currently has on file for you. In this tab, you can also add information for a new disability and upload/view supporting documentation for any of your disabilities. We will cover this information in more detail in Module 2 – Confirming/Adding Disability Information.
To-Do List Tab

Though email will be the primary form of communication with your PMC Coordinator, the To-Do List tab is used for coordinator-initiated, task-oriented communications for common tasks that students need to do, i.e. reminders for coordinator meetings you need to attend, for deadlines such as accommodations requests, or confirming participation in exams, etc. When a coordinator (or PMC front desk staff) sends you a To-Do List item, you will see who it is from, the date/time it was added, a subject line, and a deadline (if applicable). Each To-Do List item has a “view messages” button where you can view the message with clarifying details and send a quick message to whoever sent you the item.
It is up to the student then to deal with the To-Do List item, complete the task and then confirm completion by changing the status of the item from “pending” to “complete”. To the left of each item, in the Status column, there is a circle button designating whether it is “pending” (with no checkmark) or “complete” (with a blue checkmark). When you have dealt with a To-Do List item, you will need to change the item’s status by clicking on the empty circle button to mark it as “complete” with a blue checkmark. Your coordinator will be notified that you are done with the task.
If you are still working on it and/or have a quick message for your coordinator about it, you can leave it marked as “pending” or mark it as “pending” by removing the checkmark. Note: the message function is for quick confirmation messages to your coordinator or for short, clarifying questions. More involved communications must be sent via email.
Step-by-Step
To deal with To-Do List items:
- View Messages: Taking note of who the item was added by, date/time added, and any deadline, click on the View Messages button. A “Follow-up Messages” dialog appears where you can read messages from your coordinator and respond accordingly.
- Send Messages: You send a message by typing in the “Enter a Message” field and hitting the Send button.
- Change Status of To-Do List items: When you have dealt with what was asked of you in the To-Do List item, you will need to click the checkbox to change the “Status” of the item from “pending” (with no checkmark) to “complete” (with a blue checkmark), or if you have a further question or message related to the item, you will needto leave the status as pending or change it from “complete” to “pending”. To change the status, go to the Status column and click the circle:
- Clicking to add a blue checkmark changes the status to “complete”. Your coordinator will be notified that you have marked this item as complete and it will be removed from your coordinator’s list of “pending” follow-up items that they need to address.
- Clicking to remove the blue checkmark changes the status to “pending”. Your coordinator will be notified that you have marked this item as pending and it will be placed in your coordinator’s list of “pending” follow-up items for them to address.
Note: When sending a message to your coordinator via a To-Do List item, don’t forget to change the status of that item to “pending”. If they have marked it as complete and you don’t change it to pending after sending a message, your message may get lost in the shuffle.
Accommodations Tab
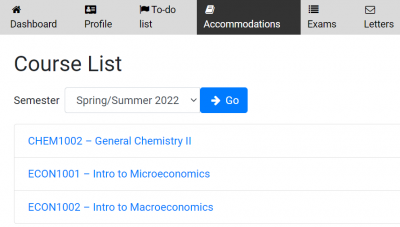 Through the Accommodations tab, you can access your list of courses for the current and upcoming semesters where you can request and check the approval status of your teaching and exam accommodations for each course you are enrolled in. From your template accommodations within each course, you can select the teaching and exam accommodations you require and submit them for approval, or decline all accommodations for any given course.
We will cover this information in more detail in Module 3 – Accommodation Requests & Letters of Accommodations.
Exams Tab
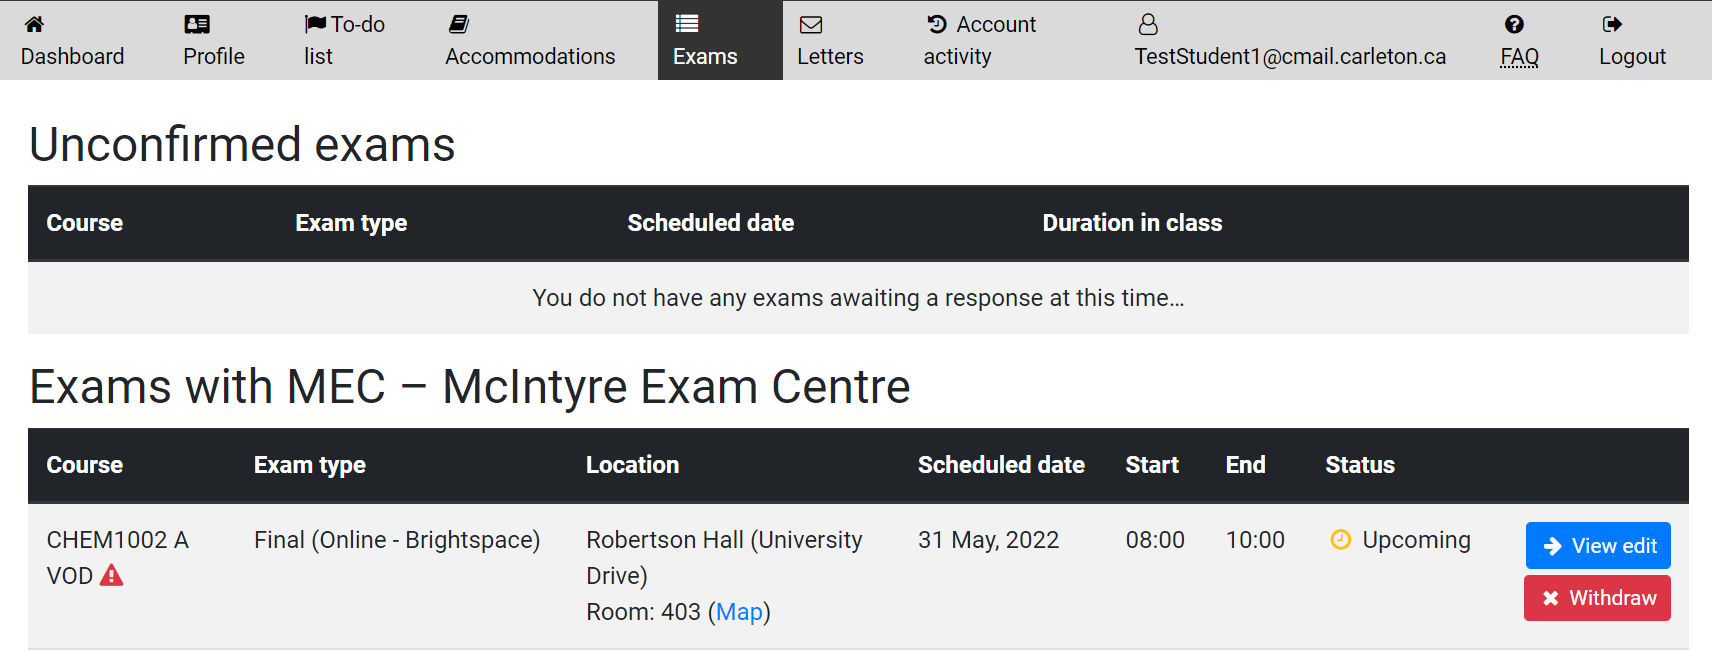
When a course instructor has issued a Notice of Examination for one of your courses, you will use the Exams tab to confirm your participation in that test or exam and to select/decline the accommodations you may or may not wish to use for that particular test or exam or opt-out of all accommodations. Providing details about the exam type (final, mid-term, quiz, whether online or in class), location, scheduled date, start and end times, the Exams tab gives you a categorized list of your tests and exams, starting with any “Unconfirmed Exams” awaiting your confirmation, followed by a list of tests/exams to be administered by the McIntyre Exam Centre (MEC) or by your professor, as well as a list of any tests/exams that you have selected to write in class without accommodations. After confirming participation, you can also use the Exams tab to check the approval status of your selected exam accommodations or withdraw completely from your accommodations arrangements for any confirmed exam.
We will cover Confirming Participation / Selecting Accommodations in more detail in Module 4 – Test and Exam Accommodations.
Letters Tab
The Letters tab gives you access to all the Letters of Accommodation (LoA) that have been issued by your PMC coordinator for any courses in which your accommodation requests have been approved.
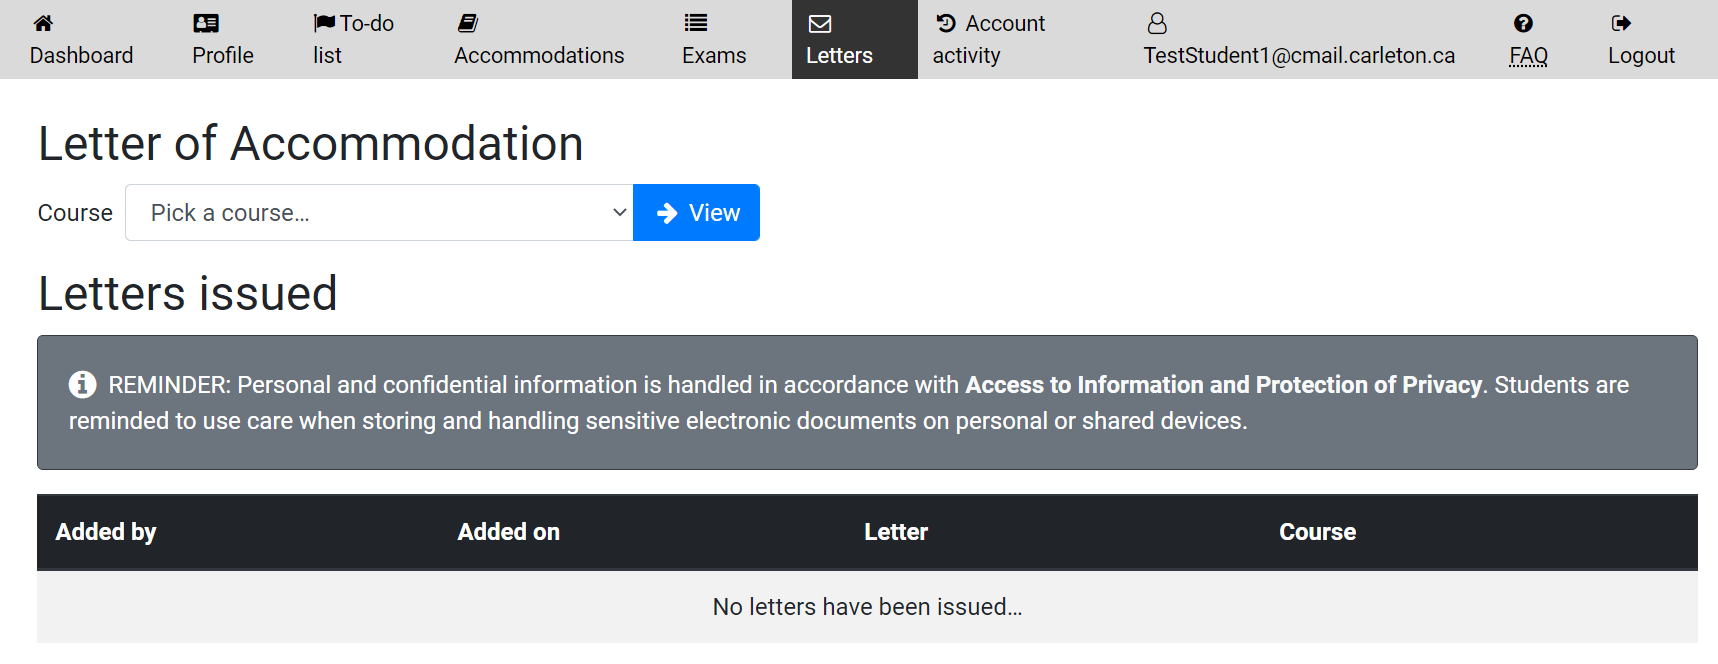
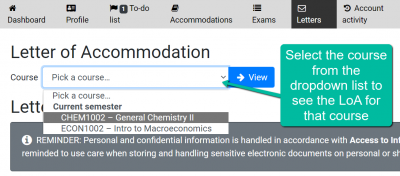 From the course dropdown, you can select the desired course and click the View button to see a copy of the LoA. Your course instructor will also be issued a copy of this letter so it will not be necessary for you to forward it to them, but you can access the letters here for your records.
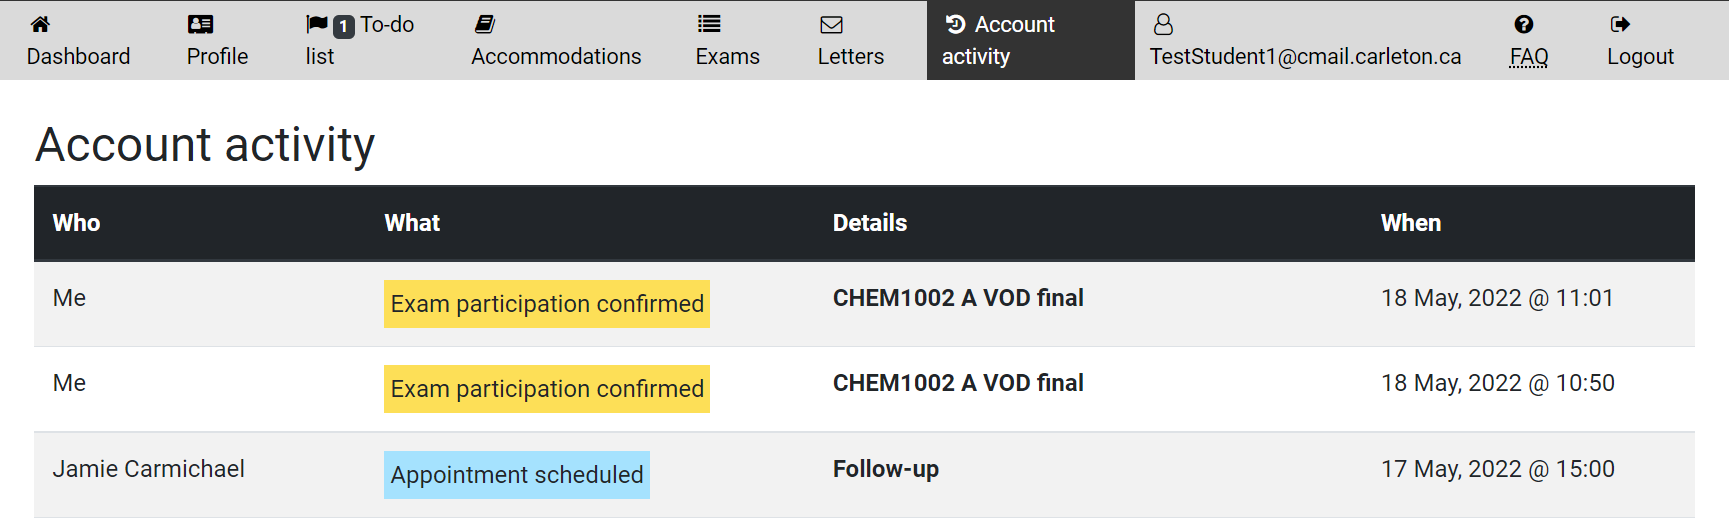
Account Activity Tab
The Account Activity tab details all activities that have occured related to your accommodations management from the creation of your Ventus account onward. This tab shows you a log of who carried what accommodations activities in which courses, logging the date and time, and providing a colour-coding of the types of activity for easy visual reference.
Resources
Ventus Student Support and FAQ
Visit the Ventus Student Support and FAQ materials for guidance on the accommodations process at Carleton and how Ventus can be used to support the management of your academic accommodations.
Ventus Support Line and Live Chat
Scheduling and Examinations Services operates the following services for Ventus-related issues and technical inquiries:
- Toll-free lines:
- From within Canada & USA: 1-877-557-2930
- Outside Canada/US: +1-613-518-2601
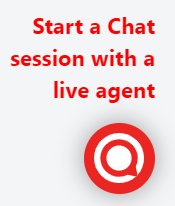
- Live Chat Support – On the Exam Services Live Chat Support page, click the icon (like the one to the right on this page) that will appear on the bottom right of the screen to chat with examination staff representative.
Toll-free lines and Live chat support are available 8:30 am -10 pm on weekdays, 8:30 am – 4:30 pm on weekends.
PMC Coordinator
Contact your PMC Coordinator if you have any questions or concerns regarding your accommodations and support.
Was this page helpful?
no one has found this useful yet.