GPU VM Account Details
Testing the GPU VM software
Troubleshooting
This page will show you how to test your virtual machine’s GPU and access and test the software that is pre-installed on it. Even though Ubuntu 24.04 is the current long release version we chose Ubuntu 22.04 because some of the dependent libraries were not available for 24.04 at the time of this installation.
GPU VM Account Details
- Image Information
-
Image Name: SCS-GPU-tensorflow-2024-08-19
Creation Date: August 19, 2024 (TBD)
Operating System: Ubuntu 22.04
Window Manager: XFCE
Intended usage: Openstack GPU virtual machine with AI programming support
- Account
-
Accessing your GPU Virtual Machine. You will be given a username and password once your VM is ready.
Please change your password as soon as the VM is provisioned for you. This can be done by logging into your VM and then opening a terminal window and typing ‘passwd’.
Please note:
- Change the default password for your account
- Your account does not have Openstack dashboard access. Access is by IP address only.
- There are no system backups for your VM, that is, you are responsible for your own backups!
- Accessing your GPU Virtual Machine
-
1. From outside of Carleton you will need to VPN to Carleton in order to access the VM
- VPN: Carleton VPN when connecting from outside of the campus
2. Listed are the ways you can connect to your VM:
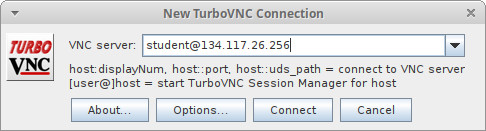
- TurboVNC (graphical desktop): download the TurboVNC client and start it and enter ‘student@134.117.26.XXX’ where XXX is the IP that was assigned to your VM. Detailed TurboVNC instructions are here
- ssh (command line): use a terminal window to gain ssh access
- System Administration
-
- You have full root/sudo privileges on your GPU VM.
- You can restart your VM using the ‘reboot’ command
- If you shutdown your VM then you need to contact an SCS Sysadmin to Start the VM for you
- If your VM is in an unusable state or it is difficult to fix errors then you have the option to re-launch your VM. Please contact the SCS System Administrator to re-launch the VM for you. Re-launching it means terminating the VM (you lose all local data) and launching a new instance.
- Sometimes the VM is not accessible via TurboVNC but you can access it using an ssh terminal like putty
- run the command ‘passwd’ to change your local Ubuntu password
- Software
-
This is the tested software installed on this virtual machine.
Software Version NVIDIA Driver Ver. 550.90.07 CUDA Driver Version 12.4 CUDA Runtime Version 12.3 cuDNN 8.9.7 GCC 9.5.0 / 11.4.0 / 12.3.0 Bazel 6.5.0 OpenCV 4.5.4 Python software:
Software Version Python 3.10.12 Pip3 24.2 Tensorflow 2.16.1 Python-torch 2.4.0+cu118 Keras 3.4.1 Pandas 2.2.2 Numpy 1.26.4
Testing the GPU VM software
Here are some helpful tests to see if your software is running correctly.
This image has a script that tests all the AI software:
python3 /home/student/os-scripts/ai-software-test.bash
- Probing your GPU
-
This command allows you test if the GPU is being detected, identifies the GPU and shows any running jobs, utilisation, and memory usage in real time:
nvidia-smi -l
You should be able to view a realtime command prompt window that shows:
CUDA version
GPU name
What job is running on your GPU
Stats about your GPU: realtime heat, load and memory usage
- Testing CUDA
-
There are CUDA samples that you can download, compile and run for your version of CUDA. These samples have been compiled for you in your account. One of the samples probes your GPU and gives you detailed spec’s about it. You can try to run this sample code in the student account’s xterm shell:
/home/student/cuda-samples/Samples/1_Utilities/deviceQuery/deviceQueryThis is an excellent test to check:
- if your GPU is detected
- if CUDA is installed correctly
- the hardware and software details of your GPU
The output for in this instance looks like:
CUDA Device Query (Runtime API) version (CUDART static linking)Detected 1 CUDA Capable device(s)
Device 0: “NVIDIA A16”
CUDA Driver Version / Runtime Version 12.4 / 12.3
CUDA Capability Major/Minor version number: 8.6
Total amount of global memory: 14878 MBytes (15600910336 bytes)
(010) Multiprocessors, (128) CUDA Cores/MP: 1280 CUDA Cores
GPU Max Clock rate: 1755 MHz (1.75 GHz)
Memory Clock rate: 6251 Mhz
Memory Bus Width: 128-bit
L2 Cache Size: 2097152 bytes
Maximum Texture Dimension Size (x,y,z) 1D=(131072), 2D=(131072, 65536), 3D=(16384, 16384, 16384)
Maximum Layered 1D Texture Size, (num) layers 1D=(32768), 2048 layers
Maximum Layered 2D Texture Size, (num) layers 2D=(32768, 32768), 2048 layers
Total amount of constant memory: 65536 bytes
Total amount of shared memory per block: 49152 bytes
Total shared memory per multiprocessor: 102400 bytes
Total number of registers available per block: 65536
Warp size: 32
Maximum number of threads per multiprocessor: 1536
Maximum number of threads per block: 1024
Max dimension size of a thread block (x,y,z): (1024, 1024, 64)
Max dimension size of a grid size (x,y,z): (2147483647, 65535, 65535)
Maximum memory pitch: 2147483647 bytes
Texture alignment: 512 bytes
Concurrent copy and kernel execution: Yes with 2 copy engine(s)
Run time limit on kernels: No
Integrated GPU sharing Host Memory: No
Support host page-locked memory mapping: Yes
Alignment requirement for Surfaces: Yes
Device has ECC support: Enabled
Device supports Unified Addressing (UVA): Yes
Device supports Managed Memory: Yes
Device supports Compute Preemption: Yes
Supports Cooperative Kernel Launch: Yes
Supports MultiDevice Co-op Kernel Launch: Yes
Device PCI Domain ID / Bus ID / location ID: 0 / 0 / 5
Compute Mode:
< Default (multiple host threads can use ::cudaSetDevice() with device simultaneously) >deviceQuery, CUDA Driver = CUDART, CUDA Driver Version = 12.4, CUDA Runtime Version = 12.3, NumDevs = 1
Result = PASS
- Test CuDNN
-
The following will test:
- If your NVIDIA driver and CUDA install is working
- that your CUDNN libraries are working
To verify you have the CuDNN installed run:
sudo apt search cudnn | grep installedIt also requires environment variables that are already set for the student user in this default VM. See the CuDNN installation guide how to set the environment variables for CuDNN.
The sample code is already compiled in the ‘student’ user account. Run the sample code as follows in the shell:
/home/student/cudnn-samples/mnistCUDNN/mnistCUDNNCuDNN Sample code output should look like this:
Executing: mnistCUDNN

cudnnGetVersion() : 8907 , CUDNN_VERSION from cudnn.h : 8907 (8.9.7)

Host compiler version : GCC 11.4.0
There are 1 CUDA capable devices on your machine :
device 0 : sms 10 Capabilities 8.6, SmClock 1755.0 Mhz, MemSize (Mb) 14878, MemClock 6251.0 Mhz, Ecc=1, boardGroupID=0
Using device 0Testing single precision
Loading binary file data/conv1.bin
Loading binary file data/conv1.bias.bin
Loading binary file data/conv2.bin
Loading binary file data/conv2.bias.bin
Loading binary file data/ip1.bin
Loading binary file data/ip1.bias.bin
Loading binary file data/ip2.bin
Loading binary file data/ip2.bias.bin
Loading image data/one_28x28.pgm
Performing forward propagation …
Testing cudnnGetConvolutionForwardAlgorithm_v7 …
^^^^ CUDNN_STATUS_SUCCESS for Algo 1: -1.000000 time requiring 0 memory
^^^^ CUDNN_STATUS_SUCCESS for Algo 0: -1.000000 time requiring 0 memory
^^^^ CUDNN_STATUS_SUCCESS for Algo 2: -1.000000 time requiring 0 memory/////// more output cut for brevity ///////
Resulting weights from Softmax:
0.0000000 0.0000000 0.0000000 1.0000000 0.0000000 0.0000714 0.0000000 0.0000000 0.0000000 0.0000000
Loading image data/five_28x28.pgm
Performing forward propagation …
Resulting weights from Softmax:
0.0000000 0.0000008 0.0000000 0.0000002 0.0000000 1.0000000 0.0000154 0.0000000 0.0000012 0.0000006Result of classification: 1 3 5
Test passed!
- Check Tensorflow
-
Tensorflow version:
python3 -c 'import tensorflow as tf; print(tf.__version__)'Test tensorflow GPU support:
python3 -c "import tensorflow as tf; print(tf.config.list_physical_devices('GPU'))"Tensorflow benchmark test that tests GPU and performance:
python3 /home/student/os-scripts/tensor-bench.py
- Test pyTorch, keras and pandas
-
The following programs will test if the software is installed correctly on your VM
pyTorch
python3 /home/student/os-scripts/torch-test.pykeras
python3 /home/student/os-scripts/keras-test.pypandas
python3 /home/student/os-scripts/pandas-test.py
- TensorRT
-
NVIDIA TensorRT is a high-performance inference optimizer and runtime that delivers low latency and high throughput for deep learning inference applications.
TensorRT is installed on this image and you can check the samples here:
/usr/src/tensorrt/samples
Unfortunately the tensorflow integration is not working. Most likely this version of tensorflow is not enabled for TensorRT support. Probably the easiest way to run tensorflow with tensorRT support is to load the docker image. Note: you need to change the default docker networking, conflicts with the Carleton wireless network.
Troubleshooting
- Extend the LVM filesystem
-
Usually the file system is using all the allocated space assigned to it. When Openstack assigns disk space it will allocate the same amount as your disk mage and sometimes that disk image will have far less space than what is allocated for you. To expand your disk space to the total amount that was allocated to you can run the following command:
sudo /home/student/os-scripts/extend-lvm.sh /dev/vdaLVM is the logical volume manager that allows ‘dynamic’ allocation of disk space.
- NUMA node read from SysFS...
-
Because this is ‘bleeding’ edge software you can expect some software issues. This one in particular is concerning NUMA node error reading from memory. If you want to fix this particular ‘warning’ there is a bash script you can run:
sudo /home/student/os-scripts/numa-node-fix.bashReference: https://gist.github.com/zrruziev/b93e1292bf2ee39284f834ec7397ee9f
- Need to use another version of gcc?
-
There are two versions of gcc installed on this VM. You can use the update-alternatives to switch between the versions:
sudo update-alternatives --config gcc
Share: Twitter, Facebook
Short URL:
https://carleton.ca/scs/?p=18955