SSH Connection with TurboVNC
Remote Desktop Client for connecting to OpenStack instances
Table of Contents
Our OpenStack images that include desktops are preconfigured to run the turbovnc server. This server allows you to connect to your OpenStack instance using the TurboVNC client, which provides a very fast and secure desktop environment.
Step 1: Download TurboVNC Client for your OS
Download TurboVNC: TurboVNC Releases Download Page. Find the package for your computer’s operating system (OS)
- For macOS on M-series chips, select the TurboVNC-version_number–arm64.dmg
- For macOS on Intel chips, select the TurboVNC-version_number–x86_64.dmg
- For Windows 64-bit (most cases), select the TurboVNC-version_number–x64.exe
- For Windows 32-bit (old devices), select the TurboVNC-version_number–x86.exe
- For Linux, you can select a suitable source file, rpm package, etc
Step 2: Install the TurboVNC Client
Install the TurboVNC client that you downloaded. In macOS and Windows, this should be as easy double-clicking on the installer file that you downloaded in the previous step.
Some Important Notes:
- On Windows 11, the TurboVNC client does not automatically setup start-menu or desktop shortcuts to access the tool. The easiest way to open it is to click on the Windows Start button, and then type TurboVNC in the search bar. The TurboVNC Viewer App will appear under the Best Match list. If you Right-click on the icon, it will give you the option to Pin to Start. This can make it easier to find in the future.
Step 3: Open a TurboVNC desktop connection
NOTE: TurboVNC cannot be used to connect to our instances for the first time as it does not support the first logon password reset. See Login Credentials & First Login below for more information
Open the TurboVNC client app. You will see a windows similar to this:
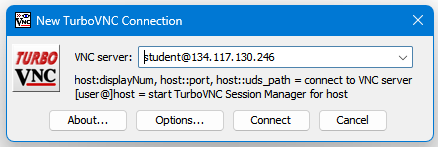
- Fill in the VNC server field to be the format username@floating-ip-address (see the Login Credentials below for information about your username and password)
- Click the Connect button
- Enter your Password when prompted
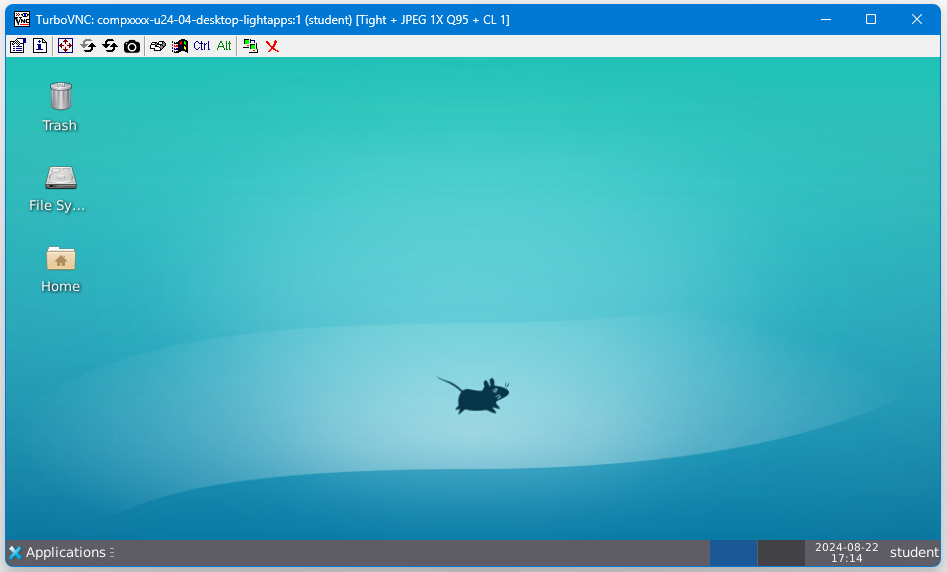
- That’s it! In a few seconds a window should open showing your desktop connection, similar to the image below
-
Login Credentials: Most of our OpenStack images share the same default credentials:
username: student
password: studentIMPORTANT: New images since (2022/2023) force a password change on the first login.
First Login Scenarios:- TurboVNC WARNING: TurboVNC does NOT support first login password changes, so your first login must use another login tool below
- vscode WARNING: vscode does NOT support first login password changes, so your first login must use another login tool below
- ssh terminal (putty, etc) first login: When you login, you will be redirect to a change password prompt. You will then have to enter the current password (student) again, and then enter your new password twice. When you change your password, it will then log you out and you have to login again with that new password
- x2go first login: When you login, you will be redirect to a change password prompt. You will then have to enter the current password (student) again, and then enter your new password twice. When you change your password, it will then prompt you to click reconnect, at which point you can login again using the new password
- openstack web console first login: When you login, you will be redirect to a change password prompt. You will then have to enter the current password (student) again, and then enter your new password twice. In this case, you stay connected. The next time you login, you will need the new password
WARNING: If you are using an older image (pre-2022) that does not enforce an ssh key or a password change, then we strongly encourage you to immediately change your password or setup an ssh key!
Example TurboVNC Desktop Window: Your TurboVNC Desktop Windows should look similar to the image below:
Optional: Reconnect to a TurboVNC Session
If you want to reconnect to a TurboVNC session, you can simply close the TurboVNC window, without actually logging out of the desktop. This will save your session for you to connect to at a later time.
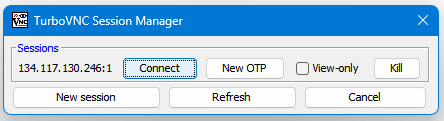
- If you have a TurboVNC session already running when you connect, you will see an additional window after the password prompt
- To reconnect to a previous session, click the Connect button next to the appropriate session (there could be more than one)
- To start a new session, click the New Session button.
BUG: TurboVNC connections will fail after an update
If TurboVNC is updated on your instance, you may have a situation where connections from the TurboVNC client subsequently fail. This is caused by a bug where TurboVNC is unable to identify the proper Linux Window Manager being used on your instance.
Solution:
- Use an ssh terminal session to connect to your instance
- On the instance, open the file:
/etc/turbovncserver.confand add the line$wm = "xfce";to the end of the file. Close the file and save it - Attempt to connect to the instance using your TurboVNC client