Accounts
- What do I do once I am locked out? How long does it last?
-
Accounts can be locked out for up to 30 minutes. To have your account unlocked, log into myonepassword.carleton.ca and select the option to “Unlock MyCarletonOne Account”. If you continue to have issues, please contact the ITS Service desk.
- Email at Carleton
-
Email at Carleton University is powered by the Microsoft M365 for Education service, it features a 50 GB of storage inbox and access to the MS Office suite.
Information about accessing your Carleton email account is found here.
- My MC1 Password works for some but not all Services
-
For example: I can access by Carleton email and not my MediaSpace account.
Alumni retain access to Carleton email and Carleton Central to manage key university services like transcripts, tax forms, and contact information. However, access to educational tools such as Brightspace, Zoom, and MediaSpace is tied to active course enrolment and instructional needs. These platforms are licensed for current students, faculty, and staff to support teaching and learning, and access is removed when a student graduates or is no longer registered in courses.
If you believe you ought to have access to these systems, please submit a support request.
- MC1 Password Requirements
-
The MC1 password must meet these criteria:
- Password must be between 8 to 15 character(s) with no spaces.
- Password must contain at least 1 lowercase and 1 uppercase letter.
- Password must contain at least 1 numeric character.
- Password will only accept the following special character(s) ! . _
- Password must not contain your username or display name.
- Password must not be one of your 5 previous passwords.
- Password cannot be changed for 1 day after the last password change.
- When is my Brightspace account created
-
- The student is active for the coming or next school term (registered in a course)
- Multi Factor Authentication (MFA)
-
Students will automatically begin seeing prompts to set up MFA when they attempt to log into Carleton services using their MyCarletonOne password.
Student information about Microsoft MFA and their MC1 account
Staff MFA information
allow-manage
- Delegate Permission Levels
-
-
Reviewer With this permission, the delegate can read items in your folders.
- Author With this permission, the delegate can read and create items, and change and delete items that he or she creates. For example, a delegate can create task requests and meeting requests directly in your Task or Calendar folder and then send the item on your behalf.
-
Editor With this permission, the delegate can do everything that an Author has permission to do and additionally can change and delete the items that you created.
-
- Make Someone my Delegate
-
A delegate automatically receives Send on Behalf permissions. By default, the delegate can read only your meeting requests and responses. The delegate isn’t granted permission to read other messages in your Inbox.
- Click the File tab.
- Click Account Settings, and then click Delegate Access.
- Click Add.If Add doesn’t appear, an active connection might not exist between Outlook and Exchange. The Outlook status bar displays the connection status.
- Type the name of the person whom you want to designate as your delegate, or search for and then click the name in the search results list.
Note: The delegate must be a person in your organization’s Exchange Global Address List (GAL).
- Click Add, and then click OK.
- In the Delegate Permissions dialog box, accept the default permission settings or select custom access levels for Exchange folders.If a delegate needs permission to work only with meeting requests and responses, the default permission settings, such as Delegate receives copies of meeting-related messages sent to me, are sufficient. You can leave the Inbox permission setting at None. Meeting requests and responses will go directly to the delegate’s Inbox.
Note: By default, the delegate is granted Editor (can read, create, and modify items) permission to your Calendar folder. When the delegate responds to a meeting on your behalf, it is automatically added to your Calendar folder.
- To send a message to notify the delegate of the changed permissions, select the Automatically send a message to delegate summarizing these permissions check box.
- If you want, select the Delegate can see my private items check box.
Important: This setting affects all Exchange folders. This includes all Mail, Contacts, Calendar, Tasks, Notes, and Journal folders. There is no way to grant access to private items in only specified folders.
- Click OK.
Notes:
- Messages sent with Send on Behalf permissions include both the delegate’s and your names next to From. When a message is sent with Send As permissions, only the your name appears.
-
Once you add someone as a delegate, they can add your Exchange mailbox to their Outlook profile. For instructions, see Manage another person’s mail and calendar items.
- Change permissions for a delegate
-
-
Click the File tab.
- Click Account Settings, and then click Delegate Access.
- Click the name of the delegate for whom you want to change permissions, and then click Permissions.
Note: If you want to remove all Delegate Access permissions, don’t click Permissions but instead click Remove and skip the rest of these steps.
- Change the permissions for any Outlook folder that the delegate has access to.
- To send a message to notify the delegate of the changed permissions, select the Automatically send a message to delegate summarizing these permissions check box.
Note: If you want copies of meeting requests and responses that you receive to be sent to a delegate, ensure that the delegate is assigned Editor (can read, create, and modify items) permission to your Calendar folder, and then select the Delegate receives copies of meeting-related messages sent to me check box.
-
- What happens to my Cmail after I graduate?
-
Carleton University students are assigned an email address at the time of admission to a course of study and retain it for life.
- I need a departmental email address
-
If you require an Email address for your department, team or event, Staff and Faculty can request a new Email address using the Customer Portal
- How do I access a shared mailbox?
-
You must have a Staff @cunet email address.
Junk-Email
- Block/Unblock sender from sending you email
-
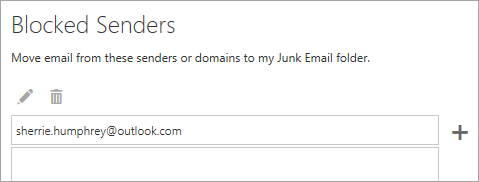
If you’re receiving unwanted email, you can block the email addresses and domains you don’t want to receive messages from. Add any email address or domain to your blocked senders list to move these messages directly to your Junk Email folder.
Note: Email is automatically removed from the Junk Email folder after 14 days and is not recoverable. For more information, see Recover deleted email messages in Outlook on the web.
- Sign into you Carleton email via the web (Students / Staff )
- Go to Settings
 > View all Outlook settings.
 - In the left pane, select Mail > Accounts > Block or allow.
- Under Blocked Senders, enter the email address or domain that you want to block and select
 .
.
- Select Save
 .
.
To unblock an address delete the address from the list
- Stop messages from going into your Junk Email folder
-
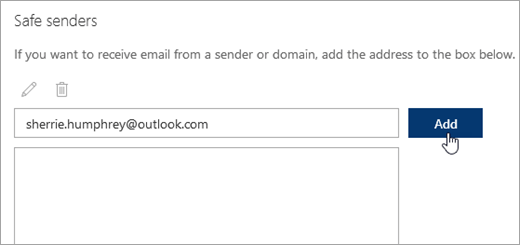
There are times when you don’t want messages from a specific person or domain to end up in your Junk Email folder. Messages from addresses or domains on the safe senders list won’t get moved to your Junk Email folder.
 > View all Outlook settings.
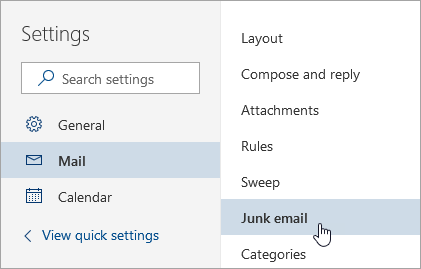
Lyris
- How Do I Get a New Lyris List Created?
-
Only a Lyris System Administrators in ITS can create or delete a list. Please complete this form and we will process your request.
- How Do I Become a Lyris List Administrator?
-
To send emails via the Lyris ListManager at Carleton University, you must be a List Administrator and have a valid user name and password. To become a Lyris List Administrator, please contact the ITS Service Desk.
ManageOther
- Add another person’s mailbox to your profile
-
If you frequently work with someone else’s Exchange mail folders, you probably will want to add the other person’s Exchange mailbox to your Outlook profile. Doing so will automatically open the other person’s mailbox every time you open Outlook. The other mailbox appears in the Folder Pane beneath your Exchange mailbox folders.
As the delegate, do the following in Outlook:
- Click File > Account Settings > Account Settings.

- On the Email tab in the list, click the Exchange account type, click Change, and then click More Settings.
-
On the Advanced tab, under Open these additional mailboxes, click Add, and then enter the mailbox name of the person whose mailbox that you want to add to your user profile. If you do not know the mailbox name, ask the person who granted you Delegate Access permissions.
- Click File > Account Settings > Account Settings.
- Send or respond to meeting requests on behalf of another person
-
To give the delegate sufficient permissions to accept meeting requests for the manager, the manager must do the following:
- Click File > Account Settings > Delegate Access.
- Click Add, then type or select, the delegate’s name, and then click Add.
- Do one of the following:
- In the Delegate Permissions dialog box, give the delegate Editor (can read, create, and change items) permissions in the manager’s Calendar folder.
- Click OK to close the Delegate Permissions dialog box, then select the check box at either My delegates only, but send a copy of meeting requests and responses to me or My delegates only.
To respond to meeting requests
- Open the other person’s Inbox if his or her meeting requests are not sent to you directly.
- Open the meeting request.
- Click Accept, Tentative, or Decline.
To send a meeting request
- Open the other person’s calendar.
- On the Home tab, in the New group, click New Meeting.
- Enter the attendees, subject, location, and start and end times as you ordinarily do.
- Create or reply to an email message on behalf of another person
-
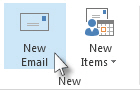
- In Mail, click Home > New Email.
- On the Options tab, in the Show Fields group, click From.
- In the From box, type the name of the person on whose behalf you are sending the message.
To select the name from a list in the Address Book, click From.
- Add recipients, a subject, and the contents of the message as you typically do.
To reply to an email message
- In the other person’s mailbox, select the message that you want to reply to on behalf of your manager.
- Click Home (If you have opened the message, click Message), and then click Reply, Reply All or Forward.

- On the Options tab, in the Show Fields group, click From.
- In the From box, type your manager’s name. To select the name from a list in the Address Book, click From. If you don’t see the From button and box, click Options > From.
- Add recipients, a subject, and the contents of the message as you typically do.
- In Mail, click Home > New Email.