Instructors can create groups of students in D2L Brightspace to use for group assignments, discussion groups and more. It is possible that a student can be in more than one group in a course. Students can be placed randomly in a group, or may be able to select their own.
Lockers provide online file storage within Brightspace. Groups may have a shared locker where files can be uploaded and shared with group members and the instructor. While each student has a personal locker, it is not recommended to use this as a personal file management, as it is limited to 10MB of content and is only accessible through the groups tool.
| NOTE: While lockers are a good place to share files with group members, it is recommended to use OneDrive for any collaborative document or live-editing needs. |
Viewing Groups
- Log into Brightspace with your MyCarletonOne username and password.
- Select your course under My Courses or the course selector grid

- Select Tools in the course navbar.

- Select Groups. This will take you to a list of the groups you are a member of for the present course.
- Select the number in the Members column to view all group members.
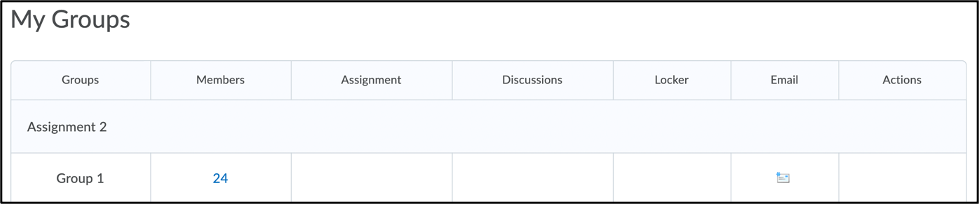
- Select the email icon
 in the Email column to send an email to the group.
Self-Enroll in a Group
If an instructor has enabled group self-selection, students will need to sign up for a group of their choosing. These groups will have likely restrictions on how many students can join.
- Select Tools in the course navbar.
- Select Groups.
- Select View Available Groups.
- Review the groups currently available. If other students have enrolled in a group, select the number in the Members column to see the list of students currently enrolled.
- Select Join Group to join a group.
You are now a member of the group.
Using a Group Locker
- Select Tools in the navbar.
- Select Groups.
- Select Group Files under the Locker column to open a group locker.
NOTE: If you do not see Group Files listed in the Locker column, there is no locker for this group. - Any files uploaded to the locker will be listed on this page.
- Select a file name to open the file.
To Upload a File
- Select Tools in the navbar.
- Select Groups.
- Select Group Files under the Locker column to open a group locker.
- Select Upload Files.
- Select Upload.
- Select the file to upload from your computer.
TIP: Ensure the file has a descriptive name to identify it. Add any additional information in the Description box. The description will display under the file name in the locker. - Select Save.
The file is now uploaded and is accessible to all group members.
To Create a File
Create a simple word file directly in a group locker.
- Select Tools in the navbar.
- Select Groups.
- Select Group Files under the Locker column to open a group locker.

- Select New File.
- Type a descriptive file name.
- Type the file text. Use the HTML editor to add any formatting, photos, videos or text styles.
- Select Save.
The file is now created and will be accessible to all group members.
To Organize a Locker Using Folders
Organize the files in a locker by creating folders.
- Select Tools in the navbar.
- Select Groups.
- Select Group Files under the Locker column to open a group locker.
- Select New Folder.
- Type a descriptive folder name.
- Select Create.
- Select the files to add to the new folder by clicking the selection box beside the file name.
- Select Move.
- Select the folder name to move them to.
- Select Move.
The files will now be saved in a folder. Create multiple files to further organize the locker.
Emailing Groups
- Log into Brightspace with your MyCarletonOne username and password.
- Select your course under My Courses or the course selector grid
- Select Tools in the navbar.
- Select Groups from the drop-down menu. You will be taken to the Groups tool.
- Select the email icon in the Email column to send an email to the group.
- A Compose New Message window will open. If you want to email specific group members, you can remove or add email addresses in the BCC field.
- Compose and format your message in the Body field
- Under Attachments, you can add an attachment to your email in the following ways:
- Select Upload to select a file from your computer.
- Select Record to create an audio or video recording within Brightspace.
- Select Choose Existing to select a file that your have already uploaded and saved to your Brightspace course.
- When you have finished composing your email, select Send.
Was this page helpful?
70 people found this useful