Note: Connecting to office PC
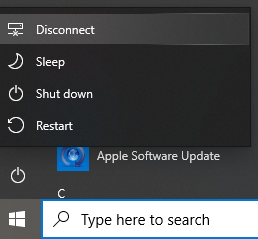 If connecting remotely to your office computer never choose the ‘Shut down’ option when disconnecting your RDP session, as that will power off your office PC and you will not be able to remotely power it back on. If you are unable to connect to your office PC please contact the ITS Service Desk at 613-520-3700 or ITS.Service.Desk@carleton.ca
REMOTE WORK CHECKLIST
If you have obtained permission to work from home, use this checklist in advance to ensure that you have the necessary equipment and that it is properly configured.
IDENTIFY if you have a computer to work from home
- Do you have a Carleton laptop you will bring home?
- Do you have an existing home computer?
Note: during the COVID-19 situation, if you do not have a mobile device or a computer at home to perform your work, staff and faculty can bring their office desktop computer home. Please confirm and let your manager know if you need to do this.
DETERMINE WHICH SERVICES you will need to access
Services that are accessible from a browser
Most faculty and staff-facing services are directly accessible from a home Internet connection, using a web browser and/or an app:
- Email exchange.carleton.ca or Outlook for Windows or Mac Mail app
- Intranet websites i.carleton.ca
- Carleton Central central.carleton.ca
- BrightSpace brightspace.carleton.ca
- OneDrive onedrive.microsoft.com or OneDrive app
- Teams teams.microsoft.com or Teams app
Services that require a VPN connection
As the number of simultaneous VPN connections into campus is limited, consider maintaining a VPN connection only as long as you actually need it.
- Network drives (W, V, P)
- SAP Concur Travel & Expense
- While you can log into Travel and Expense, www.carleton.ca/concur, without VPN, if you are approving expenses, you will need to connect over a VPN connection
- Concur info site: https://carleton.ca/facts/travel/
- Banner
- INB Banner, e.g. Banner Forms https://i.carleton.ca/banner/
- Chrome or Firefox are the recommended browsers
- Remote Desktop
- Only if you have both a computer at home and a computer left powered on at Carleton
SET UP YOUR COMPUTER for Work from Home
Services that are accessible with just a browser
If you have identified that you can work from home using services accessible from a web browser, you need only confirm you have Microsoft Azure MFA configured to use a phone or phone number accessible from home, and you are good to go.
You will find most web-based services work well with a modern web browser.
Services that require a VPN connection
- VPN configuration
- configure before you go off-campus — contact the Service Desk during business hours, as required
- carleton.ca/its/help-centre/remote-access
- Network Drives
- Banner INB, Forms access
- Remote Desktop Connection
- carleton.ca/its/help-centre/remote-access
- Requires a PC left at Carleton, powered up, Remote Desktop enabled; set to never sleep, and for which you know the Device name:
- Device name: Right-click Start Menu; select “System”
- Set to Never Sleep: Right-click Start Menu; select “Power Options”, set “Sleep” to “Never” (scroll to bottom of the list)
- Enable Remote Desktop (enabled by default for CUNET PCs): Right-click Start Menu; select “System”, click on “Remote Desktop”
- For CUNET domain-attached PCs, membership in the local security group named “Remote Desktop Users,” is required. Contact the Service Desk to configure.
MANAGE YOUR OFFICE PHONE NUMBER
- Setup and check your Voicemail: carleton.ca/its/help-centre/voicemail or better yet, avoid checking and…
- Have your voicemail messages automatically emailed to you: carleton.ca/phone/voicemail-advanced-voicemail/#advanced
- Request a Teleworker VOIP phone at home to provide a Carleton number at your home: carleton.ca/its/all-services/phone/list-of-services/work-from-home-teleworker/
Note: Do not take your office VOIP phoneset home before your Teleworker VOIP request is approved — your office phoneset will not work from home without an external power adapter and a license.
SET UP A VOICE BRIDGE (optional)
- Voice Bridge: you can add a Quick Conference voice bridge to your desk phone number, which gives you a voice bridge for meetings: 613-520-3456, along with a 4-digit conference ID to share: carleton.ca/its/all-services/phone/conferencing/
- Screen Sharing – Audio/Video Conferencing: You can share the contents of your computer screen with other users, using the Microsoft Teams app. The Teams app also provides voice conferencing — assuming EVERYONE is using the Teams app (on their computer or phone). If you must accommodate phone connections, then a separate Voice Bridge (e.g. see Quick Conference above) can provide the audio component of your meeting, with those using the Teams app to view shared screens, muting their microphones to prevent audio feedback over the voice bridge.
VIRTUAL MEETINGS
Teams works in web browsers but for the best experience download the App on your phone tablet or computer.
All staff and faculty are licensed to use MS Teams, a tool for running remote meetings, and can additionally invite students (or 3rd-parties) by their email address (e.g. JaneDoe@cmail.carleton.ca).
NOTE: If a particular staff/faculty member’s name does not show up in the pick-list when you start typing their name to invite them, simply have them register their @cunet.carleton.ca staff/faculty email address here: carleton.ca/its/ms-offer-faculty (The use of Microsoft Teams by staff/faculty assumes they have previously ENABLED their Office 365 “extras” license, for example to use OneDrive, or to obtain the MS Office Desktop suite for home use).
Set up a Teams Meeting
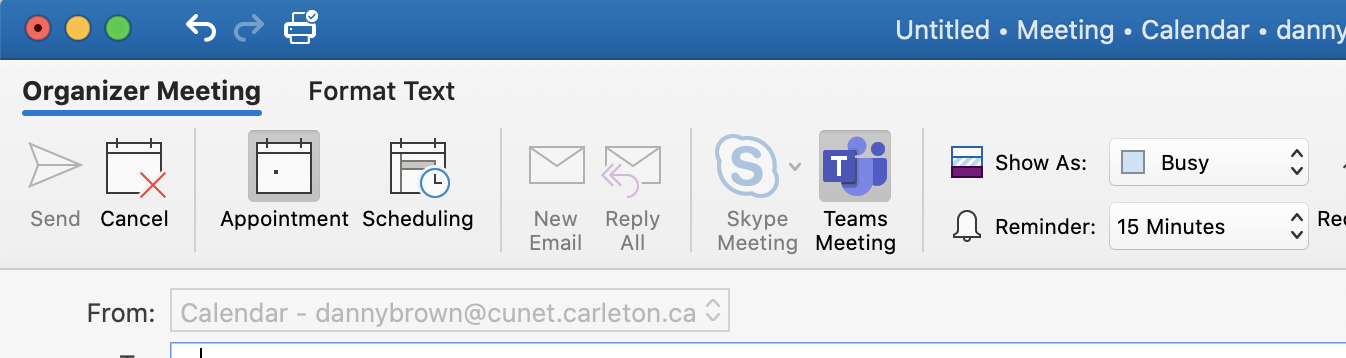
Setting up Teams meetings is built directly into Outlook on both Mac and PCs. Teams meeting links can also be sent using Exchange’s web interface, at exchange.carleton.ca.
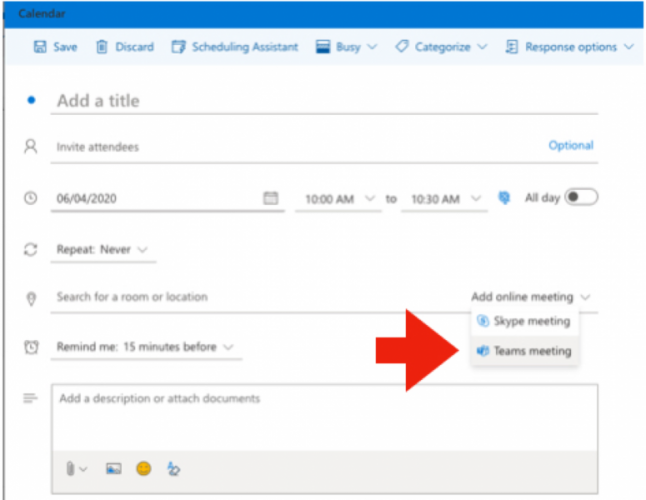
- To schedule a meeting, open Outlook and switch to the calendar view.
- Click Meeting and at the top of the view click Team Meeting
- Add intended meeting attendees as per usual meeting invites.
Teams meeting details will be added after you send the invitation.
Join a Teams Meeting
Emails inviting you to Teams meeting will contain a link to Join Microsoft Teams Meeting
- Click the link and your Teams App should open.
Share your Desktop
- In a call or meeting, move your mouse across the window to display the Call Options.
- Select the Share Desktop
- You will be prompted to choose one of your screens/desktops or windows/programs to share.
- Click on the desired content you’d like to share.
- If you’re sharing a screen, your entire desktop will shared, and the shared area will be outlined in red.
- If you’re sharing a program, only that program will be shared, and just that program will be outlined in red. As you change the size of this window, the red outline will change with it. Anything that appears over the shared program—whether a notification popping up or an application you drag over—will show up as a grey box to everyone else in the call.
- To stop sharing, choose the Stop Sharing icon in the Call Options Window.
MS Teams Reference Links
- Microsoft-provided
- Carleton-provided