vscode: Remote Access and Code Editing
Table of Contents
-
Login Credentials: Most of our OpenStack images share the same default credentials:
username: student
password: studentIMPORTANT: New images since (2022/2023) force a password change on the first login.
First Login Scenarios:- TurboVNC WARNING: TurboVNC does NOT support first login password changes, so your first login must use another login tool below
- vscode WARNING: vscode does NOT support first login password changes, so your first login must use another login tool below
- ssh terminal (putty, etc) first login: When you login, you will be redirect to a change password prompt. You will then have to enter the current password (student) again, and then enter your new password twice. When you change your password, it will then log you out and you have to login again with that new password
- x2go first login: When you login, you will be redirect to a change password prompt. You will then have to enter the current password (student) again, and then enter your new password twice. When you change your password, it will then prompt you to click reconnect, at which point you can login again using the new password
- openstack web console first login: When you login, you will be redirect to a change password prompt. You will then have to enter the current password (student) again, and then enter your new password twice. In this case, you stay connected. The next time you login, you will need the new password
WARNING: If you are using an older image (pre-2022) that does not enforce an ssh key or a password change, then we strongly encourage you to immediately change your password or setup an ssh key!
-
Your public floating IP address of your instance will have the form: 134.117.xxx.xxx – If you don’t see the 134.117 part, then you haven’t set up a floating IP address! This IP address is assigned when you run the Associate Floating IP Address command for your instance (via the OpenStack dashboard) Associate Floating IP with an Instance above.

In addition to these instructions, you can find a video tutorial here: Video: vscode: Remote Access and Code Editing
Step 1: Install vscode
The first thing you need to do is install vscode on your local device (person computer). We won’t go into the details of installing it here as it varies depending on your device (Linux, Windows, iOS). The install is usually straight-forward.
The vscode download for various platforms can be found here: vscode download
Step 2: Install Remote-SSH Extension
vscode cannot make remote connections initially. The Remote-SSH extension is required
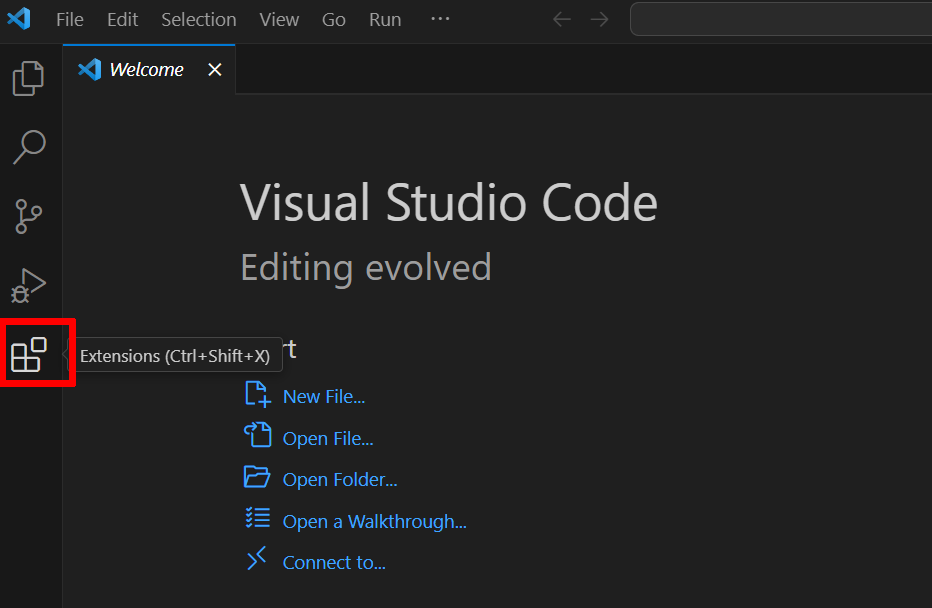
Open vscode and click on the Extensions panel button (see Red Box in the image below)
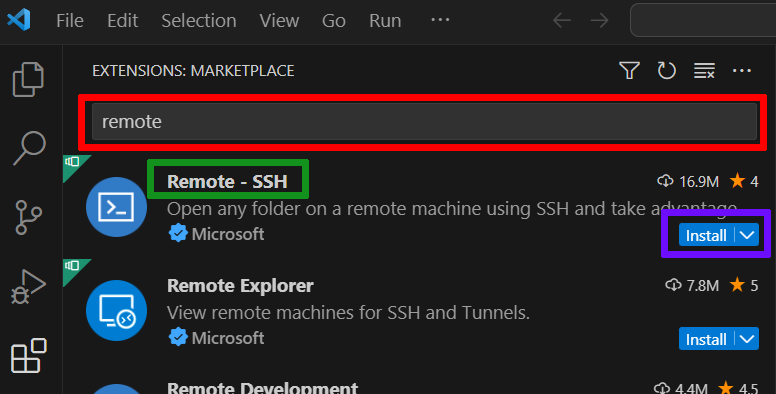
Click on the extension search bar (see Red Box in the image below) and start typing remote ssh.
The Remote – SSH extension should appear (see Green Box in the image below).
Click on the Install button (see Purple Box in the image below).
Step 3: Create Remote-SSH Connection
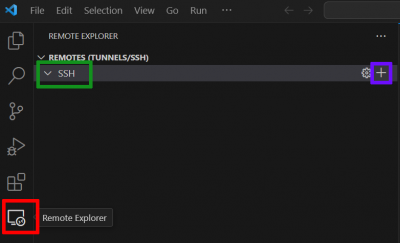
A new panel button called Remote Explorer should appear – you may have to close and reopen vscode (see Red Box in the image below). Click on the Remote Explorer button.
Expand the tree down until you see the SSH branch (see Green Box in the image below).
Click on the plus (+) button to begin adding a new SSH connection (see Purple Box in the image below).
In the SSH Connection box that opens (see Red Box in the image below)
Enter ssh student@134.117.130.199 – replacing the IP with you own 134.117.#.# IP address

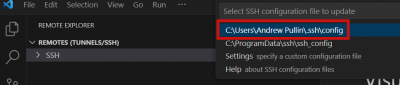
It will ask you to save the connection information to an ssh config file. The default one will vary depending on what operating system you are running. In general you can select the first option (see Red Box in the image below)
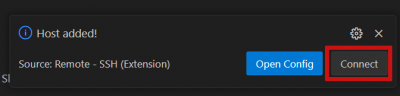
A pop-up will appear saying the host was added. If you want, you can manually modify the ssh config file by clicking Open Config. However, this is not required, and in this case we will just click Connect (see Red Box in the image below)
You will then be prompted for the password for the student account (see Red Box in the image below).

It will then show a pop-up on the bottom right showing the vscode-server being added to the remote account. This make take a few moments to complete.

And that should complete adding the connection. A new empty vscode workspace should open that is connected to that remote server.
Step 3 OPTIONAL: SSH with a Jump Host (No VPN) and Passkeys
As an alternative to VPN, you can ssh through the SCS access.scs.carleton.ca jump host. You can see this article for more information on using the access as a jump host.
We recommend you confirm with a regular ssh shell (terminal) application that you are able to use the access jump host to jump to your target server (eg: your openstack instance).
Once confirmed you can edit the vscode ssh config file manually and add the below config:
NOTE: If you are only connecting with a password, do NOT include the OPTIONAL IdentityFile and AddKeysToAgent options below, as they do not apply. If you wish to use the public/private key IdentityFile so that you do not need to types your password every time, then you should follow this article that explains how to set those up.
Host access-jump-host
  HostName access.scs.carleton.ca
  User cmail_username
  # OPTIONAL use of identify file (so you do not have to use a password)
  IdentityFile /Path/To/Private/Key/privatekey.ed25519
  # OPTIONAL add key to your local computer's ssh agent if you use a key with a passphrase.  You will need to research how to setup the ssh agent on your particular operating system (beyond the scope of this article)
  AddKeysToAgent yes

Host my-openstack-instance
  # The below IP must be your openstack IP or other destination server
  HostName 134.117.128.32
  User student
  ProxyJump access-jump-host
  # OPTIONAL use of identify file (so you do not have to use a password)
  IdentityFile /Path/To/Private/Key/
  # OPTIONAL add key to your local computer's ssh agent if you use a key with a passphrase.  You will need to research how to setup the ssh agent on your particular operating system (beyond the scope of this article)
  AddKeysToAgent yes
Once you have saved the above ssh config in vscode, replacing usernames, IPs, etc as required for your particular situation, you will now see my-openstack-instance as a connection option when you open a new remote ssh connection in vscode.
Step 4: Open Folder on Remote Server
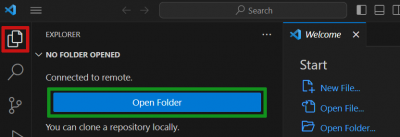
Now that the vscode workspace is connected to the remote server, we need to open a folder. Click the Explorer navigation button (see Red Box in the image below) and click Open Folder (see Green Box in the image below)
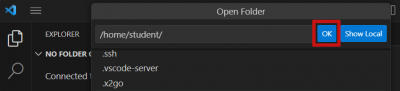
The open folder search box will automatically start in the home directory (/home/student) of the student account, so simply click OK (see Red Box in the image below) unless you want to open a specific sub-folder.
You will again be asked to enter the password for the student account (see Red Box in the image below)

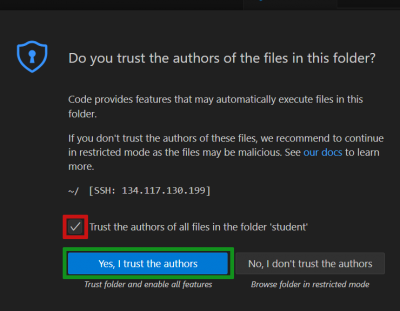
A window will pop up asking if you trust the authors of files in this folder. If a check box is shown to trust all files in the folder ‘student’, check it (see Red Box in the image below), although this may not appear in all cases. Click Yes, I trust the authors (see Green Box in the image below)
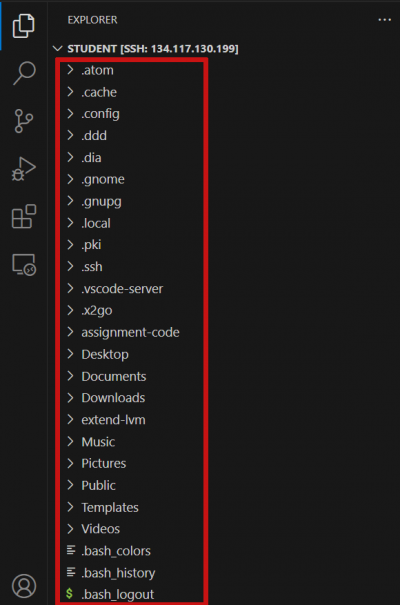
The Explorer view will now show all of the files and folders in the student account home directory (see Red Box in the image below).
NOTE: The exact content of the directory will vary depending on which course image you are connecting
Step 5: Open a terminal, edit some code, run some code!
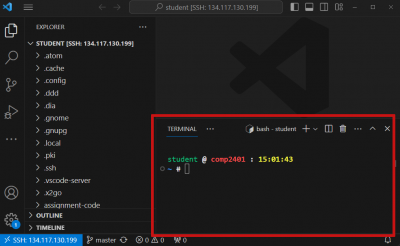
It can be convenient to open a terminal window so we can run commands just like we would if we had ssh’d into the system. You can open a terminal window in many ways. Here are three easy ones:
- With the Ctrl + ` (Ctrl + backtick) hot key
- By right-clicking on any file or folder in the student home directory and clicking Open in Integrated Terminal
- By clicking on any file or folder in the student home directory, and going to the View menu and click Terminal
Either of these actions will open a terminal, as seen in the Red Box in the image below
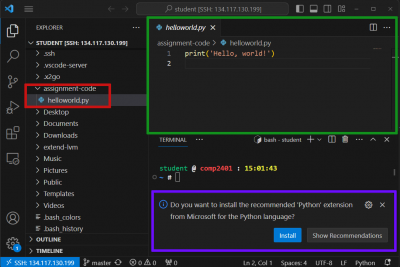
Next, we can open a file to edit with vscode. In the example below, we have a folder called assignment-code, with a python file called hello-world.py (see Red Box in the image below). If you click on the hello-world.py file, it will open the file in the workspace so you can edit it (see Green Box in the image below).
NOTE: If this is the first time you have edited a python file, vscode may helpfully offer to install a python extension to help with you python coding (see Purple Box in the image below). It will often do this for any programming language that you open for the first time. It is up to you to decide if you want this extension. In some cases, your instructor may ask that you install specific extensions with certainly capabilities. So make sure to check your course notes.
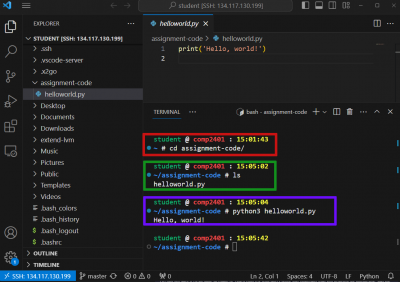
We can use the terminal window to conveniently run commands. In this example, we manually run the python program hello-world.py.
- First we cd assignment-code to get into the assignment directory (see Red Box in the image below)
- Then we enter ls to list the files and make sure we see the hello-world.py file (see Green Box in the image below)
- Then we run the python file with python3 hello-world.py and we see the output (it prints Hello, world!”) (see Purple Box in the image below)
NOTE: The commands you run to execute code will vary, this is just one example of a possible way of running a python file
Troubleshooting: Failed Login
vscode failed logins are most often caused by two things:
- New Openstack Instance with Expired Password: New openstack instances have a default username and password, and the password is expired and must be changed. This cannot be done through the vscode remote connection interface, so you must use a different Connection Tool to connect to your instance for the first time. Once you have set a new password, you can use vscode normally.
- Instance Disk Full: If an instance’s disk drive fills up, it will not be possible to login with vscode as the tool needs to setup temporary files to initialize. The indicator of this problem is (usually): when you enter the password, vscode will hang, sometimes showing an installing vscode server message that never goes away. If you see that behavior, it is likely that the disk is full. You must login with another Connection Tool, free up some disk space, and then return to using vscode.
Troubleshooting: Disk Full
vscode installs a lot of libraries and support tools to make you coding easier. It also stores a cache of all the original downloaded installers, which it keeps even after the tool has been successfully added to vscode. It is quite common for all of this to quickly fill an openstack instance’s disk drive. Check with your course instructor for instructions on how to clear the vscode cache as it can vary.