SCS GPU VM 2026-7
This page will show you how to access your SCS GPU VM and test AI software.
GPU VM Account Details
-
Image Name: SCS-GPU-U26.04-tensorflow-2026-08-25
Creation Date: August 25, 2026
Operating System: Ubuntu 26.04
Window Manager: XFCE
Intended usage: Openstack GPU virtual machine with AI programming support -
Accessing your GPU Virtual Machine.
- You will be given a username and password once your VM is ready.
- Please change your password as soon as the VM is provisioned for you. This can be done by logging into your VM and then opening a terminal window and typing ‘passwd’.
Please note:
- Your account does not have Openstack dashboard access. Access is by IP address only.
- There are no system backups for your VM, that is, you are responsible for your own backups!
-
1. From outside of Carleton you will need to VPN to Carleton in order to access the VM
- VPN: Carleton VPN when connecting from outside of the campus
2. Listed are the ways you can connect to your VM:
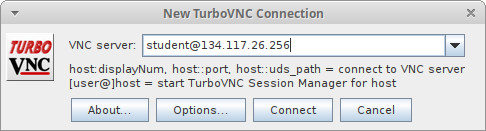
- TurboVNC (graphical desktop): download the TurboVNC client and start it and enter ‘student@134.117.26.XXX’ where XXX is the IP that was assigned to your VM. Detailed TurboVNC instructions are here
- ssh (command line): use a terminal window to gain ssh access
-
- You have full root/sudo privileges on your GPU VM.
- You can restart your VM using ‘sudo reboot’ command
- If you shutdown your VM then you need to contact an SCS Sysadmin to Start the VM for you
- If your VM is in an unusable state or it is difficult to fix errors then you have the option to re-launch your VM. Please contact the SCS System Administrator to re-launch the VM for you. Re-launching it means terminating the VM (you lose all local data) and launching a new instance.
- Sometimes the VM is not accessible via TurboVNC but you can access it using an ssh terminal client (built into Windows 11 powershell)
- run the command ‘passwd’ to change your local Ubuntu password
- the software was installed using venv (see commands below)
-
When using SCS GPU resources for AI and deep learning, students should use data legally and ethically, protect privacy, and follow university policies and applicable laws. Do not upload, store, or process sensitive, confidential, or personal data unless you are explicitly authorized to do so, since AI workflows and remote systems can increase the risk of accidental data leakage. Models should also be checked for bias, limitations, and accuracy, and AI-generated outputs should not be treated as unquestionable fact. Wherever possible, programs and experiments developed on these systems should aim to serve the greater good and avoid applications that could cause harm, recognizing that well intentioned projects can still have unintended negative impacts if these risks are not carefully assessed in advance. Please review any concerns about your project with your course instructor or faculty member.
-
This is the tested software installed on this virtual machine. Please note you need to source the venv environment in order to use this software: source ~/venvs/ai/bin/activate
Software Version NVIDIA Driver Ver. 610.57.04 CUDA Driver Version 13.3 CUDA Runtime Version 13.3 GCC 15.2.0 OpenJDK 21.0.11 Bazelisk 1.29.0 Python software:
Software Version Venv Python 3.14.4 / 3.13.7 Tensorflow / PyTorch Pip3 26.2.1 None Tensorflow 2.21.0 ~/venvs/tensorflow-project/.venv/bin/activate Python-torch 2.13.0 ~/venvs/ai/bin/activate Keras 3.15.1 ~/venvs/tensorflow-project/.venv/bin/activate Pandas 3.0.5 ~/venvs/tensorflow-project/.venv/bin/activate NumPy 2.5.2 ~/venvs/tensorflow-project/.venv/bin/activate -
venv allows you to load conflicting software on the same VM. For example, PyTorch and Tensorflow use different python versions so they get their own venv space to install. This VM has the following venv environments:
PyTorch
- source ~/venvs/ai/bin/activate
- Test that its working: python ~/os-scripts/test-pytorch.py
Tensorflow
- source ~/venvs/tensorflow-project/.venv/bin/activate
- Test that its working: python ~/os-scripts/test-tensorflow.py
Useful venv commands
- To deactivate the current venv run: deactivate
- Check wether you are in a virtual env: echo “${VIRTUAL_ENV:-No virtual environment active}”
Software Tests
In order to test the software you need to load the correct venv (see above) environment:
| Software Test | venv | Test Script (~/os-scripts) |
|---|---|---|
| ‘Test your GPU’ | None Required | nvidia-smi |
| CUDA | None Required | cuda-samples-13.3/build/cpp/1_Utilities/deviceQuery/deviceQuery |
| Bazelisk | None Required | test-bazelisk.sh |
| Panda / NumPy | Tensorflow | python test-panda-numpy.py |
| PyTorch | PyTorch | python test-pytorch.py |
| Tensorflow | Tensorflow | python test-tensorflow.py |
VM Basics
- It is safe to reboot your VM. Just like your desktop or laptop you will kill any running processes but your data will be intact. It is not uncommon for your GPU to be mis-configured after an update, many times a reboot will load the new libraries and your GPU will be detected once again. To reboot your system ssh to your VM and run: sudo reboot
- Extend the filesystem: Usually the file system is using all the allocated space assigned to it. When Openstack assigns disk space it will allocate the same amount as your disk image and sometimes that disk image will have far less space than what is allocated for you. To expand your disk space to the total amount that was allocated to you can run the following command: sudo /home/student/os-scripts/extend-disk.sh /dev/vda . More: https://carleton.ca/scs/2024/extend-disk-space/