Using SSH Keys to Support Multi-node Compute Tools & Scripts
Step 1: Set up Multiple Compute Nodes
Step 2: Update hostname of the compute nodes
Step 3: Set up the SSH Keys and Environment
Step 4: Replicate the SSH Environment
Step 5: Replicate /etc/hosts file
Step 6: Test Your Passwordless SSH Connections!
Graphic: Set up of SSH Enabled Multi-node Compute Environment
Copy Files Between Remote Nodes
This guide will take you through the steps of setting up a multi-node compute environment that uses ssh keys to support scripts and computing tools that communicate and move data between the compute nodes.
You can learn more general information about passwordless ssh login here:
Passwordless SSH With Key Pairs
Step 1: Set up Multiple Compute Nodes
For this example, we will set up the following nodes (instances) on:
- primary-node – main control node for your multi-node environment; this node will typically have an OpenStack floating IP address assigned so that you can access the environment from the Carleton network (either an on-campus computer or your home device using VPN).
- node-1, node-2, node-3, …, node-n – compute nodes (as many as required)
Instructions for setting up nodes (instances), assigning floating IPs, and connecting to instances can be found here: OpenStack Step-by-Step Guide
Step 2: Update hostnames of the compute nodes
In this step, you will need to edit two system files: /etc/hostname and /etc/hosts. To do so, you will need to open them with root privileges by prefixing your command with the sudo command. For example, you can use the simple nano editor to edit one of the files like so:
sudo nano /etc/hostname – sudo checks that your user is authorized to run commands as root and will prompt for your password
- On the primary-node and node-1 -> node-n, edit the
/etc/hostnamefiles to have a suitable name for each host. After a reboot, this will be reflected in the system name that appears on the console, the shell and the desktop. This is helpful for making sure you do not make changes to the wrong system! - On the primary-node, edit the
/etc/hostsfile to includeIP HOSTNAMErecords.
For example:192.168.5.123 primary-node192.168.5.179 node-1192.168.5.65 node-2192.168.5.221 node-3
NOTE 1: You will need to find the IP address of your nodes from either the OpenStack interface or running the commandsipconfigorip addron the node itself
NOTE 2: On the SCS OpenStack, the IP address will ALWAYS start with 192.168.x.x
Step 3: Set up the SSH Keys and Environment
Setting up a passwordless ssh key environment will allow your scripts or compute tools to communicate and move data between all of your compute nodes. This tutorial will not go into all the background about ssh key pairs, but you can learn more about that in this guide: Passwordless SSH With Key Pairs.
Steps for setting up the ssh key pair environment:
- Login to the primary-node as the user that will be running the scripts or compute tools and run a terminal or shell (student user works fine on most of our images)
- Create an SSH public/private key pair:
ssh-keygen
Do NOT enter the a filename (leave the default/home/student/.ssh/id_rsa)
Do NOT enter a passphrase (leave it blank)
This will create the public and private keys:~/.ssh/id_rsa– private key~/.ssh/id_rsa.pub– public key - Copy the user’s public to that user’s account on every node (including the primary-node itself):
This is done using thessh-copy-idcommand. You will need to say yes when prompted to verify the host-key (if this is the first time you are connecting to that node). You will also be prompted to enter the password for the user’s accountssh-copy-id node-1ssh-copy-id node-2ssh-copy-id node-3...ssh-copy-id node-nssh-copy-id primary-node– This will ensure that the~/.ssh/known_hostsfile has the host key for EVERY node AND the primary-node. It will also add the user’s public key to the~/.ssh/authorized_keysfile on the primary-node, meaning the private key can ALSO unlock the primary-node, in addition to node-1 -> node-n
SSH public and private key (key pair) and environment files are now set up
After completing the above steps, all four ~/.ssh/ files should be configured:
~/.ssh/id_rsa – private key
~/.ssh/id_rsa.pub – public key
~/.ssh/authorized_keys – includes the public key (It will be identical to the id_rsa.pub file if no other keys were set up previously)
~/.ssh/known_hosts – includes the host keys for EVERY host (primary-node and node-1 -> node-n)
Step 4: Replicate the SSH Environment
The SSH public and private keys and the environment files can now be COPIED from primary-node to each of node-1 -> node-n
scp ~/.ssh/* node-1:~/.ssh/
scp ~/.ssh/* node-2:~/.ssh/
scp ~/.ssh/* node-3:~/.ssh/
...
scp ~/.ssh/* node-n:~/.ssh/
Step 5: Replicate /etc/hosts file
To make it easier to move between the primary-node and node-1 -> node-n, COPY the /etc/hosts file to each node.
NOTE: Because /etc/hosts is a system file, you will need to first copy the file to each node, then ssh onto the node and use sudo to copy the file to that system’s /etc/hosts
Copy the /etc/hosts file to each node (repeat the below steps for each of node-1 -> node-n:)
- Copy the
/etc/hostsfile from the primary-node to node-1:scp /etc/hosts node-1:~/ - SSH to node-1:
ssh node-1 - Move the
hostsfile you just copied to overwrite the system/etc/hostsfile:sudo mv ~/hosts /etc/hosts
As was the case earlier in this guide, when you edit (or in this case, overwrite) a system file such as/etc/hosts, you need to prepend your command with thesudocommand
Step 6: Test Your Passwordless SSH Connections!
You should now be able to ssh between all of your nodes without using a password.
- Test from the primary-node:
ssh node-1ssh node-2ssh node-3...ssh node-nssh primary-node - Test from at least one of the nodes, such as node-1:
ssh primary-nodessh node-1ssh node-2...ssh node-n
NOTE: Ideally test all of the systems, but if you have a LOT of them, a few random tests should be sufficient
NOTE: Some tools and scripts only require that you can ssh from the primary-node to node-1 -> node-n, so you would not need to do this step.
Graphic: Set up of SSH Enabled Multi-node Compute Environment
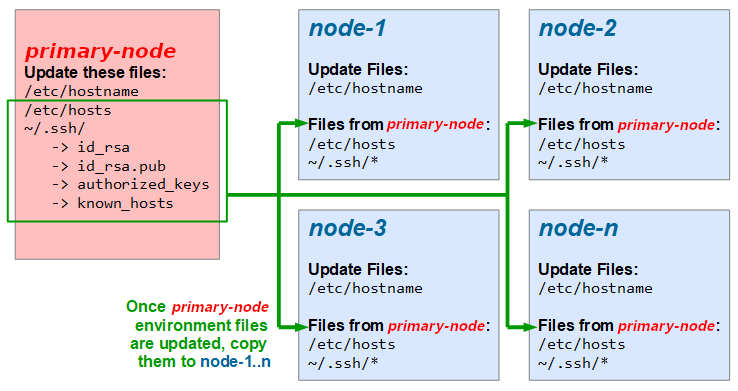
Graphical overview of setting up a multi-node compute environment, using ssh keys for inter-node connections:
Copy Files Between Remote Nodes
Once you have the ability to ssh between computers, either using passwords or the ssh keys as setup above, it is easy to copy files the computers. If you do have ssh keys setup allowing you to ssh with no password, then these tools will not prompt for a password. Here are a few example tools:
- Copy files with rsync:
rsync options source_path destination_path
rsync -r -v ~/Downloads student@node1:~/Downloads-r– tells rsync to copy files recursively (all sub-files and folders)-v– tells rsync to show the files as they are copied~/Downloads– tells rsync to copy the files in the user’s Downloads folderstudent@node1:~/Downloads– tells rsync to copy the files to the remote server node1 using the student user account, and copy the files into the student user’s Downloads directory
rsync is a powerful tool as you can specify various options that control what is copied. For example, it will not “sync” files that are already up-to-date on the destination node.
- Copy files with scp:
scp options source_path destination_path
scp -r -v ~/Downloads student@node1:~/Downloads-r– tells rsync to copy files recursively (all sub-files and folders)-v– tells rsync to show the files as they are copied~/Downloads– tells scp to copy the files in the user’s Downloads folderstudent@node1:~/Downloads– tells rsync to copy the files to the remote server node1 using the student user account, and copy the files into the student user’s Downloads directory
scp is not “tunable” to precisely control what files are copied. It also does not check if a file is already up-to-date as the destination.