- What Are the Benefits of Setting Up Groups?
- Creating Groups
- Enrollment Type Options
- Manage your Groups
- Setting Up Group Lockers
- Exporting Group Lists
Groups are smaller clusters of students within a larger class. Groups allow students to work collaboratively on projects/assignments and to share files. Students can belong to multiple groups within a course and can see all the same content that other learners in the course see. Group members are also visible to all members of the same group. There is no way to make group membership private or confidential in D2L Brightspace. To set up PMC Accommodations, use the Classlist, not groups.
What Are the Benefits of Setting Up Groups?
Setting up groups allows for additional functionality in the course such as:
- Assigning TAs to different clusters of students
- Sharing work spaces, such as Discussions and Group Lockers in smaller clusters of students
- Releasing content to specific groups within the course
→Best Practices for Setting Up Groups
NOTE: By default, students can access groups via the Tools menu in a Brightspace course. Instructors have the option to remove student access by deleting the Groups link from the Tools menu in the course navbar. For more information, see Understanding Brightspace Navbars. To submit a support request, visit the TLS Support Portal.
Creating Groups
You can use categories to organize and manage related groups in your course. For example, you can have a category for Assignment 1, Assignment 2, Seminars, etc.
- Create a Group Category
- Assign Students or TAs to a Group
- Change Group or Category Names
- Add a Group to a Category
| NOTE: Groups have a maximum enrollment of 200 users. If there are more than 200 students in a course, you can create new group categories; there is no limit to the number of group categories within a given course. |
TIP: Before creating a set of groups in your course, consider the enrollment type options available in Brightspace:
|
Creating a Group Category
- Log into Brightspace with your MyCarletonOne credentials.
- On the Brightspace homepage, locate your course in one of the following ways:
- Select the course tile under the My Courses widget.
- Select the Course Selector Grid
 and select the course from the drop-down menu. If you are enrolled in more than 20 courses, you can search for the course name using the search bar.
- In the navbar, select Tools.

- In the drop-down menu, select Groups. You will be taken to the Manage Groups page.
- Select the New Category button.

- Enter the desired name for the Group Category in the Category Name text box. You also have the option to enter a description in the Description text box.
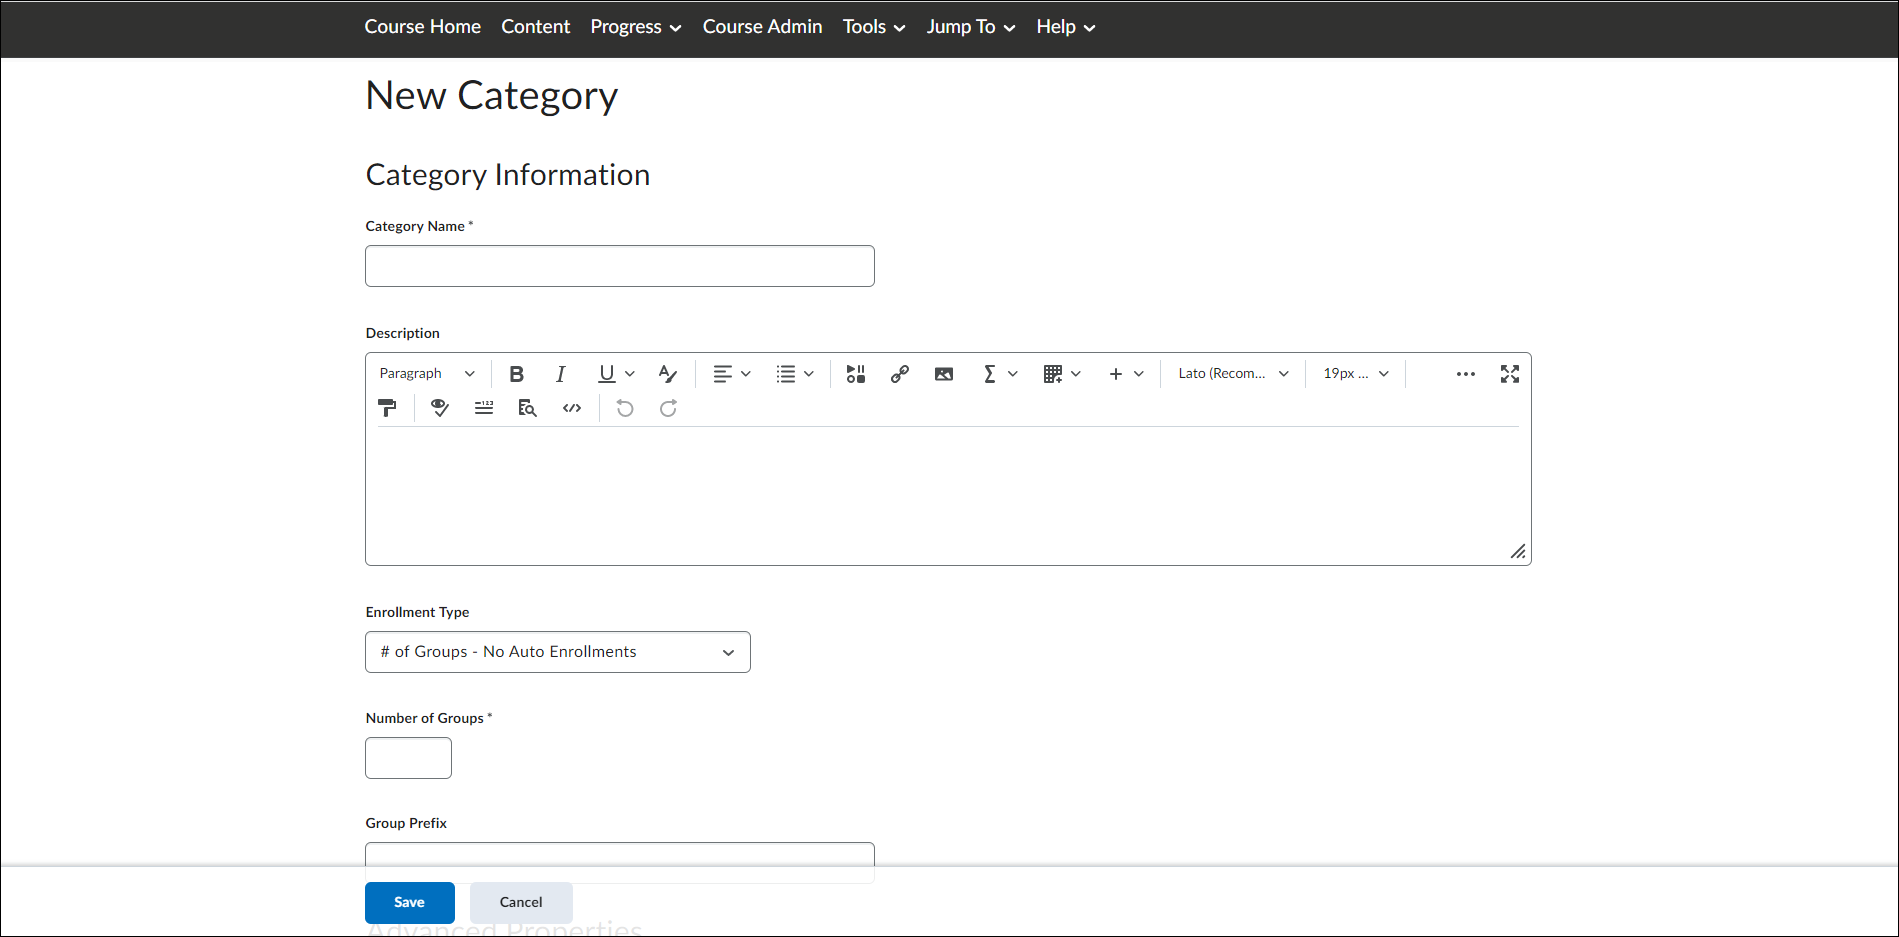
- Select an Enrollment type from the drop-down menu. See a description of the enrolment type options in the table below.
- Enter the number of groups to create and/or the number of students per group.
- To apply a distinctive prefix to each group name and code in the category, enter it in the Group Prefix field. If you do not fill in this field, the prefix defaults to “Group”.
- Under Advanced Properties, you have the option to make category and group descriptions visible to group members.
- Under Additional Options, you have the option to setup a discussion area workspace, group lockers, or a dropbox folder for each group to submit their assignments in.
- Select Save to save your settings and return to the Manage Groups page.
Assigning Students or TAs to Groups
- Log into Brightspace with your MyCarletonOne credentials.
- On the Brightspace homepage, locate your course in one of the following ways:
- Select the course tile under the My Courses widget.
- Select the Course Selector Grid and select the course from the drop-down menu. If you are enrolled in more than 20 courses, you can search for the course name using the search bar.
- In the navbar, select Tools.
- In the drop-down menu, select Groups. You will be taken to the Manage Groups page.
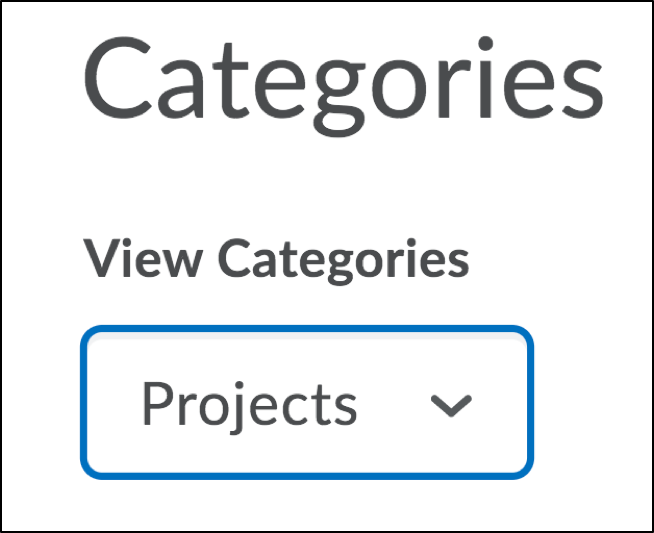
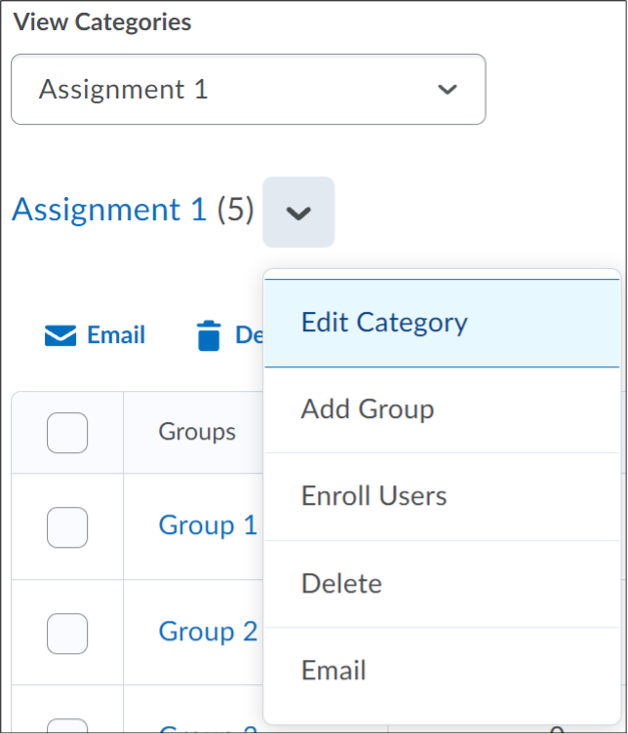
- Select a group category from the View Categories drop-down list to view all groups within that category.
- Select the drop-down arrow
 next to the category name in your groups table, then select Enroll Users.
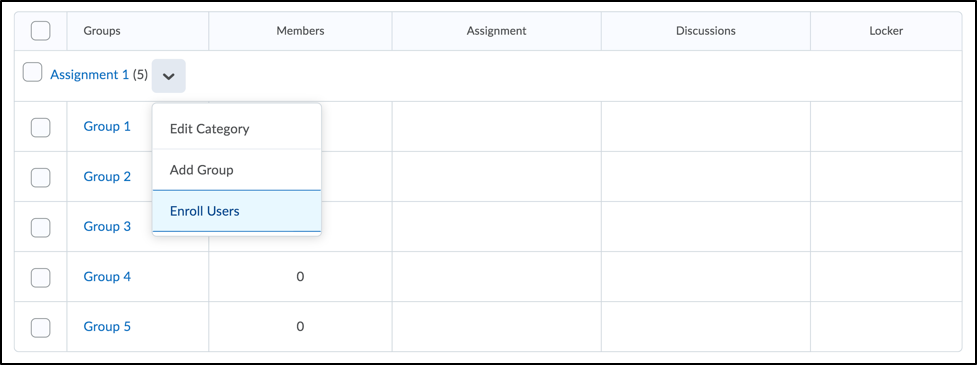
- On the Enroll Users page, scroll down to the table listing all users enrolled in your course.
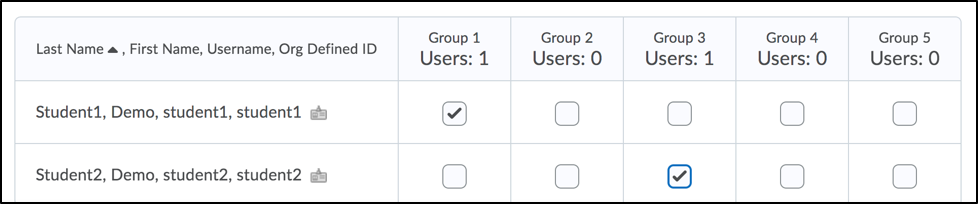
- To add a user to a group, check the box for that user in the appropriate group column.
- To remove a user from a group, uncheck the box for that student in the appropriate group column.
TIP: Search for a student’s name in the search field to jump to a specific student, or select Show Search Options to access more search filters, including the options to view all users who are currently not enrolled in a group.
- Select Save to save your enrollments and return to your Manage Groups page.
Creating Groups from Sections (Bulk Enrolling)
If you are creating groups based on sections in your course, you can request to have your students bulk enrolled into groups. Watch the Groups from Sections video for a step-by-step tutorial on how to fill out the Bulk User Enrolment Form and submit your form via the TLS Support Portal.
Changing Group or Category Names
- Log into Brightspace with your MyCarletonOne credentials.
- On the Brightspace homepage, locate your course in one of the following ways:
- Select the course tile under the My Courses widget.
- Select the Course Selector Grid and select the course from the drop-down menu. If you are enrolled in more than 20 courses, you can search for the course name using the search bar.
- In the navbar, select Tools.
- In the drop-down menu, select Groups. You will be taken to the Manage Groups page.
- Select a group category from the View Categories drop-down list to view all groups within that category.
- In your groups table, select the group name that you want to edit. To edit a category name, select the drop-down arrow
 next to the category above the groups table, then select Edit Category.
- Enter a new name in the Group Name or Category Name field.
- Select Save.
Adding a Group to a Category
- Log into Brightspace with your MyCarletonOne credentials.
- On the Brightspace homepage, locate your course in one of the following ways:
- Select the course tile under the My Courses widget.
- Select the Course Selector Grid and select the course from the drop-down menu. If you are enrolled in more than 20 courses, you can search for the course name using the search bar.
- In the navbar, select Tools.
- In the drop-down menu, select Groups. You will be taken to the Manage Groups page.
- Select a group category from the View Categories drop-down list to view all groups within that category.
- Select the drop-down arrow next to the category above the groups table, then select Add Group.
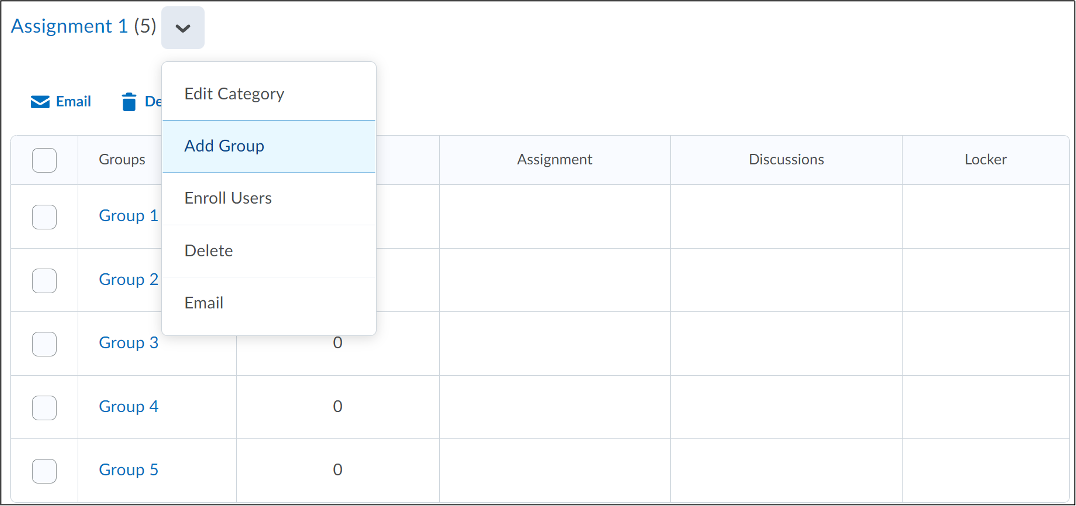
- In the Add Group window, enter a name for the group.
- Select Save.
Enrollment Type Options
Watch the video tutorial or review the enrollment type options in the table below.
→Best Practices for Group Enrollment
| Enrollment Type Option | Description |
| # of Groups – No Auto Enrollments | Selecting this option creates a specified number of groups, for which you can add any number of users using the Enroll Users page.
When to use:
|
| Groups of # | Selecting this option creates the minimum number of groups needed to place users in groups of a specified maximum size. More groups are created when they are needed to accommodate users. In the Members column of the Groups table, capacity markers display in the form x/y, where x is the number of enrolled students and y is the capacity.
When to use:
|
| # of Groups | Selecting this option creates a specified number of groups.
When to use:
|
| Groups of # – Self Enrollment | Selecting this option creates the minimum number of groups needed to accommodate users in groups of a specified maximum size automatically. Users choose the group they want to enroll in from the Groups page. In the Members column of the Groups grid list, capacity markers display in the form x/y, where x is the number of enrolled students and y is the capacity.
When to use:
|
| # of Groups – Self Enrollment | Selecting this option creates a specified number of groups, which users enroll in from the Groups page.
When to use:
|
| # of Groups, Capacity of # – Self Enrollment | Selecting this option creates a specified number of groups with a specified number of enrollments per group. Users choose the group they want to enroll in from the Groups page. In the Members column of the Groups table, capacity markers display in the form x/y, where x is the number of enrolled students and y is the capacity.
Note that you can increase or decrease the capacity for self-enrollment groups after they have been created, and prior to the group sign-up expiry date and time. Decreasing a group size to an amount smaller than has already signed up for a group will not re-allocate users to other groups, so you must assign those users manually to other groups. When to use:
|
| Single user, member-specific groups | Using this option creates a group with a single user where the first name and last name of the learner is the name of the group. When a new learner is enrolled in the course a group is automatically created for them.
When to use:
|
Manage your Groups
You can view, edit, and manage your groups from your Manage Groups page.
To Access your Manage Groups Page
Select Tools in your course navbar, then select Groups in the drop-down menu.
- View your group categories and groups
- Create new categories
- Edit categories or groups
- Add a group or category description
- Check which students are enrolled in what group
- Delete categories and groups.
- Send an email to all the students in a specific group.
View your Groups Categories and Groups
- Select Tools in your course navbar, then select Groups in the drop-down menu.
- View your Group categories and Groups in the table. Group Categories are indicated with an arrow.
Create New Categories
- Select Tools in your course navbar, then select Groups in the drop-down menu.
- Select New Category.
- Follow the instructions above.
Edit Categories or Groups
Select Tools in your course navbar, then select Groups in the drop-down menu.
To Edit a Category:
- Select the drop-down arrow next to the category name above the groups table, then select Edit Category.
- Make your changes on the Edit Category page, then select Save.
To Edit a Group:
- Select the name of a group in your groups table.
- Make your changes on the Edit Group page, then select Save.
Add a Group or Category Description
Select Tools in your course navbar, then select Groups in the drop-down menu.
To add a Category description:
- Select the drop-down arrow next to the category name above the groups table, then select Edit Category.
- Add a description.
- Select Save.
To add a Group description:
- Select the name of a group in your groups table.
- Add a description.
- Select Save.
Check Which Students are Enrolled in What Group
- Select Tools in your course navbar, then select Groups in the drop-down menu.
- Under the Members column in your groups table, select the number indicating how many students are enrolled in the group.
- You will see a pop-up window displaying a list of group members.
Delete Categories or Groups
WARNING: Deleting a group or group category will delete any associated group discussions, assignments, and group locker files.
Select Tools in your course navbar, then select Groups in the drop-down menu.
To Delete a Group:
- In the groups table, place a checkmark next to the group(s) you want to delete.
- Select the Delete icon above the groups table.
To Delete a Category:
- Select the drop-down arrow next to the category name above the groups table.
- Select the Delete option from the drop-down menu.
Send an Email to all Students in a Specific Group
- Select Tools in your course navbar, then select Groups in the drop-down menu.
- In your groups table, select the checkbox to select the group you want to email.
- Select Email.
- A Compose New Message window will open. Compose your message, then select Send
Setting Up Group Lockers
When setting up the Groups, there will be options to create Lockers, Assignment area and/or Discussion area workspaces. The Assignment and Discussion areas allow for only the students within the Group to see the posts and files. Lockers are a way for students to share files with one another. This is particularly useful for group projects.
Set up a Group Locker
- Log into Brightspace with your MyCarletonOne credentials.
- On your Brightspace homepage, locate your course in one of the following ways:
- Select your course under My Courses.
- Select the Course selector icon
 , then select your course from the menu.
- In the navbar at the top of your course page, select Tools.
- In the drop-down menu, select Groups. You will be taken to the Manage Groups page.
- Select a group category from the View Categories drop-down list to view all groups within that category.
- Select the drop-down arrow next to the category name above the groups table, then select Edit Category.
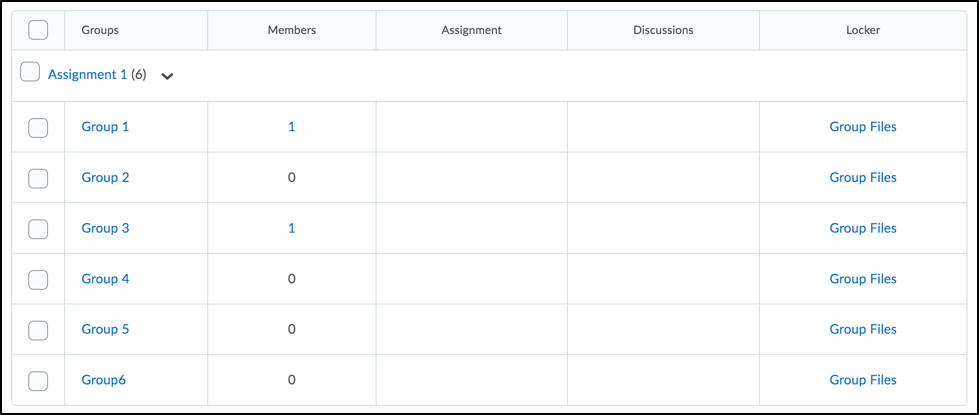
- Scroll down to the Additional Options heading, then select Set up lockers.
- Select Save.
- On the Manage Groups page, you will now see a column titled Locker. If you select Group Files you will see any files people in that Group have shared. You can also add files to this area for specific groups by selecting Group Files.
Exporting Group Lists
You can export a list of group members from your course gradebook to an Excel or CSV file.
To Export a Group List
- Log into Brightspace using your MyCarletonOne credentials.
- On your Brightspace homepage, locate your course in one of the following ways:
- Select your course under My Courses.
- Select the Course selector grid , then search for your course name or select your course from the drop-down menu.
- Select Progress in the course navbar.

- In the drop-down menu, select Grades.
- Select the Enter grades tab.

- Select Export.
- Configure the following export options:
- Export Grade Items for:
- Select Groups from the drop-down menu.
- Select Apply.
- A Groups drop-down menu will appear. Select a group.
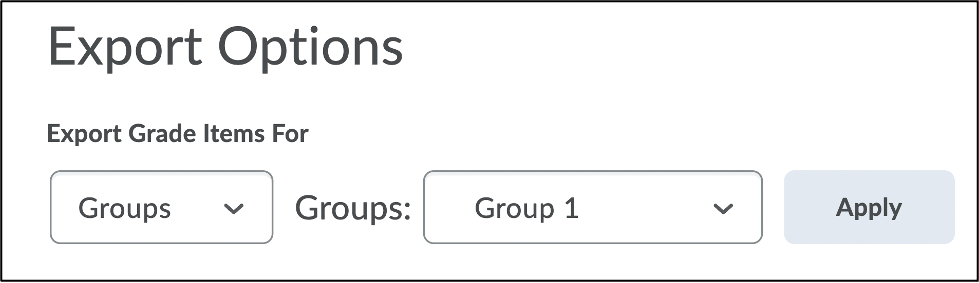
- Select Apply.
- Key Field: Org Defined ID is selected by default, meaning that the export will identify students by their ID. You can select username, or both to customize the export.
- Grade Values: Points grade is selected by default.
- User Details: Select Last Name, First Name, Email, and Group Membership.
- Export Grade Items for:
- Select Export.
- Select Export to CSV or Export to Excel.
- When the export is complete, select Download.
Was this page helpful?
14 people found this useful
Still need help? Contact us