- Creating a Quiz
- Setting Up a Quiz for Automatic Grading
- Creating Randomized Quizzes
- Customizing Quiz Results Display Settings
- Adding a Quiz Submission View
- Consider Quiz Settings
- Related Support Pages
Desire2Learn (D2L) Brightspace’s Quiz tool allows instructors to create tests and exams for online assessment. You have the option to add a range of question types to your quizzes, including multiple choice, matching, short answer, true/false, and more. Quiz questions are stored in the Brightspace Question Library. The question library allows for randomization and shuffling within quizzes. Once you have created a quiz activity for your course, you are able to add questions and preview your quiz before making it available to students.
For more quiz instructions and video tutorials, see D2L Brightspace Quiz Documentation
Creating a Quiz
For an overview of how to create a quiz in Brightspace, watch the Create New Quiz D2L video tutorial.
Note: For quiz grade items that are connected to the gradebook, you will need to hide the grade item from the students until you are ready to release the grades. See Showing/Hiding Grades for instructions on how to hide grade items.
TIP: We strongly recommend creating your questions in the Question Library before you create your quiz. Quiz questions can be stored in the Question Library for re-use in multiple quizzes or in other types of assessments, such as self-assessments for student practice and studying. You can create your quiz questions in a Question Library section that can be easily imported into your quiz. Follow the instructions linked below from the Using the Question Library page to create a quiz question section:
To Create a Quiz
- Log into Brightspace with your MyCarletonOne credentials.
- On the Brightspace homepage, locate your course in one of the following ways:
- Select the course tile under the My Courses widget.
- Select the Course Selector Grid
 and select the course from the drop-down menu. If you are enrolled in more than 20 courses, you can search for the course name using the search bar.
- In the navbar, select Tools.

- Select Quizzes from the drop-down menu
- Under the Manage Quizzes tab, select New Quiz.
- Enter a name for your quiz.
- Enter a due date for your quiz. The due date indicates the quiz deadline to students. If a quiz is submitted after the due date, the submission will be flagged as late. Brightspace quizzes do not require a Due Date. Start and End Dates are recommended for determining the timeframe in which students can take the quiz.
- Enter a description (optional).
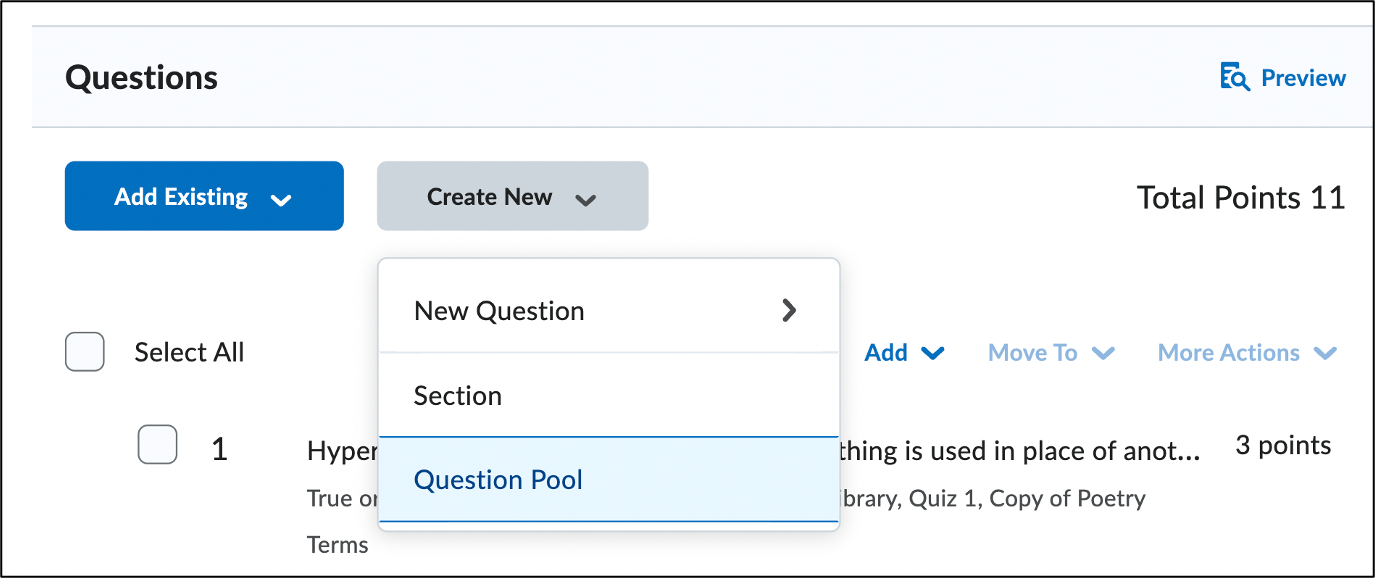
- Under Questions, you have the following options for adding questions to your quiz:
- Add Existing – Add an existing question from your question library.
- Create New – Create a new question, question section, or question pool
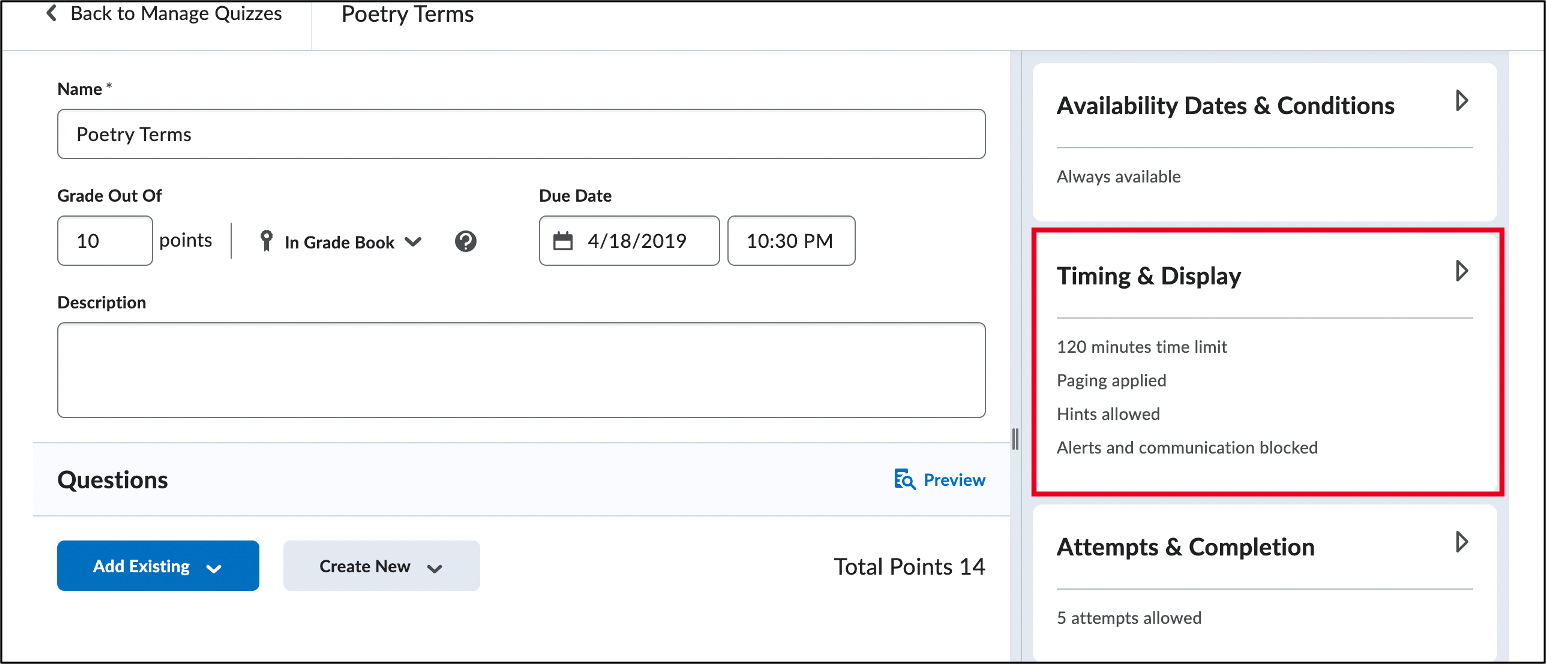
- In the right panel, customize your quiz settings under the following categories:
Availability Dates & Conditions
- Start and End Dates – Start/End dates determine the timeframe in which students can take the quiz.
- Select the Start Date field to set a Start Date for the quiz, then enter the date and time.
- Select the End Date field to set an End Date for the quiz, and enter the date and time
- Release Conditions – Users are not able to access or view the quiz unless they meet the release conditions. See the Creating Release Conditions page for instructions.
- Add Availability Dates to Calendar – Only end date if both are set
- Special Access – Special Access allows quizzes to be available to only a select group of users or individualized due dates for certain users. See the Adding Special Access page for instructions.
- Password – Only users who enter this password will be granted access to write this quiz.
Timing & Display
- Time Limit – To set a time limit for students to complete the quiz, select Time Limit and enter the number of minutes students are allowed to complete the quiz.
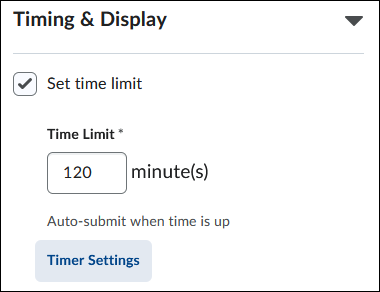
Select the Timer Settings option to see a list of additional timer behaviors.
-
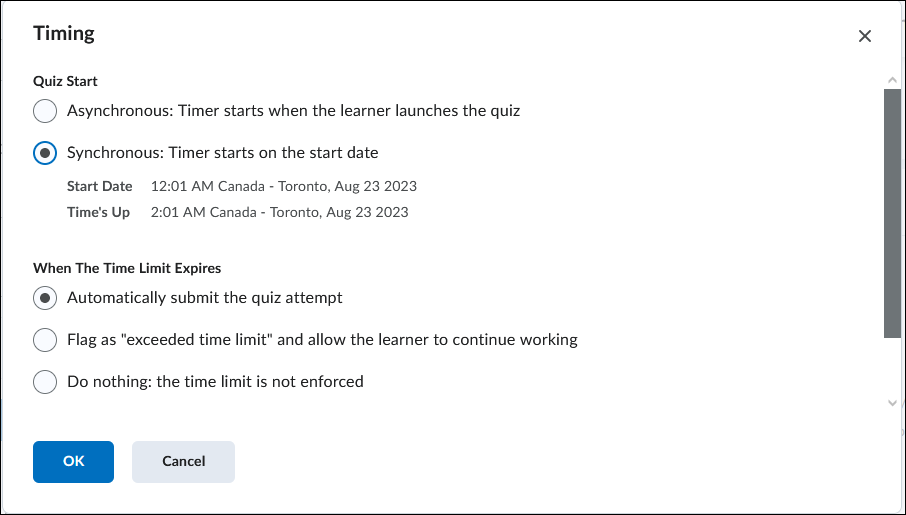
- The options for Quiz Start are:
- Asynchronous
- Synchronous – this option creates a Synchronous Quiz that has the same start and end time for all learners. The start and end dates are determined by the selections made in the Availability Dates & Conditions section.
- The options for when the selected time limit expires are:
- Automatically Submit Quiz Attempt
- Flag as “exceeded time limit” and allow the learner to continue working
- Do nothing: the time limit is not enforced
- The options for Quiz Start are:
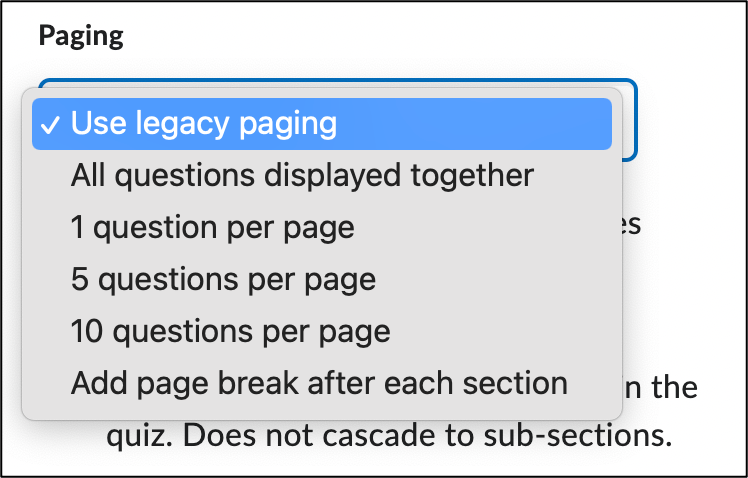
- Paging – Select one of the following paging options from the drop-down menu:
- All Questions Displayed Together
- 1 question per page
- 5 questions per page
- 10 questions per page
- Add page break after each section
- Shuffle Quiz – Select this option is you want to shuffle your quiz questions.
- Allow Hints – Select this option if you want to allow hints. Hints display extra information about a question to students when they are taking a quiz.
- Disable Email, Instant Messages, and Alerts Within Brightspace – If you select this option, students cannot access the Brightspace Email, Instant Messages, or their alerts if they have a quiz attempt in progress.
-
Attempts & Completion
- Attempts – By default, 1 attempt is selected. To edit the number of attempts select Manage Attempts and configure the following:
- Attempts allowed – Select the number of attempts from the drop-down menu.
- Overall Grade Calculation – To edit how the overall grade is calculated, select one of the following options from the drop-down menu:
- Highest Attempt
- Lowest Attempts
- Average of all Attempts
- First Attempt
- Last Attempt
- Select OK.
- Category – If you have set up quiz categories, you have the option to select a category from the drop-down menu.
- Notification Email – If you want to receive notifications when a quiz is attempted, enter an email address or multiple email addresses separated by a comma.
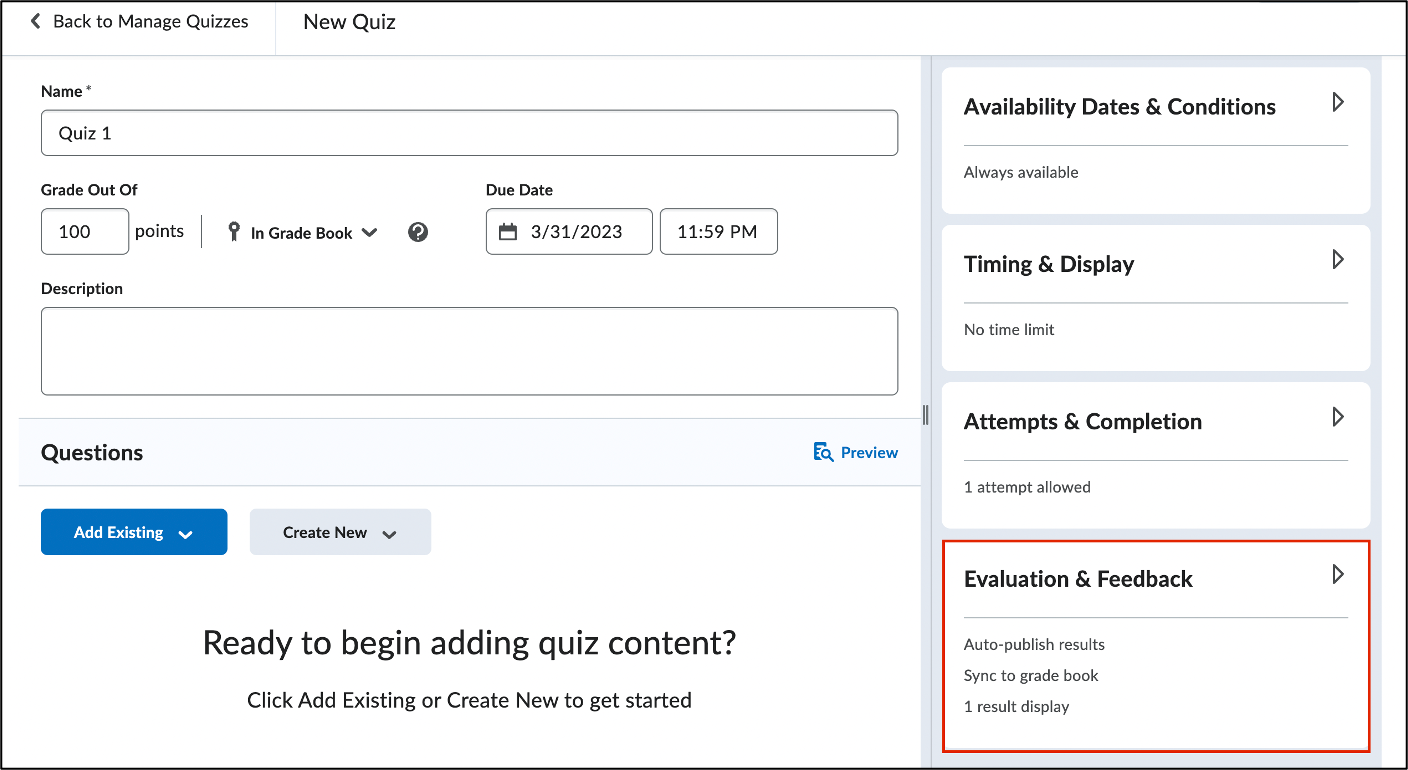
Evaluation & Feedback
- Auto-publish attempt results immediately upon completion. When this setting enabled, learners will be able to view their evaluated attempt immediately upon submission.
- Synchronize to grade book on published. With this setting enabled, the learner’s overall grade and overall feedback will be automatically published to the grade book once it has been evaluated.
- When published, display to learners. Select the Attempt Grade checkbox to make the attempt grades visible to learners. Use the drop down menu to select visibility settings for what will be displayed when the evaluation is published.
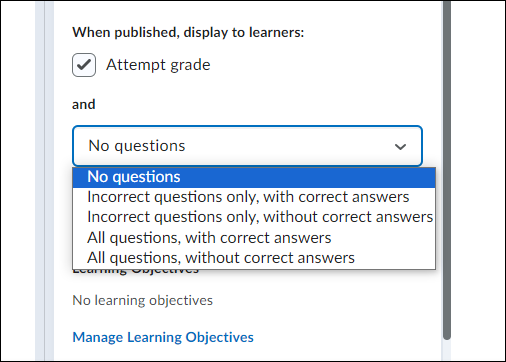
WARNING: Changing the No Questions pulldown menu to the “All Questions Without Correct Answers” option will allow students to see their grade per question. To avoid showing these scores, use the Customizing Quiz Results Display instead.
- Select Save and close to return to your Manage Quizzes page, or aelect Save to remain on the quiz editing page.
To Link a Quiz to a Grade Item
- Log into Brightspace using your MyCarletonOne credentials.
- On your Brightspace homepage, locate your course in one of the following ways:
- Select your course under My Courses.
- Select the Course selector grid , then search for your course name or select your course from the drop-down menu.
- Select Tools in the course navbar.
- In the drop-down menu, select Quizzes.
- Locate an existing quiz or create a new quiz.
- To edit an existing quiz: Select the arrow
 next to the assignment you want to connect to a grade item, then select Edit.
 - To create a new quiz: Select the New Quiz Button.
- To edit an existing quiz: Select the arrow
- Select the Grade Out Of drop-down menu.
- Select Edit or Link to Existing.
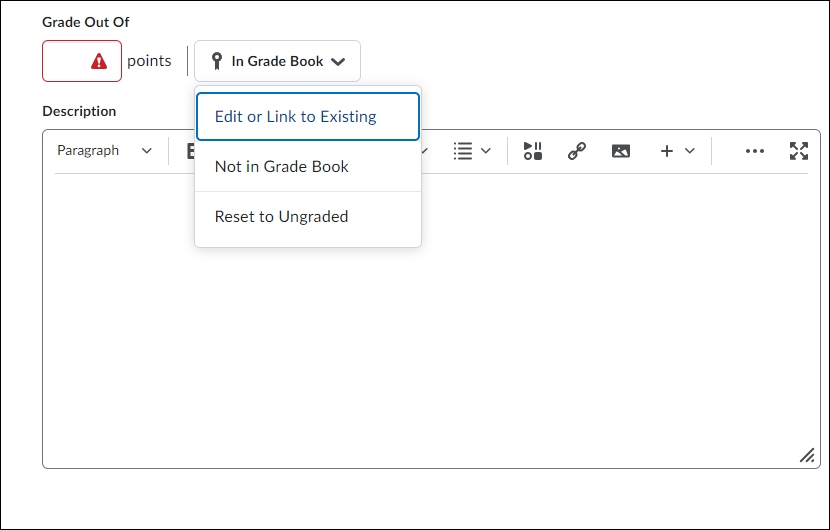
- Select Link to an existing grade item.
- Select the grade item from the drop down menu.
- Select OK when you are done.
- Select Save and Close when you are finished editing your settings.
To Create a New Grade Item Within a Quiz
- Log into Brightspace using your MyCarletonOne credentials.
- On your Brightspace homepage, locate your course in one of the following ways:
- Select your course under My Courses.
- Select the Course selector grid , then search for your course name or select your course from the drop-down menu.
- Select Tools in the course navbar.
- In the drop-down menu, select Quizzes.
- Locate an existing quiz or create a new quiz.
- To edit an existing quiz: Select the arrow next to the assignment you want to connect to a grade item, then select Edit Quiz.
- To create a new quiz: Select the New Quiz Button.
- To edit an existing quiz: Select the arrow
- Select the Grade Out Of drop-down menu.
- Select Edit or Link to Existing.
- Select Create and link to a new grade item.
NOTE: The name of the created grade item will be the same as the linked Assignment.
- Select Choose Grade Scheme.
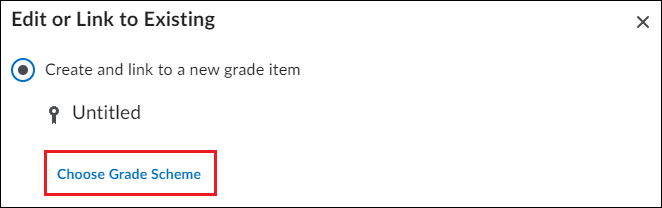
- Select a Grade Scheme from the drop-down menu.
- Select OK when you are done.
- Select Save and Close when you are finished editing your settings. You have now created a grade item that is linked to this Quiz.
Setting Up a Quiz for Automatic Grading
A quiz can be configured for automatic grading by auto-publishing the feedback and auto-exporting the grades.
NOTE: This setting should only be enabled for quizzes that contain questions that can be auto-graded (Multiple Choice, True/False, etc.). Some question types, such as Written Response, require manual grading.
- Log into Brightspace with your MyCarletonOne credentials.
- On the Brightspace homepage, locate your course in one of the following ways:
- Select the course tile under the My Courses widget.
- Select the Course Selector Grid and select the course from the drop-down menu. If you are enrolled in more than 20 courses, you can search for the course name using the search bar.
- In the navbar, select Tools.
- In the drop-down menu, select Quizzes. You will be taken to the Manage Quizzes page.
- Locate an existing quiz or create a new quiz.
- To edit an existing quiz: Select the arrow next to the quiz you want to connect to a grade item and select Edit Quiz.
- To create a new quiz: Select New quiz button.
- To edit an existing quiz: Select the arrow
- Select Evaluation and Feedback.
- Ensure that the Auto-publish attempt results immediately upon completion checkbox is selected.
NOTE: For quiz grade items that are connected to the gradebook, you will need to hide the grade item from the students until you are ready to release the grades. See Showing/Hiding Grades for instructions on how to hide grade items.
- Select Save and Close when you are finished editing your settings.
To Add a Quiz to a Module/Submodule
NOTE: If you have created a quiz via the Tools menu in your course navbar, it will not appear in the content area of your course unless you add the existing quiz to a module or submodule.
- Log into Brightspace using your MyCarletonOne credentials.
- On the Brightspace homepage, locate your course in one of the following ways:
- Select the course tile under the My Courses widget.
- Select the Course Selector Grid and select the course from the drop-down menu. If you are enrolled in more than 20 courses, you can search for the course name using the search bar.
- In the navbar, select Content.

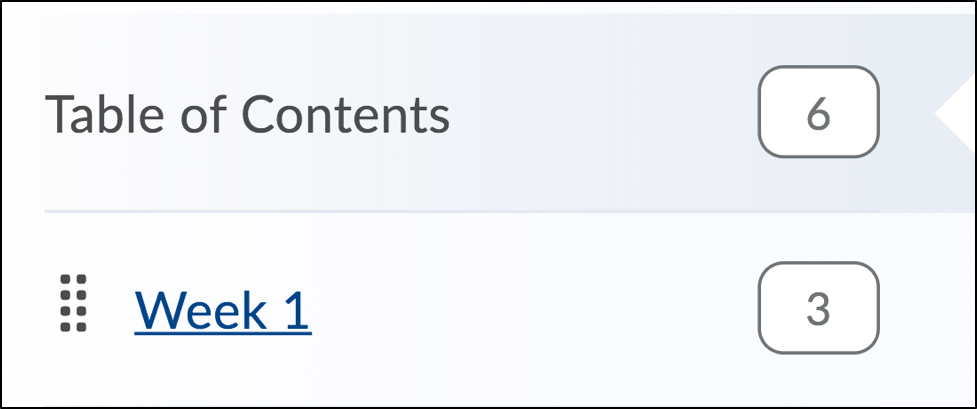
- In the left sidebar under Table of Contents, select the module/week section where you’d like to add the Quiz (Week 1 is an example of a module in the image below). Alternatively, you can scroll down the Table of Contents page to locate the module/sub-module you want to add a quiz to. For instructions on how to add a new module or sub-module to your course, see the Adding Modules and Sub-modules page.
- Select Existing Activities, then select Quizzes in the drop-down menu.
- In the Add Activity pop-up window, select the quiz you want to add to the module/submodule.
The quiz will now appear as a link in your module or sub-module.
Adding Questions to your Quiz
As a best practice, quiz questions should be created and organized in the Question Library. Questions that are stored in the Question Library can be easily imported into a Brightspace quiz and re-used in multiple quizzes.
To create quiz questions in Brightspace, the following steps are recommended:
- Add a section to your Question Library to organize your questions in a folder.
- Create or Import your quiz questions into the section.
- Import the questions from your Question Library section into your quiz.
NOTE: For video-based quiz questions, always use Kaltura video embeds to maintain integrity and accessibility for students. Kaltura provides autocaptions and prevents unauthorized content downloads. Students can download files added to the quiz. However, avoid uploading files directly to quizzes to prevent slow load times, particularly for students with low internet bandwidth.
Question Types Available in Brightspace
→Checkout D2L’s instructions and video tutorials for each specific question type
The table below is copied with expressed permission from the Memorial University of Newfoundland.
| Question Type | Description | Benefits | Challenges | Tips |
| True/False (T/F) | True or false is a type of question where the question-creator indicates whether a statement is truthful or not. | Automatically graded. Easy to create simple low level recall questions. | Learners have a chance of guessing the correct answer. Difficult to create challenging questions. Without e-proctoring, learners could cheat. | Works best if you create a Question Pool by selecting a sub-set of questions from the Question Library. [:30] |
| Multiple Choice (MCQ) | Multiple choice questions give users multiple possible answers to a question and asks them to select the correct or best answer | Automatically graded. Easy to create simple low level recall questions. Options can be randomized. | Difficult to create challenge questions. Without e-proctoring, learners could cheat.
NOTE: If using “All of the Above” or “None of the Above” as options, the options should not be randomized. |
Works best if you create a Question Pool by selecting a sub-set of questions from the Question Library. [:30] |
| Multi-Select (MS) | Multi-select is a type of question where the user selects one or more correct answers from a group of possible answers. | Automatically graded. Easy to create simple low level recall questions. Can enable students to receive partial marks. Options can be randomized. | Difficult to create challenge questions. Without e-proctoring, learners could cheat. | Works best if you use a question pool in the library. Better than multiple choice for higher order items. [1:00] |
| Written Response (WR) | In Brightspace Learning Environment, written response (formerly know as long answer) is a type of question that is more than a few words long. It is an open-ended text response. You can allow learners to upload files to this question type, as well. | Easy to create. More challenging questions can be asked. More difficult for learners to cheat/copy. | Automatic grading is not possible, although an answer key is available. Students do not have time to polish their response. | A rubric would help with marking. Useful for Math or Science as students can solve problems on paper, take a picture, and upload the image in the question response. [10:00-30:00] |
| Short-Answer (SA) | A short answer question is a type of question where the user responds to a prompt with a short, one or two-word text response. Traditionally, many people think of a short answer question as a sentence or two in length, but for the short answer question type in Brightspace Learning Environment, it can be automatically graded, and for this reason, is shorter. | Can be graded automatically. Easy to create. More challenging questions can be asked. Part marks are possible. | Automatic grading is more challenging. Learners need to have correct spelling. | Good for 1-2 sentence responses. [2:00] |
| Multi-Short Answer (MSA) | Like the short answer question, multi-short answer is a few short-word text responses. It is well-suited for situations that require an answer in the form of a list | Can be graded automatically. Easy to create. More challenging questions can be asked. Works well if the answer comes from a pool of possible answers. | Automatic grading is more challenging. Learners need to have correct spelling. | Good for 1-2 sentence responses per space. [4:00] |
| Fill in the blanks (FIB) | A fill in the blanks question is a question type where the user has to insert the correct response into a blank space in order to complete a sentence. You can have more than one blank in this question type, and it can be automatically graded. | Can be graded automatically. Easy to create. More challenging questions can be asked. | All correct/acceptable answers need to be included. Learners need to have correct spelling. | Good for lower level skills, knowledge. [1:00] |
| Matching (MAT) | Matching questions ask users to pair correct items together for points. For example, users may be asked to match a term to its proper definition or a date to its event. | Can be graded automatically. Easy to create. Options can be randomized. Can have a 0:1 match, 1:1, 2:1, or a combination. | Directions need to be clear. May take longer for students to complete. | Good for lower level skills, knowledge. [:30 per response] |
| Ordering (LA) | An ordering question is a type of question where the user places the answers in the correct order. | Can be graded automatically. Easy to create. Options can be randomized. | There has to be one linear sequence. | Good for lower level skills, knowledge. [:30 per response] |
| Arithmetic Questions (2+2) | An arithmetic question is a question type in which numbers can be randomly chosen for each variable. The numbers used for each variable in the question are based on specific number ranges. | Can be graded automatically. Easy to create. Arithmetic symbols embedded in the software. Supports unique question generation using variables. | It may take students time to orient themselves to the function of inserting symbols. | Good for basic arithmetic problems. [varies] |
| Significant Figures (x10) | The significant figures question type is most applicable to science and math related questions. Users are able to enter their answers in scientific notation format. | Easy to create. Can be auto graded. Equation Editor and Sig Fig symbols embedded in the software. Supports unique question generation using variables. | It may take students time to orient themselves to the function of inserting symbols. | Great for introductory science courses. [varies] |
| Likert Question (LIK) | The Likert question is unique to the Survey tool. Likert questions are a way to gather feedback by creating questions with answers based on one of the six scales available. | Used in Surveys only. | Ungraded. | Great for conducting surveys for people’s perceptions, attitudes, and preferences towards a topic. [varies] |
For more information on how to use the Brightspace question library, you can visit the D2L support page Creating Question Library questions.
To Add new Questions to a Quiz
- Log into Brightspace with your MyCarletonOne credentials.
- On the Brightspace homepage, locate your course in one of the following ways:
- Select the course tile under the My Courses widget.
- Select the Course Selector Grid and select the course from the drop-down menu. If you are enrolled in more than 20 courses, you can search for the course name using the search bar.
- Locate your quiz in one of the following ways:
- In the navbar, select Tools and select Quizzes in the drop-down menu. Find your quiz on the Manage Quizzes page.
- In the navbar, select Content and select the module or submodule that holds your quiz.
- Select the arrow
 next to the quiz you want to add questions to.
 - In the drop-down menu, select Edit.
- Under the Questions heading, select Create New.
- Select New Question, then select a question type from the menu.
→Select here to view D2L’s instructions and video tutorials for each specific question type - Enter the required and optional fields for your selected question type, which may include one or more of the following:
- Question Text: This is the text that is displayed to students.
- Points: The default is 1 point for certain question types. This is the point value for your quiz question.
- Answers: This is where you enter the answers for a multiple choice question, or select true or false for a true or false question.
- Review how the questions will appear to students in the preview panel to the right side of the page.
- When you are finished entering your question details, select Save.
To Import Questions from the Question Library
NOTE: Create your questions in a Question Library section folder before importing your questions into a quiz. Follow the instructions linked below:
- Log into Brightspace with your MyCarletonOne credentials.
- On the Brightspace homepage, locate your course in one of the following ways:
- Select the course tile under the My Courses widget.
- Select the Course Selector Grid and select the course from the drop-down menu. If you are enrolled in more than 20 courses, you can search for the course name using the search bar.
- Locate your quiz in one of the following ways:
- In the navbar, select Tools and select Quizzes in the drop-down menu. Find your quiz on the Manage Quizzes page.
- In the navbar, select Content and select the module or submodule that holds your quiz.
- Select the arrow next to the quiz you want to add questions to.
- In the drop-down menu, select Edit.
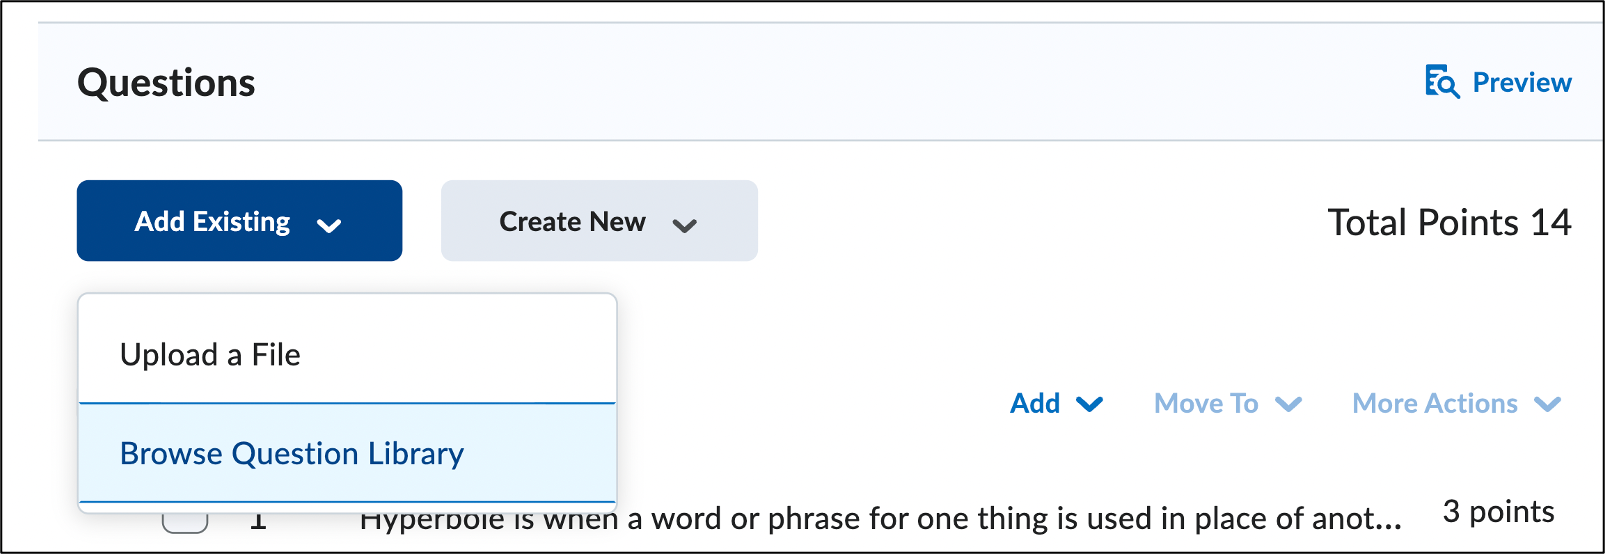
- Under the Questions heading, select Add Existing.
- Select Browse Question Library from the drop-down menu.
- Select the checkbox next to the section or question(s) you want to import.
- Select Import, or select the drop-down arrow to select one of the following import options:
- Import to bottom of Quiz
- Import to top of Quiz
- Import to Section
- You will now see a list of all imported questions. Select the move icon
 to reorder your questions. To return to your quiz editing page, select Back to Settings for (quiz name).
To Create Question Sections
Quiz sections can be created to organize question groups in your quiz, or to shuffle a specific set of questions.
- Log into Brightspace with your MyCarletonOne credentials.
- On the Brightspace homepage, locate your course in one of the following ways:
- Select the course tile under the My Courses widget.
- Select the Course Selector Grid and select the course from the drop-down menu. If you are enrolled in more than 20 courses, you can search for the course name using the search bar.
- In the navbar, select Tools, then select Quizzes in the drop-down menu. Find your quiz on the Manage Quizzes page.
- Select the quiz you want to add a section to.

- Select the Create New button.
- Select Section from the drop-down menu.
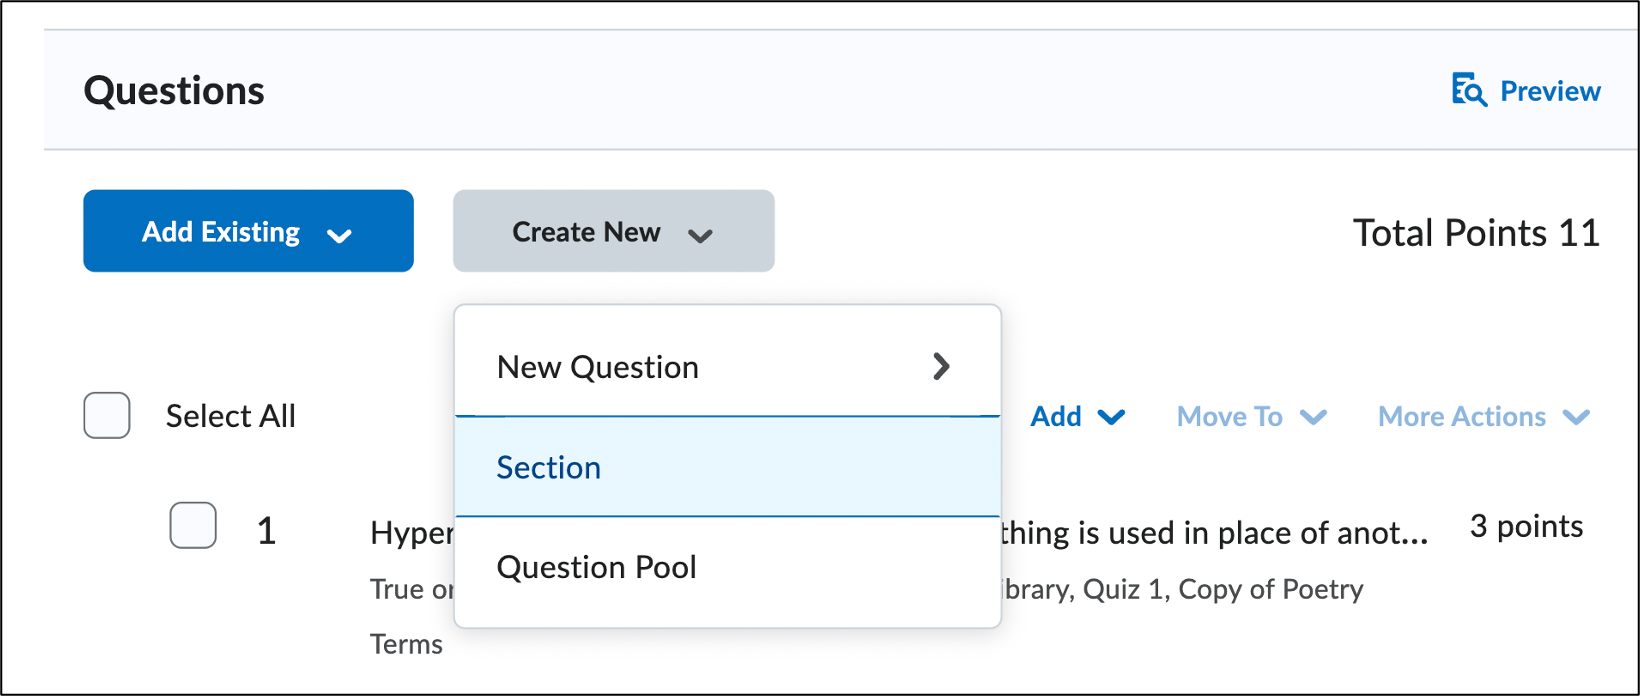
- Enter a section title and a description (optional). Customize the following settings:
- Hide Section Title from learners: Select this box to hide the section title from students as they take the quiz.
- Hide Section Text from learners: Select this box to hide the text entered in the “Section Text” text box.
- Shuffle questions in this section: Select this box to shuffle the order of the questions within the section. This will not shuffle sub-sections.
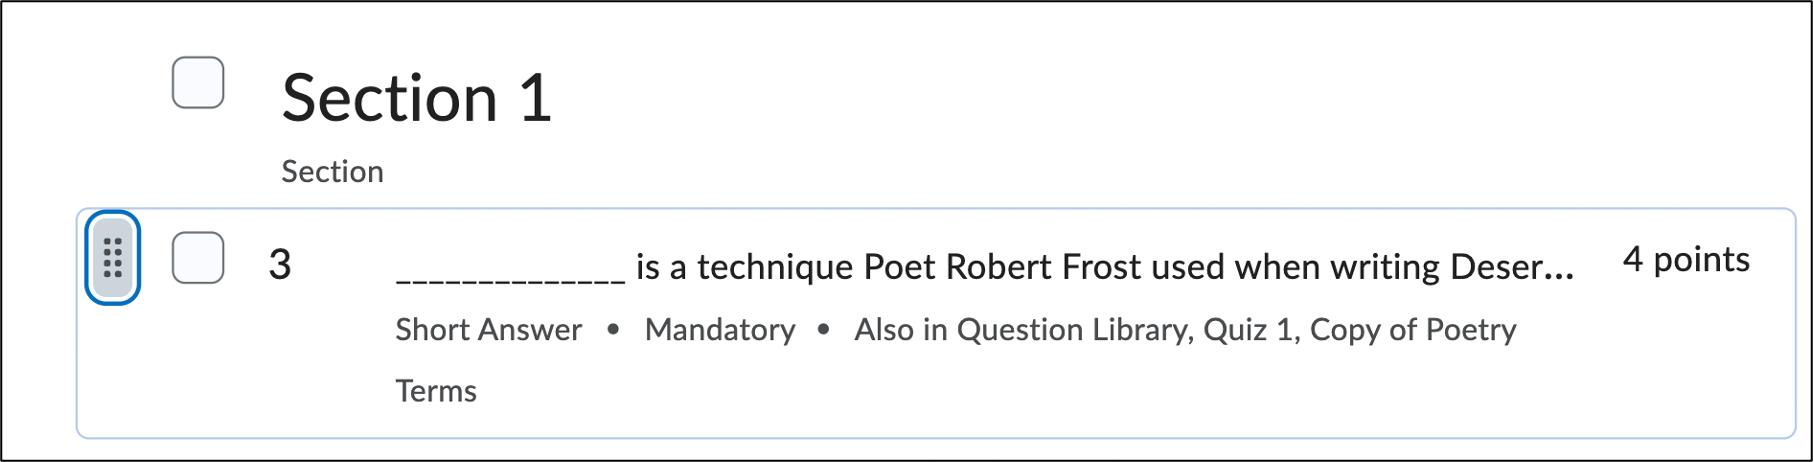
- Select Save.
- You will now see the section under the Questions heading on the Edit Quiz page. You can drag and drop a question into the section using the move icon

To Add Page Breaks
For longer quizzes, you can add Page Breaks to control how many questions are displayed per page. When a student advances to a new page of the quiz, all answers are saved automatically.
- Log into Brightspace with your MyCarletonOne credentials.
- On your Brightspace homepage, locate your course in one of the following ways:
- Select your course under My Courses.
- Select the Course selector icon
 , then select your course from the menu.
- Locate your quiz in one of the following ways:
- In the navbar, select Tools and select Quizzes in the drop-down menu. Find your quiz on the Manage Quizzes page.
- In the navbar, select Content and select the module or submodule that holds your quiz.
- Locate the quiz you want to edit and select the arrow next to the quiz name.
- In the drop-down menu, select Edit.
- In the panel on the ride side of the page, select Timing and Display.
- Select one of the following options from the Paging drop-down menu:
- All Questions Displayed Together
- 1 question per page
- 5 questions per page
- 10 questions per page
- Add page break after each section
- Select Save and Close when you are finished making changes.
Creating Randomized Quizzes
You can shuffle a quiz at the quiz level, or you can create a Question Pool to create a randomized question set.
- Question Pool – Create a set of questions within a larger question pool so that each student will receive a different version of the quiz. The greater the difference between the number of questions in the question pool and the number of questions on the quiz, the greater the chance that each student will get different questions.
- Shuffle Questions – Any quiz can be shuffled at the quiz level. When a quiz is shuffled, the questions will be reordered for each student’s quiz attempt.
To Create a Question Pool
Create a Question Pool to create a randomized question set within a quiz. Question pools can be drawn from question libraries and/or from questions that are in other quizzes in the course. See the Using the Question Library page for instructions on how to add questions to the Question Library.
NOTE: Question statistics are not computed for questions in a Question Pool.
- Log into Brightspace with your MyCarletonOne credentials.
- On the Brightspace homepage, locate your course in one of the following ways:
- Select the course tile under the My Courses widget.
- Select the Course Selector Grid and select the course from the drop-down menu. If you are enrolled in more than 20 courses, you can search for the course name using the search bar.
- In the navbar, select Tools, then select Quizzes in the drop-down menu.
- Locate an existing quiz on your Manage Quizzes page or select New Quiz.
- Select the Create New button.
- Select Question Pool from the drop-down menu.
- Enter a Question Pool title.
- Enter the Number of Questions to select.
- Enter the Points per Question.
- Select Browse Question Library.
- Select the questions you want to import, then select Import.
- You will now see a list of your selected questions and a preview on the right side of the page.
TIP: Select the Refresh
 button to shuffle the preview.
 - Select Save.
To Shuffle a Quiz
Follow the instructions below to shuffle questions at the quiz level.
- Log into Brightspace with your MyCarletonOne credentials.
- On your Brightspace homepage, locate your course in one of the following ways:
- Select your course under My Courses.
- Select the Course selector icon , then select your course from the menu.
- Locate your quiz in one of the following ways:
- In the navbar, select Tools and select Quizzes in the drop-down menu. Find your quiz on the Manage Quizzes page.
- In the navbar, select Content and select the module or submodule that holds your quiz.
- Select the arrow next to the quiz you want to add questions to.
- In the drop-down menu, select Edit Quiz.
- In the panel on the ride side of the page, select Timing and Display.
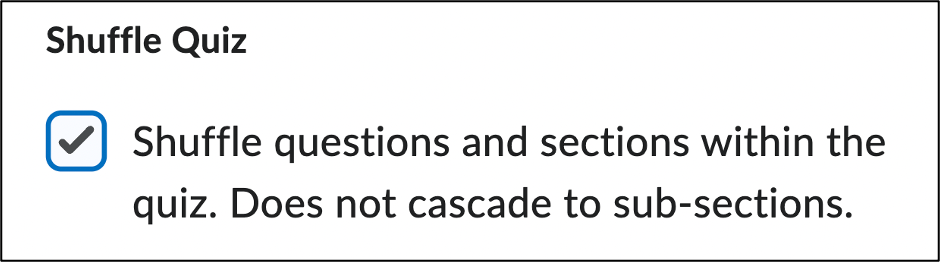
- Under the Shuffle heading, select the Shuffle questions and sections within the quiz. Does not cascade to sub-sections checkbox.
- Select Save and Close to return to your Manage Quizzes page, or select Save to continue editing your quiz settings.
To Preview a Quiz
Video Tutorial: Preview a Quiz as a Student
- Log into Brightspace with your MyCarletonOne credentials.
- On the Brightspace homepage, locate your course in one of the following ways:
- Select the course tile under the My Courses widget.
- Select the Course Selector Grid and select the course from the drop-down menu. If you are enrolled in more than 20 courses, you can search for the course name using the search bar.
- In the navbar, select Tools.
- In the drop-down menu, select Quizzes.
- Select the arrow next to the quiz you want to preview.
- In the drop-down menu, select Preview.
- Select Start Quiz! to begin previewing your quiz.
To Make Your Quiz Visible to Students
- Log into Brightspace with your MyCarletonOne credentials.
- On the Brightspace homepage, locate your course in one of the following ways:
- Select the course tile under the My Courses widget.
- Select the Course Selector Grid and select the course from the drop-down menu. If you are enrolled in more than 20 courses, you can search for the course name using the search bar.
- In the navbar, select Tools.
- In the drop-down menu, select Quizzes.
- Select the arrow next to the quiz you want to make visible. Quizzes that are hidden from students are indicated with a crossed out eye icon

- In the drop-down menu, select Make Visible to Users.
To Submit Quiz Attempts in Progress
- Log into Brightspace with your MyCarletonOne credentials.
- On the Brightspace homepage, locate your course in one of the following ways:
- Select the course tile under the My Courses widget.
- Select the Course Selector Grid and select the course from the drop-down menu. If you are enrolled in more than 20 courses, you can search for the course name using the search bar.
- In the navbar, select Tools.
- In the drop-down menu, select Quizzes.
- Select the arrow next to the quiz name.
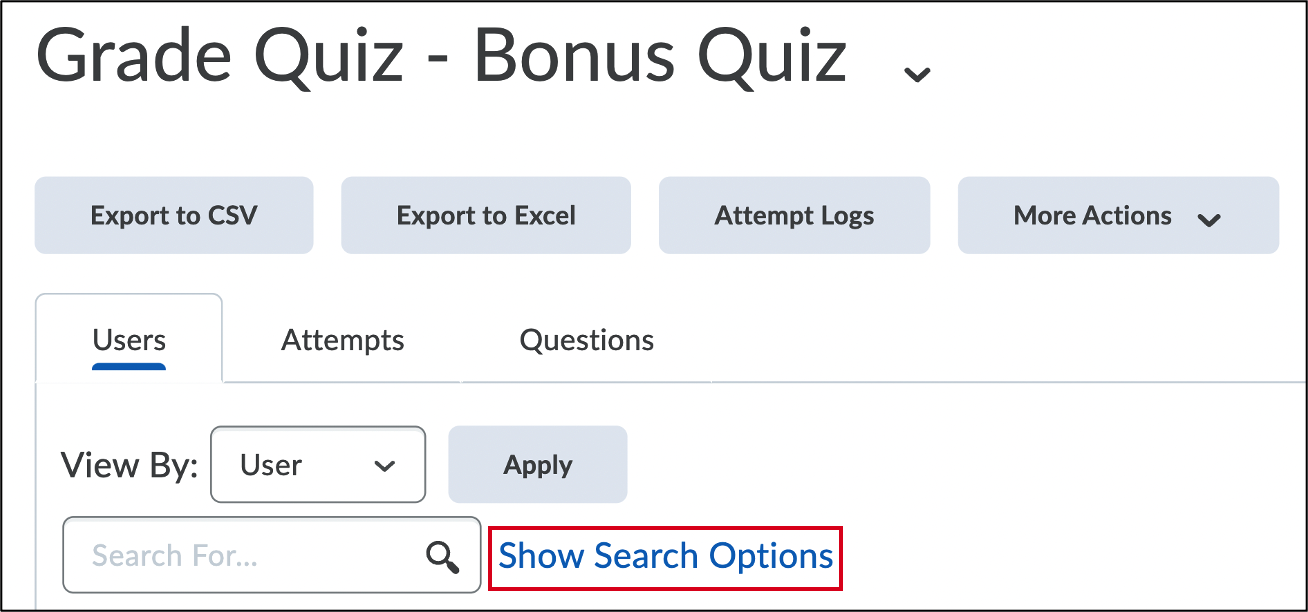
- Select Grade from the drop-down menu.
- Under the Users tab, select Show Search Options.
- From the Restrict to drop-down menu, select Users with attempts in progress.
- Scroll back to the search field and select the magnifying glass icon

- Scroll down to view the filtered list of students with attempts in progress.
- Select the Enter quiz as user icon next to the in-progress quiz attempt you want to submit.
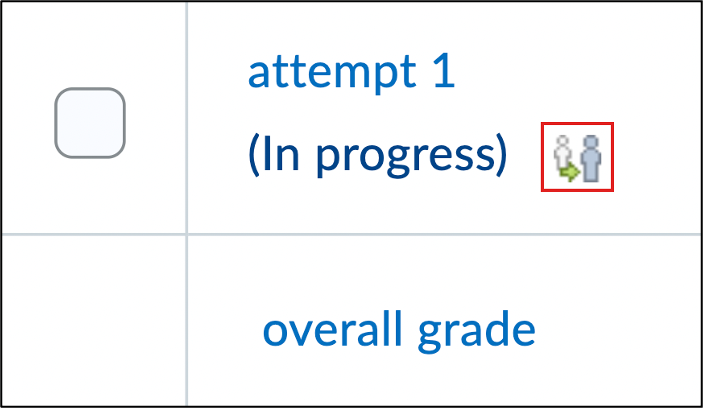
- You will be prompted to confirm that you want to enter the quiz as a user. Select Confirm.
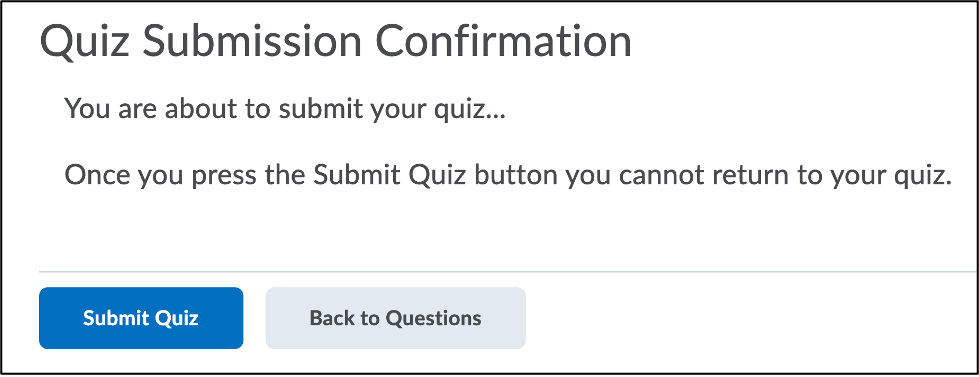
- Select Submit to submit the quiz as that user.
- You will see a Quiz Submission Confirmation page. Select Submit Quiz.
Customizing Quiz Results Display Settings
- Log into Brightspace with your MyCarletonOne credentials.
- On the Brightspace homepage, locate your course in one of the following ways:
- Select the course tile under the My Courses widget.
- Select the Course Selector Grid and select the course from the drop-down menu. If you are enrolled in more than 20 courses, you can search for the course name using the search bar.
- Locate your quiz in one of the following ways:
- In the navbar, select Tools and select Quizzes in the drop-down menu. Find your quiz on the Manage Quizzes page.
- In the navbar, select Content and select the module or submodule that holds your quiz.
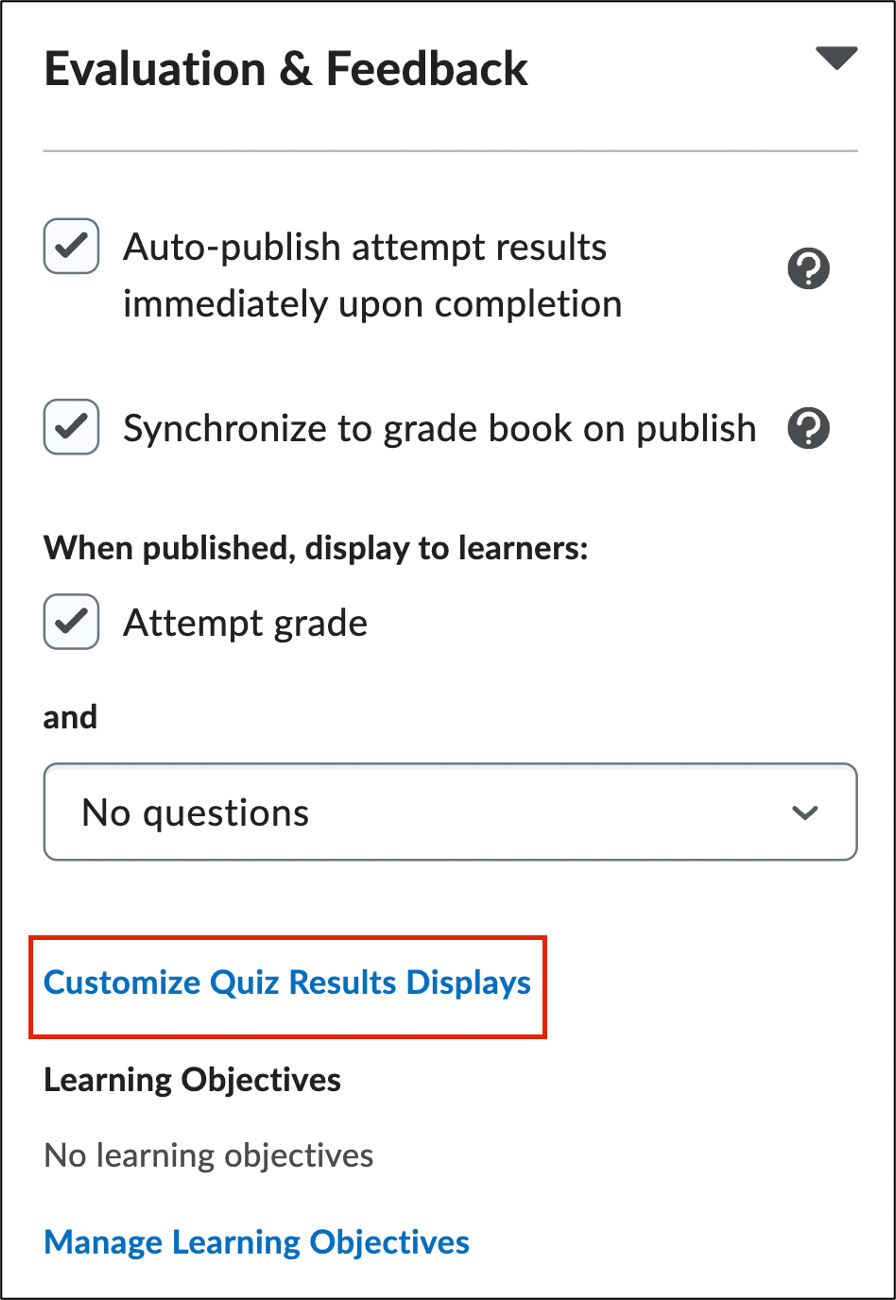
- On the Edit quiz page, select Evaluation and Feedback.
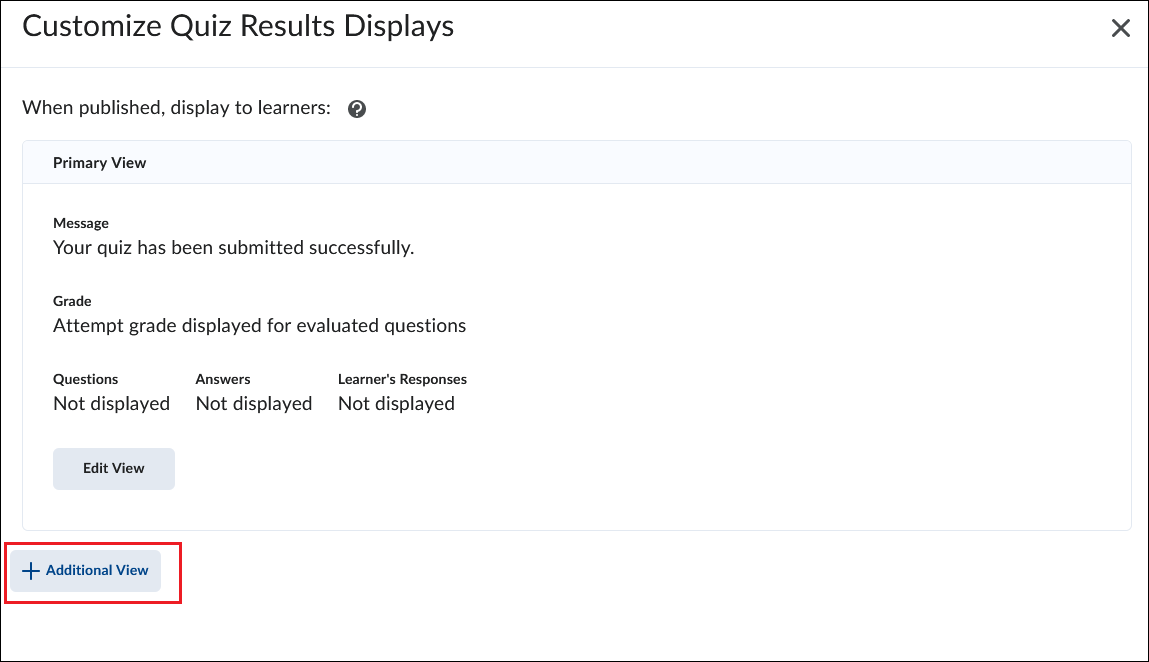
- Select Customize Quiz Results Displays.
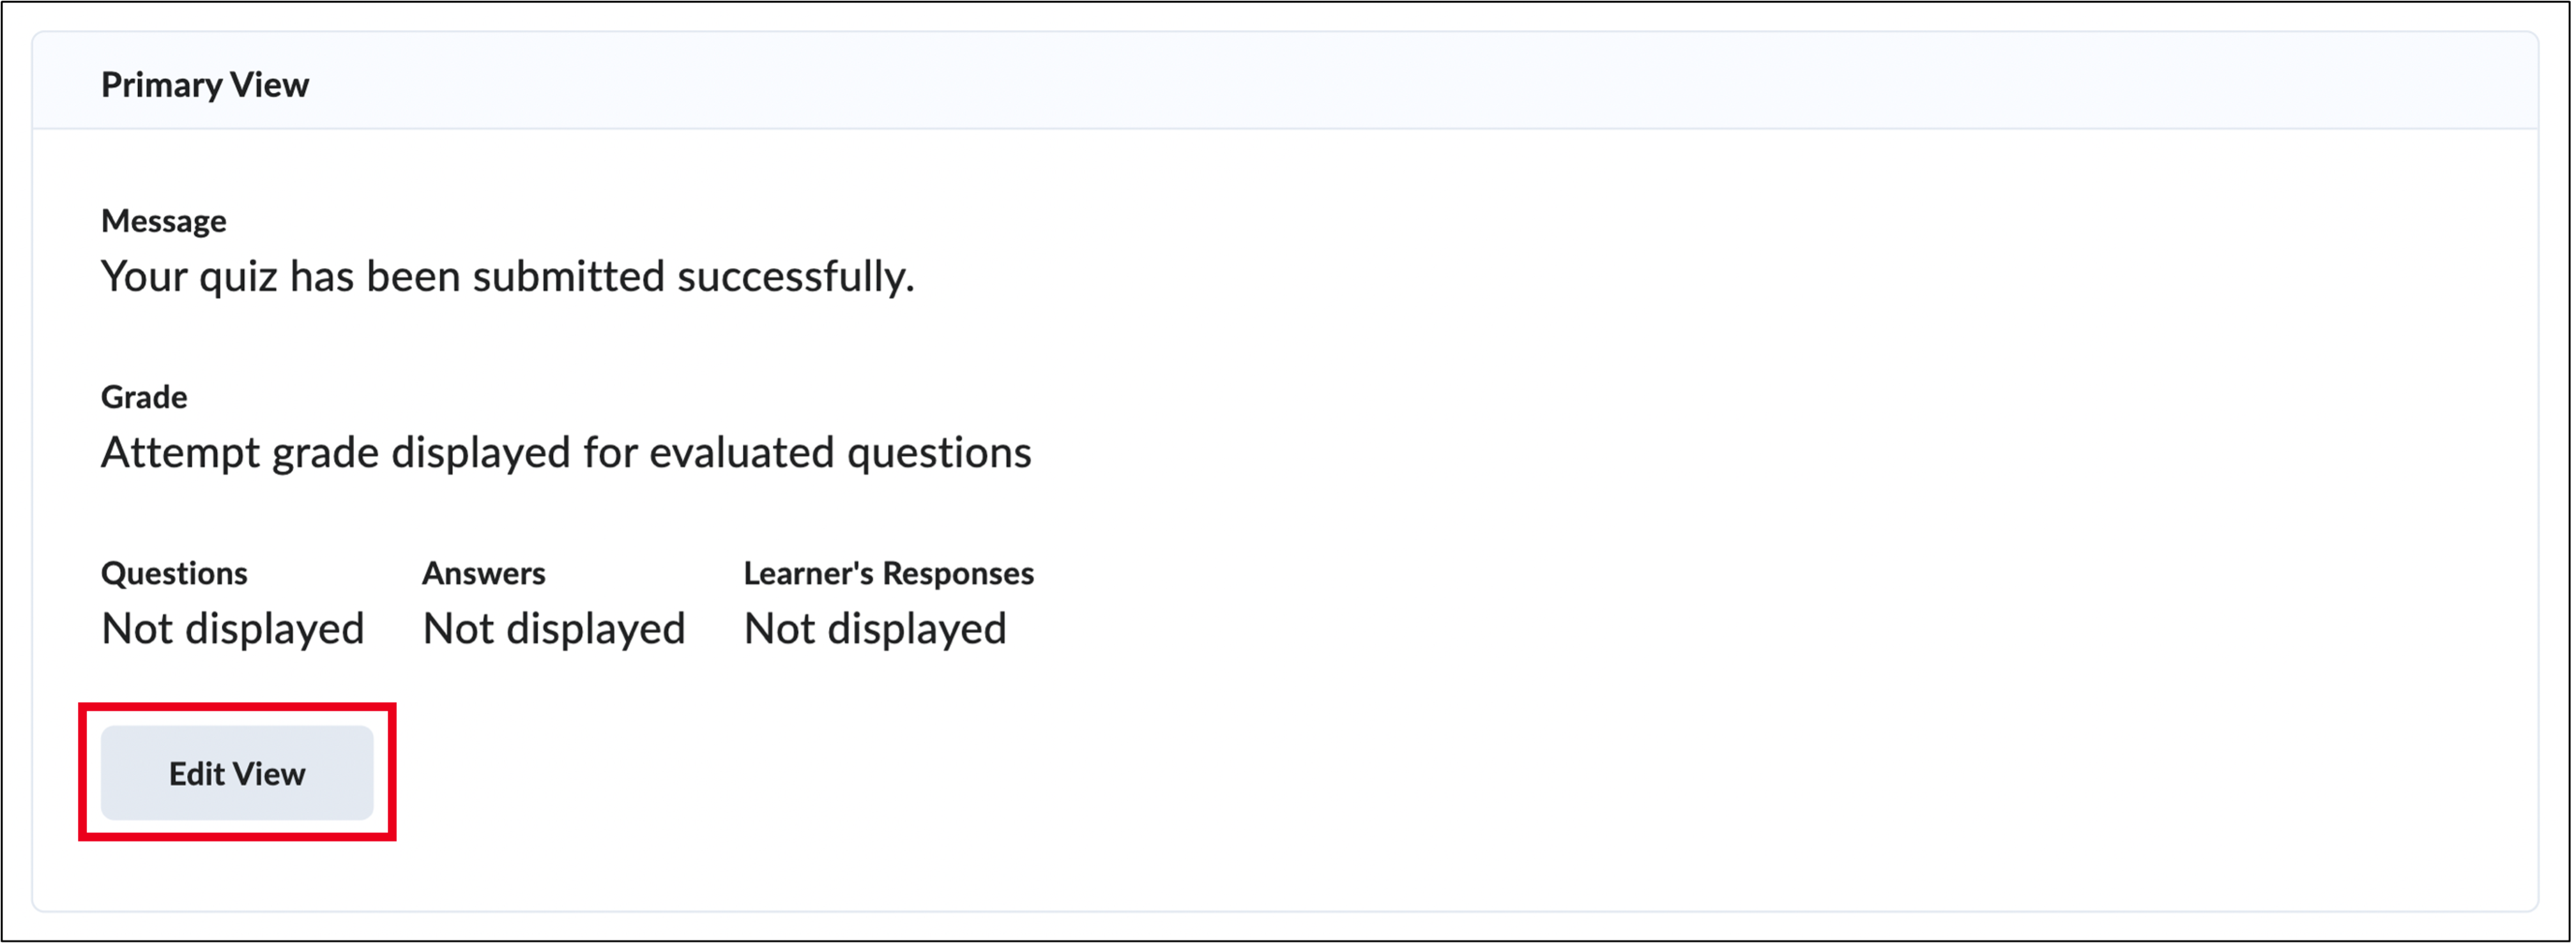
- A pop-up window will display the primary view of how students will view their published quiz attempt results, both immediately following submission, or later when reviewing their attempt. Select Edit View to customize the display.
- On the Customize Quiz Settings page, you can customize the following settings:
- Message – Edit the message that will be displayed to students.
- Grade – The Display attempt grade for evaluated questions setting is unselected by default. Select this setting if you want students to view the grade for their attempt.
- Questions – Select one of the following options from the drop-down menu:
- Don’t Show – Quiz questions will not be displayed to students when this option is selected.
- All questions – All quiz questions and learner responses are displayed when this option is selected.
- Select Show the correct answers to the displayed questions to show correct answers.
- Incorrect questions only with learner’s responses – Only incorrect questions will be displayed when this option is selected.
- Correct questions only with learner responses – Only correct questions will be displayed when this option is selected.
- Statistics – Select either of the following optional settings:
- Show class average – This allows learners to view the class average for the quiz.
- Display grade distribution – This allows learners to view the distribution of scores.
- Select Update.
- Select OK.
- Select Save and Close.
Adding a Quiz Submission View
Submission views are what students see when they complete a quiz. The default submission view in Brightspace displays the quiz score to students. The default view can be edited, or you can create a new submission view to customize what students will see once a quiz has been submitted.
To Add a Quiz Submission View
- Log into Brightspace with your MyCarletonOne credentials.
- On the Brightspace homepage, locate your course in one of the following ways:
- Select the course tile under the My Courses widget.
- Select the Course Selector Grid and select the course from the drop-down menu. If you are enrolled in more than 20 courses, you can search for the course name using the search bar.
- Locate your quiz in one of the following ways:
- In the navbar, select Tools and select Quizzes in the drop-down menu. Find your quiz on the Manage Quizzes page.
- In the navbar, select Content and select the module or submodule that holds your quiz.
- On the Edit quiz page, select Evaluation and Feedback.
- Select Customize Quiz Results Displays.
- Select +Additional View to create a new view.
- Select the Display Date for the date and time you wish this view to become active.
- On the Customize Quiz Settings page, you can customize the following settings:
- Custom Message – Edit the message that will be displayed to students.
- Grade – The Display attempt grade for evaluated questions setting is unselected by default. Select this setting if you want students to view the grade for their attempt.
- Questions – Select one of the following options from the drop-down menu:
- Don’t Show – Quiz questions will not be displayed to students when this option is selected.
- All questions – All quiz questions and learner responses are displayed when this option is selected.
- Select Show the correct answers to the displayed questions to show correct answers.
- Select Show the learner’s grade for the displayed questions to show the score per question.
- Incorrect questions only with learner’s responses – Only incorrect questions will be displayed when this option is selected.
- Correct questions only with learner responses – Only correct questions will be displayed when this option is selected.
- Statistics – Select either of the following optional settings:
- Show class average – This allows learners to view the class average for the quiz.
- Display grade distribution – This allows learners to view the distribution of scores.
- Select Create.
- Select OK.
- Select Save and Close.
NOTE: Feedback and grades must be published in order for students to receive their feedback and grades through the Quiz tool and in Grades.
Consider Quiz Settings
The Editing quiz settings page details the many settings that can be enabled, including randomization, shuffling, number of attempts, availability, time limits, password requirement, and Single-Session Lock for in-person quizzes
Related Support Pages
You can access more information on creating quizzes in Brightspace through the following resources:
Was this page helpful?
11 people found this useful
Still need help? Contact us