The Scheduler tool allows Brightspace users to schedule time slots that students can sign up for. Use the scheduler to set up either individual or group time slots, and keep track of which students have signed up for each time. The scheduler can be used to organize events during regular class time (group or individual presentation times) as well as outside of class time (office hours, feedback).
Creating a Schedule
Once a schedule has been created, students can sign up (either individually or in groups) for the available time slots.
To set up a new Schedule:
- Sign into Brightspace with your MyCarletonOne credentials.
- On the Brightspace homepage, locate your course in one of the following ways:
- Click on the course tile under the My Courses widget.
- Click the Course Selector Grid
 and select the course from the drop-down menu. If you are enrolled in more than 20 courses, you can search for the course name using the search bar.
- In the navbar, click Tools.

- Select Scheduler from the drop-down menu.
- Enter a title for the schedule. The title you entered will automatically populate in the Calendar Event Title field. This title will appear in your students’ calendars. You have the option to change the Calendar Event Title, but we recommend keeping the schedule title and calendar title the same.
- Enter a description of the title. You can use the description field to highlight important information like event type, sign-up deadlines, and which groups are associated with the scheduled event.
- Select the module where you would like the schedule to appear in your course.
- Under Range of dates and times, set the date(s) and time(s) during which the schedule will be in effect.
- Enter the Date that the schedule will be available to students.
- Select a Start Time from the drop-down menu.
- Select an End Time from the drop-down menu.

- Enter the length of each time slot in minutes. The scheduler will divide the total length of time you have provided into equal time slots. For example, if you select 11:30 am as the start time and 1:30 pm as the end time and set the duration of each time slot to 20 minutes, the scheduler will create six 20-minute time slots.
- Enter the number of Students per time slot to set the maximum number of students that can sign up for each time slot.
- To set a time slot for individual students, select 1.
- To set a time slot for groups, enter the number of students in the largest group.
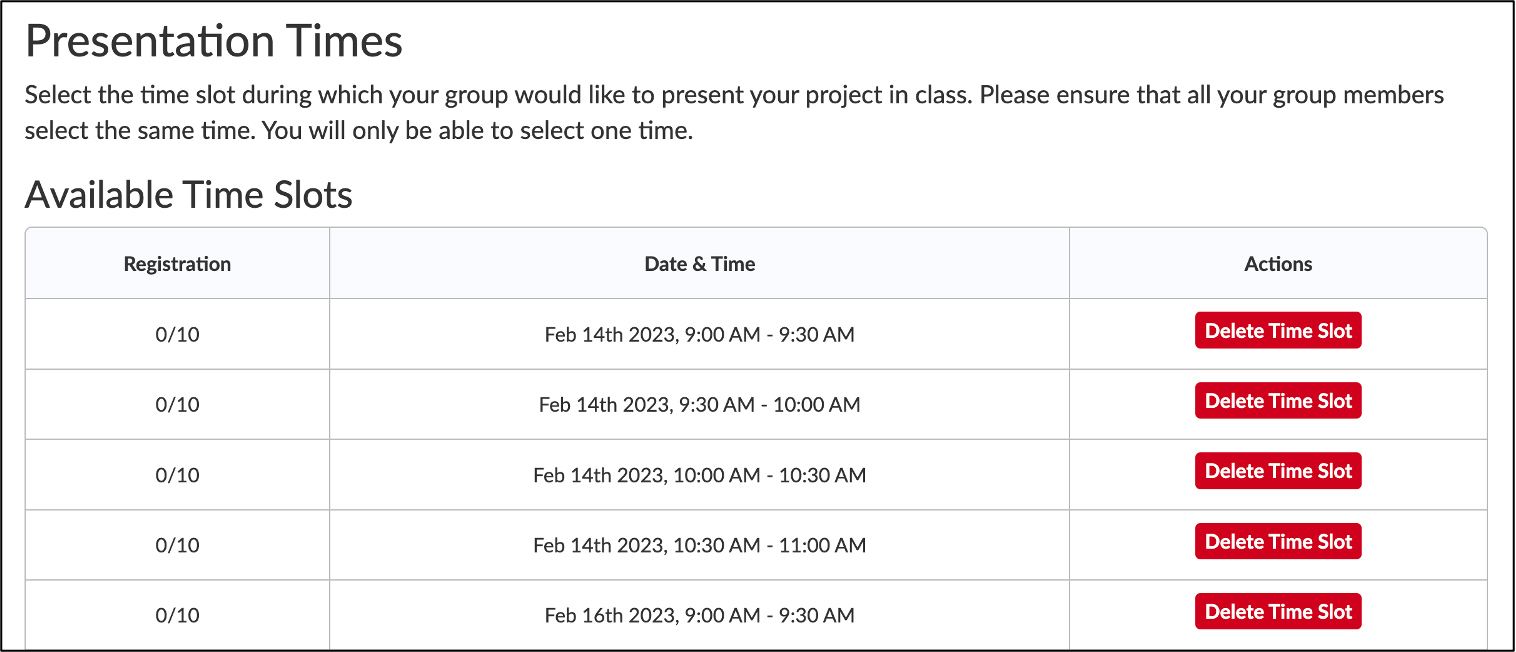
- Click Save. You will now see the Available Time Slots listed in a table.
Creating Schedule joined to existing Groups
- Follow the steps for creating a schedule outlined above.
- Enter the number of Students per time slot to set the number of students that can sign up for each time slot to a number greater than one.To set a time slot for groups, enter the number of students in the largest group.
- You will now have a drop down menu called Join time slot groups to existing groups.
- Select the existing groups you wish join to the schedule.
- Click Save.
Editing or Deleting a Schedule
Schedule settings can be edited directly within the Scheduler Tool. You have the option to edit the Schedule title or description, as well as the settings for individual time slots.
Editing a Schedule Title or Description
- Sign into Brightspace with your MyCarletonOne credentials.
- On the Brightspace homepage, locate your course in one of the following ways:
- Click on the course tile under the My Courses widget.
- Click the Course Selector Grid and select the course from the drop-down menu. If you are enrolled in more than 20 courses, you can search for the course name using the search bar.
- In the navbar, click Content.

- Navigate to the module where you added the Schedule.
- Click the Schedule link.
- Click the Edit Schedule button below the Available Time Slots table.
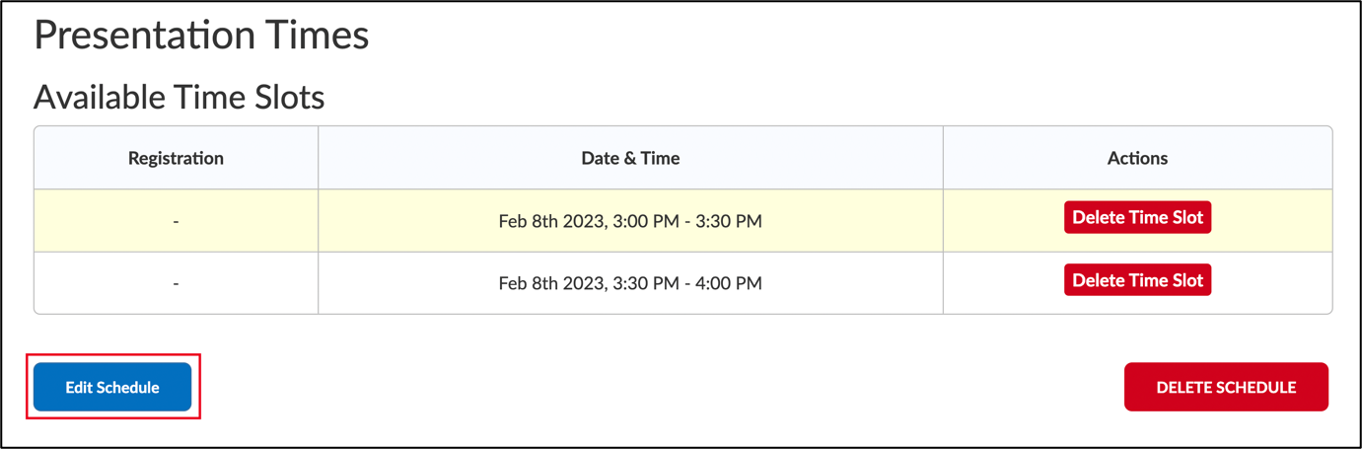
- An Edit Signup Schedule section will expand below where you can make your desired edits.
- When you are finished editing your Schedule settings, click Save.
Adding or Editing Time Slots
- Follow steps 1-5 above to access the Edit Signup Schedule page.
- Click the Add another date & time range button to expand the time slot settings.
- Edit the date, time, or duration as needed.
- Click Save.
Deleting a Schedule
| WARNING: Deleting a Schedule will permanently remove all time slots and registrations. |
- Sign into Brightspace with your MyCarletonOne credentials.
- On the Brightspace homepage, locate your course in one of the following ways:
- Click on the course tile under the My Courses widget.
- Click the Course Selector Grid and select the course from the drop-down menu. If you are enrolled in more than 20 courses, you can search for the course name using the search bar.
- In the navbar, click Content.
- Navigate to the module with the schedule.
- Click the Schedule link.
- Click the Delete Schedule button below the schedule you want to delete.
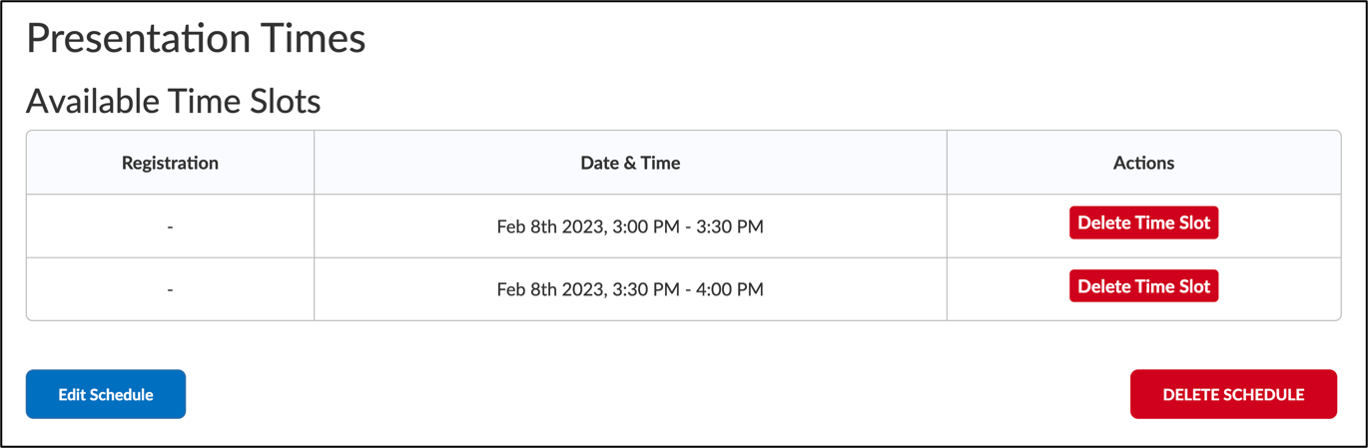
- A pop-up window will open prompting you to confirm that you want to delete the schedule. Click OK.
- A second pop-up window will open prompting you to confirm that you want to delete the schedule. Click OK.
Deleting a Time Slot
- Sign into Brightspace with your MyCarletonOne credentials.
- On the Brightspace homepage, locate your course in one of the following ways:
- Click on the course tile under the My Courses widget.
- Click the Course Selector Grid and select the course from the drop-down menu. If you are enrolled in more than 20 courses, you can search for the course name using the search bar.
- In the navbar, click Content.
- Navigate to the module where you added the Schedule.
- Click the Schedule link.
- In the Available Time Slots table, click Delete This Time Slot under the Actions column.

- A pop-up window will open prompting you to confirm that you want to delete the time slot. Click OK.
Cancelling a student’s registration
A student’s registration for a time slot can be cancelled if needed.
- Sign into Brightspace with your MyCarletonOne credentials.
- On the Brightspace homepage, locate your course in one of the following ways:
- Click on the course tile under the My Courses widget.
- Click the Course Selector Grid and select the course from the drop-down menu. If you are enrolled in more than 20 courses, you can search for the course name using the search bar.
- In the navbar, click Content.
- Navigate to the module where you added the Schedule.
- Click the Schedule link.
- For timeslots with 1 student:
- In the Available Time Slots table, click Cancel Registration under the Actions column.
- A pop-up will open prompting you to confirm that you want to cancel the student’s registration. Click OK.
- For timeslots with multiple students:
- In the Available Time Slots table, click Cancel Registration under the Actions column.
- Select the checkbox next to each student you would like to cancel registration for.
- Click Remove Selected.
- A pop-up will open prompting you to confirm that you want to cancel the student’s registration. Click OK.
Manually enrolling a student in a time slot
- Sign into Brightspace with your MyCarletonOne credentials.
- On the Brightspace homepage, locate your course in one of the following ways:
- Click on the course tile under the My Courses widget.
- Click the Course Selector Grid and select the course from the drop-down menu. If you are enrolled in more than 20 courses, you can search for the course name using the search bar.
- In the navbar, click Content.
- Navigate to the module where you added the Schedule.
- Click the Schedule link.
- Click Add Registrations on the time slot you wish to add the user to.
- Check the names of the students you wish to register.
- Click Add Selected.
Populating time slots based on Group registration
To be able to populate time slots based on group registration, one student must be registered for each time slot. Once a student is registered for a time slot, you can use the following procedure to register that student’s group members to the same time slot.
- Sign into Brightspace with your MyCarletonOne credentials.
- On the Brightspace homepage, locate your course in one of the following ways:
- Click on the course tile under the My Courses widget.
- Click the Course Selector Grid and select the course from the drop-down menu. If you are enrolled in more than 20 courses, you can search for the course name using the search bar.
- In the navbar, click Content.
- Navigate to the module where you added the Schedule.
- Click the Schedule link.
- Click the button labelled Populate time slot registrations based on [Groups name].
- The scheduler will populate each group based on the group members of students that have already registered for a time slot.
Was this page helpful?
7 people found this useful
Still need help? Contact us